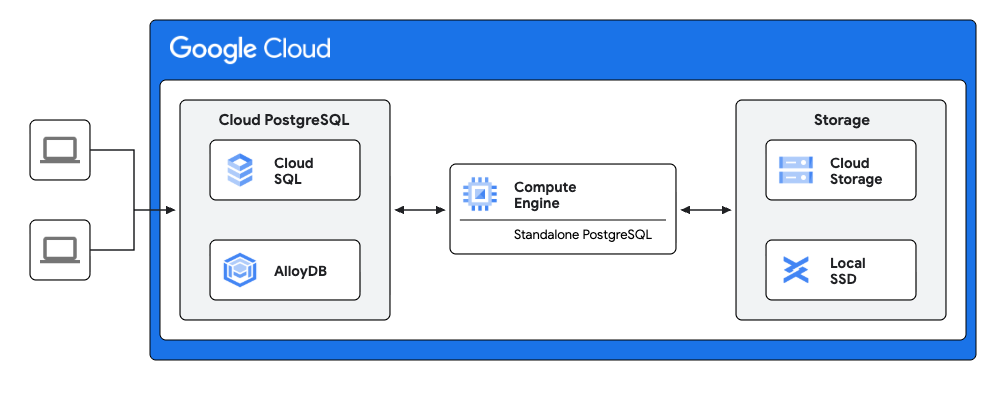
PostgreSQL implementation Step I: Standalone PostgreSQL instance on GCE
It is outside the scope of this post to detail the installation of the standalone PostgreSQL instance. It is assumed that it has been installed at the same major version as the Cloud SQL for PostgreSQL or AlloyDB instance.
Install the orafce extension
- Procure and install the extension (outside the scope of this post).
- Create the extension within the designated database.
CREATE EXTENSION orafce;
Allowlist the directory
Before using the orafce implementation of the UTL_FILE package the utl_file.utl_file_dir table must be seeded with the allowed directories.
INSERT INTO utl_file.utl_file_dir (dir, dirname)
VALUES ('/path/to/directory', 'MY_DIR');
Function emulating UTL_FILE functionality
This function replicates the behaviour of the Oracle UTL_FILE example, enabling file writing capabilities to local disk on the GCE instance.
CREATE OR REPLACE FUNCTION write_to_file(
p_dir text,
p_filename text,
p_text text
)
RETURNS text AS $$
DECLARE
v_file utl_file.file_type;
v_put boolean;
BEGIN
v_file := utl_file.fopen(p_dir, p_filename, 'w');
v_put := utl_file.put_line(v_file, p_text);
v_file := utl_file.fclose(v_file);
RETURN 'Success';
EXCEPTION WHEN OTHERS THEN
IF utl_file.is_open(v_file) THEN
v_file := utl_file.fclose(v_file);
END IF;
RETURN 'An error occurred: ' || SQLERRM;
END;
$$ LANGUAGE plpgsql;
PostgreSQL implementation Step II: Google Cloud SQL for PostgreSQL or AlloyDB
Solutions for using two different FDW extensions are detailed in this section. Only one needs to be implemented.
Solution comparison
The choice of which solution to implement depends on the use case. The table below summarises some of the key differences to consider.
Solution 1: dblink
Install the dblink extension
CREATE EXTENSION dblink;
Create server object
This step involves the definition of connection parameters for the remote GCE instance.
CREATE SERVER remote_server_dblink
FOREIGN DATA WRAPPER dblink_fdw
OPTIONS (host 'GCE_INSTANCE_IP', port '5432', dbname 'your_db');
Establish user mapping
This process maps the current local user identity to a user on the remote server.
CREATE USER MAPPING FOR CURRENT_USER
SERVER remote_server_dblink
OPTIONS (user 'your_user', password 'your_password');
Usage permissions on the foreign server may need to be granted for non current users.
Test connectivity
SELECT dblink_connect('test', 'remote_server_dblink');
Expected result
dblink_connect
----------------
OK
(1 row)
Create function
This calls the write_to_file function on the GCE instance.
CREATE OR REPLACE FUNCTION write_to_file_dblink(
p_dir text,
p_filename text,
p_text text
)
RETURNS text AS $$
DECLARE
v_result_sql TEXT;
v_result_output TEXT;
BEGIN
v_result_sql := FORMAT(
'select write_to_file(''%s'', ''%s'', ''%s'')',
p_dir,
p_filename,
p_text
);
SELECT *
INTO v_result_output
FROM dblink('remote_server_dblink', v_result_sql) AS t1(o text);
RETURN v_result_output;
EXCEPTION
WHEN OTHERS THEN
RAISE EXCEPTION 'Cloud UTL_FILE DBLINK Error: % (Parameters: %, %, %)',
SQLERRM,
p_dir,
p_filename,
p_text;
END;
$$ LANGUAGE plpgsql;
Test function
Execution of the function on the GCE instance is performed by calling the function.
SELECT write_to_file_dblink(
'MY_DIR',
'my_file_dblink.txt',
'Hello from cloud dblink solution'
);
Expected result
write_to_file_dblink
----------------------
Success
(1 row)
Validation
Read the contents of the file from the GCE instance.
cat /path/to/directory/my_file_dblink.txt
Expected result
Hello from cloud SQL dblink solution
Solution 2: plproxy
Install the plproxy extension
CREATE EXTENSION plproxy;
Create server object
This step involves the definition of connection parameters for the remote GCE instance.
CREATE SERVER remote_server_plproxy
FOREIGN DATA WRAPPER plproxy
OPTIONS (p0 'host=GCE_INSTANCE_IP port=5432 dbname=your_db');
Establish user mapping
This process maps the current local user identity to a user on the remote server.
CREATE USER MAPPING FOR CURRENT_USER
SERVER remote_server_plproxy
OPTIONS (user 'your_user', password 'your_password');
Usage permissions on the foreign server may need to be granted for non current users.
Test connectivity
Create a function to run the test
CREATE OR REPLACE FUNCTION plproxy_connectivity_check(OUT answer text)
LANGUAGE plproxy
AS $$
CLUSTER 'remote_server_plproxy';
SELECT FORMAT(
'Connected to database [%s] as user [%s]',
current_database(),
current_user);
$$;
Call the function
SELECT * FROM plproxy_connectivity_check();
Expected result
                     answer
-----------------------------------------------------
Connected to database [your_db] as user [your_user]
(1 row)
Create function
This calls the write_to_file function on the GCE instance.
CREATE OR REPLACE FUNCTION write_to_file_plproxy(
p_dir text,
p_filename text,
p_text text,
OUT result text
)
LANGUAGE plproxy
AS $$
CLUSTER 'remote_server_plproxy';
SELECT write_to_file(p_dir, p_filename, p_text);
$$;
Test function
Execution of the function on the GCE instance is performed by calling the function.
SELECT write_to_file_plproxy(
'MY_DIR',
'my_file_plproxy.txt',
'Hello from cloud plproxy solution'
);
Expected result
write_to_file_plproxy
-----------------------
Success
(1 row)
Validation
Read the contents of the file from the GCE instance.
cat /path/to/directory/my_file_plproxy.txt
Expected result
Hello from cloud plproxy solution
PostgreSQL implementation Step III: Google Cloud Storage (Optional)
In the above implementation files are read from and written to local disk mounted on the GCE instance. An alternative is to read from and write to a Google Cloud Storage (GCS) bucket.
Interacting with GCS instead of the local filesystem is achieved using Cloud Storage FUSE. This allows GCS buckets to be mounted as filesystems on the GCE instance.
It is beyond the scope of this post to cover installation, configuration options and IAM requirements. Refer to the linked documentation for further information.
For illustrative purposes the following steps are performed to mount a GCS bucket on the GCE instance.
Create a mount directory
mkdir /path/to/gcs/mount
Mount GCS bucket
It is necessary to use these mount options to allow the operating system user that runs PostgreSQL on the GCE instance (postgres by default) to write to the mounted bucket.
sudo mount -t gcsfuse \
-o allow_other,file_mode=777,dir_mode=777 \
your_gcs_bucket /path/to/gcs/mount
Testing
Allowlist the directory
Create a new directory entry for the GCS mount by inserting an entry into the utl_file.utl_file_dir table.
INSERT INTO utl_file.utl_file_dir (dir, dirname)
VALUES ('/path/to/gcs/mount', 'MY_GCS_DIR');
dblink solution
SELECT write_to_file_dblink(
'MY_GCS_DIR',
'my_gcs_file_dblink.txt',
'Hello from cloud dblink solution for GCS'
);
plproxy solution
SELECT write_to_file_plproxy(
'MY_GCS_DIR',
'my_gcs_file_plproxy.txt',
'Hello from cloud plproxy solution for GCS'
);
Validation
As before the contents of the file are read from the GCE instance.
cat /path/to/gcs/mount/my_gcs_file_dblink.txt
cat /path/to/gcs/mount/my_gcs_file_plproxy.txt
Expected result
Hello from cloud dblink solution for GCS
Hello from cloud plproxy solution for GCS
As an additional test we use gcloud to bypass the mounted GCS filesystem and read from GCS using API calls.
gcloud storage cat gs://your_gcs_bucket/my_gcs_file_dblink.txt
gcloud storage cat gs://your_gcs_bucket/my_gcs_file_plproxy.txt
Expected result
Hello from cloud dblink solution for GCS
Hello from cloud plproxy solution for GCS
Source Credit: https://medium.com/google-cloud/oracle-to-alloydb-cloud-sql-postgresql-migration-series-a-developers-guide-part-4-369e41ec6730?source=rss—-e52cf94d98af—4


