Deep Dive on the A2A Protocol with the Python ADK
This tutorial aims to build starter “Hello World” Agent examples using the A2A protocol and the Python ADK.
What is the Agent Development Kit?
The Agent Development Kit (ADK) is a flexible and modular framework for developing and deploying AI agents. While optimized for Gemini and the Google ecosystem, ADK is model-agnostic, deployment-agnostic, and is built for compatibility with other frameworks.
Google’s Agent Stack in Action: ADK, A2A, MCP on Google Cloud
Google provides full documentation on the Agent Development Kit (ADK) here:
There is also a GitHub Repo with the source to the complete Python version of the ADK project:
The Python specific examples are available here:
Google Agent Development Kit (ADK) Installation
The ADK needs a recent version of Python- 3.12 or higher but 3.13 is currently recommended. The ADK can be installed with standard commands:
pip install google-adk
What is the A2A protocol?
The Agent2Agent (A2A) protocol, an open communication standard for AI agents, was initially introduced by Google in April 2025. It is specifically engineered to facilitate seamless interoperability within multi-agent systems, enabling AI agents developed by diverse providers or built upon disparate AI agent frameworks to communicate and collaborate effectively.
A good overview of the A2A protocol can be found here:
The full specifications are available here:
Key Features of the A2A Protocol
The Agent2Agent protocol consists of several building blocks for agent interactions. The main components of the A2A protocol are:
- A2A Client (client agent)
- A2A Server (remote agent)
- Agent Card
- Task
- Message
A2A Client (client agent)
The A2A client, also known as the client agent, can be an app, service or other AI agent that delegates requests to remote agents. It uses the Agent2Agent protocol to initiate communication.
A2A Server (remote agent)
The A2A server, also called the remote agent, takes requests, processes tasks and responds with status updates or results. It exposes an HTTP endpoint that’s compatible with the Agent2Agent protocol.
Agent Card
This JSON file outlines agentic AI metadata and can be accessed using a URL. It contains basic information about an agent, including its name, description, version, service endpoint URL, transports, and authentication requirements.
Agent cards are similar to model cards for large language models (LLMs). They also advertise an agent’s capabilities and skills, serving as a profile summary that allows agents to discover each other.
Task
A task represents a unit of work needed to accomplish a request. It has a unique ID and progresses through a lifecycle of defined states (submitted, working, input-required, completed, failed). Tasks are useful for multi-turn processing or long-running agent-to-agent collaboration.
Message
As a fundamental unit of communication, a message depicts a single exchange or turn in a conversation. It contains one or more parts holding the actual content.
Messages relay answers, context, instructions, prompts, questions, replies and status updates. Depending on the sender, each message has an associated role, which can either be an agent role for server-sent messages or a user role for client-sent messages.
Do we really need another Protocol? A2A vs MCP
A2A and MCP are complementary protocols, not competitors. The key features of each protocol are:
MCP (Model Context Protocol): Think of this as a standard for an AI agent to talk to tools and data sources. It allows an agent to connect to things like databases, APIs, or other external systems to get information or perform actions. It standardizes how an agent uses its tools.
A2A (Agent2Agent Protocol): This protocol is for agents to talk to other agents. It enables different AI agents, even if they are built by different companies on different platforms, to communicate, collaborate, and delegate tasks to each other. The A2A version of MCP tools are skills.
In short:
* MCP is for agent-to-tool communication.
* A2A is for agent-to-agent communication.
An AI system could use both. For example, one agent (Agent 1) could use A2A to ask another agent (Agent 2) to perform a task. Agent 2 might then use MCP to connect to a database to get the information needed to complete that task.
Checking the Developer Environment
Once all the prerequisite packages are installed — clone the sample A2A Github repo:
git clone https://github.com/xbill9/a2a-hello-world
cd a2a-hello-world
Once you have your Google Cloud Project and preferred authentication method — run the init.sh script to validate the setup:
xbill@penguin:~/a2a-hello-world$ source init.sh
Project ID file found, skipping.
--- Authentication Method ---
Do you want to use a Gemini API Key for authentication? (y/n): n
WARNING: Your active project does not match the quota project in your local Application Default Credentials file. This might result in unexpected quota issues.
To update your Application Default Credentials quota project, use the `gcloud auth application-default set-quota-project` command.
Updated property [core/project].
--- Setup complete ---
The set_env.sh script is provided to set common ADK environment variables:
xbill@penguin:~/a2a-hello-world$ source set_env.sh
--- Setting Google Cloud Environment Variables ---
Checking gcloud authentication status...
gcloud is authenticated.
Exported PROJECT_ID=comglitn
Exported PROJECT_NUMBER=1056842563084
Exported SERVICE_ACCOUNT_NAME=1056842563084-compute@developer.gserviceaccount.com
Exported GOOGLE_CLOUD_PROJECT=comglitn
Exported GOOGLE_GENAI_USE_VERTEXAI=TRUE
Exported GOOGLE_CLOUD_LOCATION=us-central1
Exported REPO_NAME=
Exported REGION=us-central1
--- Environment setup complete ---
xbill@penguin:~/a2a-hello-world$
Debugging API Permission Errors
If your application default credentials expires or your Google Cloud Authentication expires you will get an error. The workaround is to re-authenticate:
gcloud auth login
gcloud auth application-default login
Another common error is that the environment variables are not set correctly. Go the the root directory and re-run the set_env.sh to set the variables:
cd ~/adk-hello-world-a2a
source set_env.sh
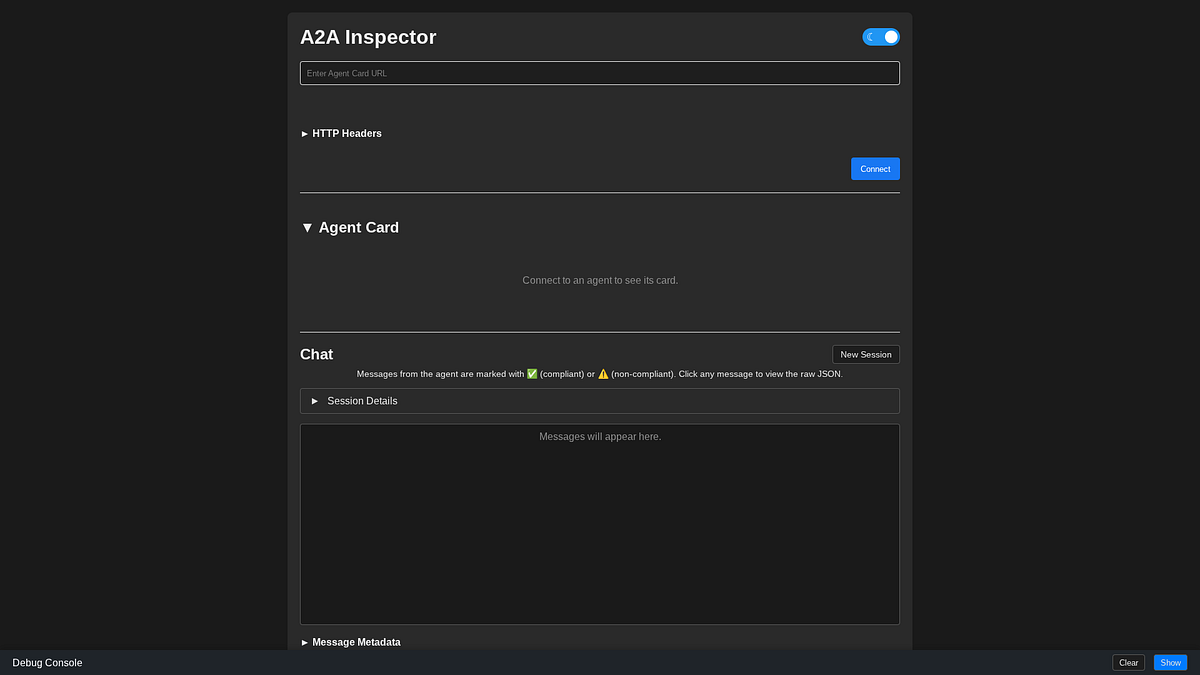
A2A Debugging Tools -A2A Inspector
The A2A Inspector is a standalone tool that provides low level visibility into the A2A protocol. The GitHub is available here:
A summary of the features of the A2A inspector can be found here:
To install the A2A Inspector:
cd ~
git clone https://github.com/a2aproject/a2a-inspector
Then follow the build instructions – you need uv, and a recent version of node:
Staring the A2A Inspector
Once the A2A inspector has been installed- you can validate the installation by using this URL:
http://127.0.0.1:5001/
Interacting with the ADK Web UI
An ADK agent can be debugged from the web based ADK GUI running in the local development environment. The web.sh script has been provided as a sample to run the ADK:
The ADK web UI can then be used to interact with the Agents:
Extending ADK Agents with A2A
The ADK provides several key tools to allow standard ADK Agents to run as standalone A2A agents — without the ADK — either in A2A Client or A2A Server mode. The Python ADK includes libraries and samples to extend a standard ADK agent to enable A2A protocol features. Instead of running the agent inside the ADK web utility- the agents are dual purposed with A2A to be able to run as dedicated agents with their own embedded Uvicorn web server.
I am confused- How Does this all Work?
When the Python Agent files are run in ADK mode — the ADK CLI or Web interface is used to directly interact with the Agents. The ADK UI is started in a well known port — usually 8000 and the Agents are accessed in that environment.
The ADK does not automatically expose the agent as an A2A agent. The basic agent code from the ADK needs to be extended and enabled to run as a standalone A2A Agent. Without the additional A2A function calls and a active standalone web server- the Agents will not be usable in A2A mode.
A2A Server Enablement
To enable an ADK agent to run as a standalone A2A server- the Python code needs several customizations.
First the A2A wrapper library needs to be installed:
from google.adk.a2a.utils.agent_to_a2a import to_a2a
Then in the main function for the Agent- the dedicated A2A server needs to be started on a unique port:
if __name__ == "__main__":
import uvicorna2a_app = to_a2a(root_agent, port=8083)
# Use host='0.0.0.0' to allow external access.
uvicorn.run(a2a_app, host="0.0.0.0", port=8083)
The to_a2a function wraps the required A2A protocol calls to allow the ADK agent to function as an A2A server. The main agent code — the root_agent is exposed via A2A. In this example — it is running on all interfaces on port 8083. Note the “0.0.0.0″ address- this would be needed if the agent was deployed to a Cloud Run Container- which tells the agent code to run on all network interfaces.
A2A Client Enablement
The ADK also provides tools to connect to remote agents in A2A Client role. The main Orchestrator Agent sample is here:
~/a2a-hello-world/src/agents/a2a_master_agent
The ADK library includes for managing remote A2A agents:
from google.adk.agents.remote_a2a_agent import AGENT_CARD_WELL_KNOWN_PATH
from google.adk.agents.remote_a2a_agent import RemoteA2aAgent
from google.adk.a2a.utils.agent_to_a2a import to_a2a
This agent has method calls to wrap remote agent calls via A2A in the local agent code:
hw_agent = RemoteA2aAgent(
name="helloworld_agent",
description="Hello World Agent",
agent_card=(
f"http://127.0.0.1:8083/{AGENT_CARD_WELL_KNOWN_PATH}"
),
)
In this example — the master agent can call the Hello World agent via A2A by using the Agent Card information from a well known address.
A2A Sample Agent Patterns
The a2a_hello_world repo has sample scripts for running the ADK and various types of agents. The root directory of the a2a-hello-world directory contains several common agent patterns. These include:
- Simple Agent (Hello World)
- Simple Agent with Multiple Tools/Skills (Weather Time)
- Agent calling an ADK Tool (Event Agent)
- Master/Orchestrator Agent (Master Agent)
Simple Agent — Hello World
This agent provides a minimal agent that simply returns “Hello World”. It has one root_agent and 1 function call get_hello_world:
source ~/a2a-hello-world/a2ahello.sh
src/agents/a2a_hello_world
The root_agent provides a basic function get_hello_world to print Hello World:
root_agent = Agent(
name="hello_world_agent",
model="gemini-2.5-flash",
description="Agent that returns a simple 'hello world' message.",
instruction="You are a helpful agent who can return a 'hello world' message.",
tools=[get_hello_world],
)
At the bottom of the Agent code- the to_a2a function exposes the Agent on port 8083 via A2A:
    a2a_app = to_a2a(root_agent, port=8083)
# Use host='0.0.0.0' to allow external access.
uvicorn.run(a2a_app, host="0.0.0.0", port=8083)
Simple Agent with Multiple Skills (Tools)
This agent provides a minimal agent with several functions (skills). It has one root_agent and 3 function calls- get_current_time, get_weather, get_sunrise_sunset_time:
source ~/a2a-hello-world/a2aweather.sh
src/agents/a2a_hello_world
Several functions in the same agent can be defined:
def get_current_time(city: str) -> dict:
"""Returns the current time in a specified city.Args:
city (str): The name of the city for which to retrieve the current time.
Returns:
dict: status and result or error msg.
"""
if city.lower() != "new york":
return {
"status": "error",
"error_message": (f"Sorry, I don't have timezone information for {city}."),
}
tz_identifier = "America/New_York"
tz = ZoneInfo(tz_identifier)
now = datetime.datetime.now(tz)
report = (
f"The current time in {city} is " f'{now.strftime("%Y-%m-%d %H:%M:%S %Z%z")}'
)
return {"status": "success", "report": report}
def get_sunrise_sunset_time(city: str) -> dict:
"""Retrieves the sunrise and sunset times for a specified city.
Args:
city (str): The name of the city for which to retrieve the times.
Returns:
dict: status and result or error msg.
"""
if city.lower() == "new york":
return {
"status": "success",
"report": "In New York, the sun rises at 6:00 AM and sets at 8:00 PM.",
}
return {
"status": "error",
"error_message": f"Sunrise and sunset time for '{city}' is not available.",
}
Then the root agent can use the functions/Tools/Skills in the same agent process:
root_agent = Agent(
name="weather_time_agent",
model="gemini-2.5-flash",
description=("Agent to answer questions about the time and weather in a city."),
instruction=(
"You are a helpful agent who can answer user questions about the time "
"and weather and sunrise and sunset in a city."
),
tools=[get_weather, get_current_time, get_sunrise_sunset_time],
)
The main root_agent is exposed on port 8084 via A2A:
a2a_app = to_a2a(root_agent, port=8084)
# Use host='0.0.0.0' to allow external access.
uvicorn.run(a2a_app, host="0.0.0.0", port=8084)
Note- this agent has been hardcoded to expect New York as the destination city- it does not actually reach out to a LLM- it just processes and returns fixed messages.
Agent with ADK Tool
This agent provides a minimal agent with one root_agent that calls the external Google Search ADK tool for information:
source ~/a2a-hello-world/a2events.sh
src/agents/a2a_events
Then the root agent can use the ADK google search tool:
root_agent = Agent(
name="events_agent",
model="gemini-2.5-flash",
description="Agent to find events in NYC using Google Search.",
instruction="Find 3 upcoming events in New York City",
# google_search is a pre-built tool which allows the agent to perform Google searches.
tools=[google_search]
)
The main root_agent is exposed on port 8082 via A2A:
a2a_app = to_a2a(root_agent, port=8082)
# Use host='0.0.0.0' to allow external access.
uvicorn.run(a2a_app, host="0.0.0.0", port=8084)
Master/Orchestrator Agent
The final agent follows a slightly different pattern. It provides a minimal agent with several functions (Tools/Skills). It has one root_agent and 3 remote agents- hw_agent, ev_agent,wt_agent:
source ~/a2a-hello-world/a2amaster.sh
src/agents/a2a_master_agent
The ADK provides Python libraries for using A2A remote agents:
from google.adk.agents.remote_a2a_agent import AGENT_CARD_WELL_KNOWN_PATH
from google.adk.agents.remote_a2a_agent import RemoteA2aAgent
from google.adk.a2a.utils.agent_to_a2a import to_a2a
The remote agents are defined with the A2A function call RemoteA2aAgent which uses the Agent Card to get the Agent information over the A2A protocol:
hw_agent = RemoteA2aAgent(
name="helloworld_agent",
description="Hello World Agent",
agent_card=(
f"http://127.0.0.1:8083/{AGENT_CARD_WELL_KNOWN_PATH}"
),
)
Then the root agent can use the remote agents via the A2A protocol:
root_agent = LlmAgent(
name="master_agent",
model="gemini-2.5-flash",
instruction="""
You are the Master Agent
you delegate to your sub agents by the a2a protocol""",
sub_agents=[ev_agent,hw_agent,wt_agent]
)
The main root_agent for the Master Agent is also exposed on port 8081 via A2A:
a2a_app = to_a2a(root_agent, port=8081)
# Use host='0.0.0.0' to allow external access.
uvicorn.run(a2a_app, host="0.0.0.0", port=8081)
This will allow the A2 Inspector to directly connect to the Master Agent.
So What is all this Doing?
All of the setup and configuration allows you to start debugging and visualizing Agent flows using the A2A protocol. The Agents can be validated using the A2A Inspector. Here are the basic Steps:
Hello World Agent Validation via A2A
Start the Hello World Agent in a new shell:
xbill@penguin:~/a2a-hello-world$ source a2ahello.sh
--- Setting Google Cloud Environment Variables ---
Checking gcloud authentication status...
gcloud is authenticated.
Checking gcloud application-default authentication status...
gcloud application-default is authenticated.
Exported PROJECT_ID=comglitn
Exported PROJECT_NUMBER=1056842563084
Exported SERVICE_ACCOUNT_NAME=1056842563084-compute@developer.gserviceaccount.com
Exported GOOGLE_CLOUD_PROJECT=comglitn
Exported GOOGLE_GENAI_USE_VERTEXAI=TRUE
Exported GOOGLE_CLOUD_LOCATION=us-central1
Exported REPO_NAME=
Exported REGION=us-central1
Exported AGENT_PATH=/home/xbill/a2a-hello-world/src/agents/a2a_hello_world
--- Environment setup complete ---
INFO:     Started server process [22438]
INFO:     Waiting for application startup.
INFO:     Application startup complete.
INFO:     Uvicorn running on http://0.0.0.0:8083 (Press CTRL+C to quit)
Start the A2A Inspector on port 5001 and connect to the Agent on port 8083:
Send a query to the Agent over A2A with A2A inspector:
Detailed message information is available for each task:
Agents Everywhere!
Now that the basic Hello World Agent has been Validated by the A2A Inspector — open several Terminal windows and start up the remaining agents:
- a2ahello.sh (port 8083)
- a2aweather.sh (port 8084)
- a2aevents.sh (port 8082)
- a2amaster.sh (port 8081)
Validate the Master Agent
Once all the agents have been started — the Master agent on port 8081 can be checked with the A2A inspector. Open the A2A inspector on port 5001 and query the Master Agent on port 8081:
Now send instructions to the Master agent via A2A using the A2A inspector tool which will then delegate and call the other agents over A2A:
The detailed message flows can be check with the A2A inspector tool:
Advanced Usage — Multiple Agents in the Same Context
The final example performs 2 agent calls in the current context. The first delegates to the sunrise_sunset function call in the weather time Agent and the 2nd then calls the events Agent to use that information to limit the activities to day time events:
Summary
The goal of the demo/article was to get basic agents running and help understand and visualize inter agent communication with the A2A protocol. The Google Agent development kit (ADK) was presented along with the complimentary A2A (Agent to Agent) protocol. Three basic agent patterns were presented— covering various combinations of local and remote functions. A Master/Orchestrator agent was started to connect and delegate to the other agents via the A2A protocol. Everything was validated using the A2A inspector.
Thanks!
Thanks to my fellow GDE and co-author : Gerardo Lopez gelopfalcongde@gmail.com
Source Credit: https://medium.com/google-cloud/a2a-agent-patterns-with-the-agent-development-kit-adk-aee3d61c52cf?source=rss—-e52cf94d98af—4


