
Trying Out the New Conductor Extension in Gemini CLI — We’re Gonna Add Auth to Our Full Stack
Picture this: you’re deep in the zone, pair-programming with your AI agent. You ask it to refactor a some code and it cheerfully agrees. Five minutes later? It’s hallucinated a dependency that doesn’t exist, imported some random libraries, ignored your project’s architectural standards, and replaced all your gemini-3-pro-preview references with gemini-1.5-pro.
The model means well, but it just doesn’t know your project like you do. It’s transient, forgetful, and a bit of a cowboy.
There are ways to mitigate this. For example, I include some code style guidance in my global GEMINI.md, which gets picked up automatically by Gemini CLI, by Google Code Assist, and by the agent in Google Antigravity.
But this doesn’t help the agent to be stateful in the way it understands your project, what you’ve done and what you intend to do. Again, there are ways to mitigate this. For example, my global guidance advises my agent to make use of a TODO.md file.
But it’s still a bit clunky, and the agent doesn’t track the detailed steps involved to implement a high-level To-Do entry.
But don’t worry — things are about to get a whole lot more civilized!
Enter Conductor: Context-Driven Development
Google has just (in December 17, 2025) dropped Conductor, a new extension for the Gemini CLI.

It’s very cool. The philosophy is simple: Measure twice, code once.
Instead of diving straight into coding like a junior dev on their fourth espresso, Conductor forces a pause. It introduces Context-Driven Development. You create formal specifications and plans that live right there in your codebase as persistent Markdown files.
Crucially, this isn’t just for shiny new “greenfield” projects. Conductor excels with “brownfield” projects too, meaning it can actually look at your existing repo, understand it, and help you improve it without breaking everything. Hurrah!
Why I’m Excited (And You Should Be Too)
It shifts the context out of the ephemeral chat window and into your repo. Your project’s context becomes a managed artifact. This gives you:
- Persistent Memory: The agent follows your style guides and tech stack choices every single time.
- Safety: You review the plan before any code is written. No surprises.
- Team Harmony: Define your testing strategy once, and the agent sticks to it — meaning features built by different people actually look like they came from the same team.
- Collaboration Across Your Devices: Commit the Conductor context like any other code, and then continue on another device.
Installing the Extension
As with all Gemini CLI extensions, installation is a breeze. Just run this:
gemini extensions install https://github.com/gemini-cli-extensions/conductor
3 seconds later, you’re good to go.
Setup Conductor in Your Workspace
Now let’s give a whirl. I’m going to use it to make some improvements to my Rickbot-ADK project.
If you haven’t come across Rickbot before: it’s a muti-personality chatbot built as a case study in how to create agentic solutions using Google ADK. I’ve written several walkthrough articles in the Rickbot series already.
Launch Gemini CLI from your terminal, then type /conductor. The CLI will show you your command options:
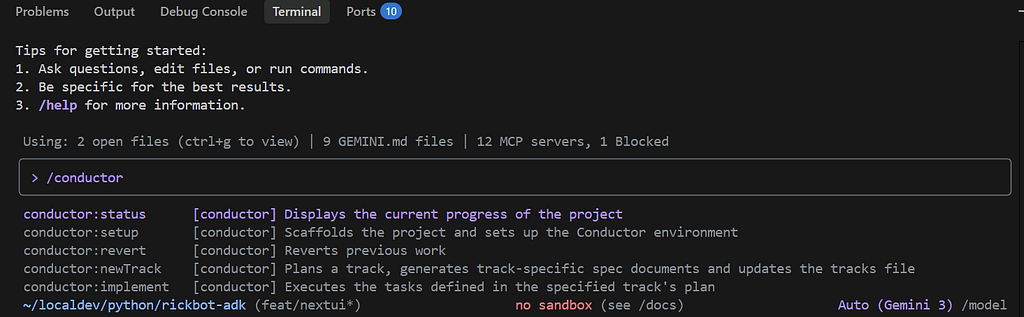
The GitHub repo gives us more detail about what each sub-command does:

Running Setup
Let’s go ahead and run /conductor:setup for our workspace. This is a one-time setup per workspace. Conductor performs a detailed analysis of the current workspace, and guides you through the setup process:

Now it will go ahead and create a bunch of markdown files in a new conductor folder in your workspace.
Product Vision
It starts by creating the product.md file, where it captures:
- Product vision and project concept
- Target audience
- Primary goals
- Key features
- Success criteria

You can see that Conductor (well, Gemini, obvs) makes some great guesses about these headings, based on what it has analysed. With the question “Who are the primary target users for Rickbot-ADK?” I was wondering: Does it mean users of the application itself, or users and consumers of my rickbot-adk repo?
I’m thinking this because: Rickbot is intended to be used by anyone; it’s just a fun multi-personality chatbot. But the purpose behind creating Rickbot was to provide end-to-end walkthroughs and guidance for building solutions with ADK. Walkthroughs like… well, this page.
Anyway, I opted to go with answer B. I can always tweak the artifacts later.
Next question!

Oh, this is good. So my answer to the first question was fine. And for question 2, I type: A B C. This will result in all of these goals being recorded, in that order.
Next…
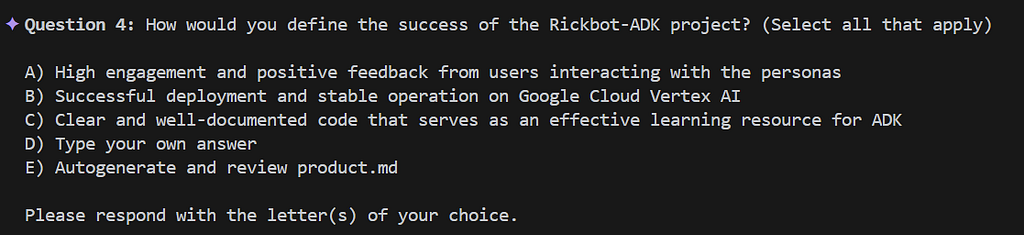
Here, I go with: C B A.
Conductor now creates the product.md file. For me, it created this:
# Product Guide: Rickbot-ADK

## Initial Concept
A multi-personality AI chatbot built using Google Gemini and the Agent Development Kit (ADK), allowing users to interact with personas like Rick Sanchez, Yoda, and others.

## Target Audience
- Fans of the various integrated personas (Rick Sanchez, Yoda, etc.).
- Anyone looking for a fun, engaging, and unique chatbot experience.
- Developers and Google Cloud users interested in exploring Agent Development Kit (ADK) and generative AI capabilities.

## Primary Goals
- **Engagement:** Provide a playful and irreverent conversational experience that captures the essence of diverse personalities.
- **Reference Implementation:** Serve as a comprehensive guide and reference for using Google Cloud ADK and the Agent-Starter-Pack in a real-world application.
- **Capability Showcase:** Demonstrate advanced generative AI features, including multimodal interactions (text/image) and real-time response streaming.

## Key Features
- **Diverse Personas:** Support for multiple distinct personalities with dynamic selection via the API.
- **Real-time Streaming:** Seamless, real-time response streaming for a more natural conversation flow.
- **Multimodal Interactions:** Support for both text and image uploads, enabling rich, context-aware interactions.
- **Decoupled Architecture:** A robust FastAPI backend that decouples the core agent logic from various user interfaces, such as the Next.js frontend.

## Success Criteria
- **Educational Value:** The code is clear, well-documented, and serves as an effective learning resource for the developer community.
- **Operational Stability:** Successful deployment and consistent, stable operation on Google Cloud Vertex AI.
- **User Satisfaction:** Positive feedback from users regarding the authenticity and fun-factor of the persona interactions.
Product Guidelines
Next, Conductor moves on to ask us questions about our product guidelines:. I.e. how we want the application to behave.
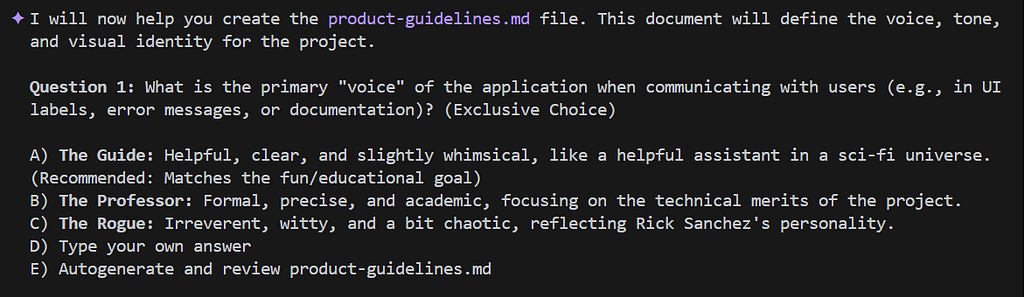
It asks us about our preferences for the UI:

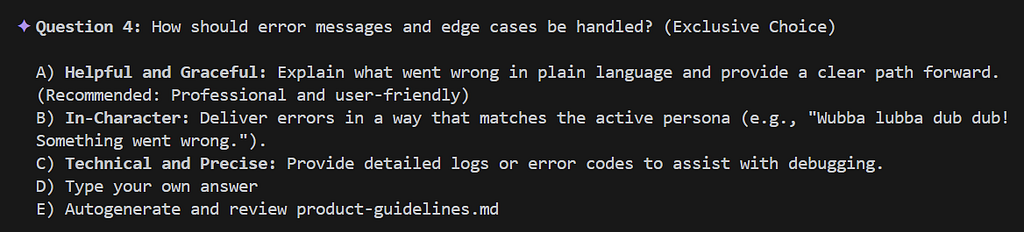
It asks us how errors should be handled:
After answering all the questions, Conductor creates product-guidelines.md. Mine looks like this:
# Product Guidelines: Rickbot-ADK

## Voice and Tone
- **Primary Voice:** **The Guide.** The application speaks to the user with a helpful, clear, and slightly whimsical voice, acting as a knowledgeable assistant in a vast sci-fi universe.
- **Tone:** **Interactive and Dynamic.** The experience is designed to feel alive, using real-time streaming, animations, and immediate visual feedback to engage the user and highlight the underlying AI's capabilities.

## Brand Messaging
- **Fun First:** The core goal is to provide an entertaining and unique experience. Interactions should be memorable and persona-consistent.
- **Educational Secondary:** While fun is the priority, the application should subtly showcase the power and flexibility of the Google Agent Development Kit (ADK).

## Visual Identity & UI Design
- **Thematic Consistency:** The UI should incorporate visual elements that reflect the diverse personas. This includes using distinct avatars (e.g., Rick, Yoda, Jack Burton) and thematic icons that ground the experience in their respective worlds.
- **Dynamic Feedback:** Use streaming text effects and loading states that keep the user informed and engaged during complex AI operations.

## User Interaction Guidelines
- **Persona-Centric Errors:** When something goes wrong, the application should handle it "in-character" where possible. For example, Rick might deliver a cynical error message, while Yoda might offer a cryptic but helpful observation about the mistake.
- **Persona-Led Onboarding:** New users should be introduced to the application's features by the personas themselves. Instead of a standard tutorial, a character like Rick or Yoda should "break the fourth wall" to explain how to interact with the bot.

## Content Standards
- **Authenticity:** All persona responses must strive for high authenticity to their source material, capturing the unique vocabulary, speech patterns, and attitudes of characters like Rick Sanchez or Yoda.
- **Irreverence:** Maintain a playful and slightly irreverent edge that matches the project's inspiration, ensuring the experience remains "fun" and not overly formal.
Code Style
Next, Conductor will assemble the code style guide. It proposes to create a set of markdown files based on the languages it has found in the project. (Conductor has a ready-made library of such style guides, for various languages.)
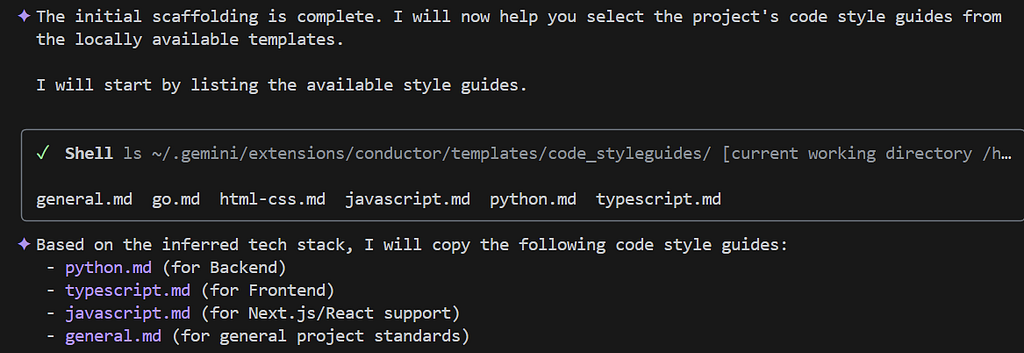
This looks fine. I have my own code style preferences, but I will incorporate these later.
Project Workflow
Now Conductor will create the workflow.md.

I won’t copy the full markdown output here as it’s quite long. But in brief, this file achieves:
- The “Single Source of Truth” power-up: By anchoring everything in plan.md, we eliminate the “what was I doing again?” drift.
- Test-Driven Development (TDD): The workflow creates tests that should initially fail before a feature is implemented. The workflow also verifies a minimum level of test coverage.
- Proof over Promise: The strict checkpointing protocol ensures we don’t just say it works; we must prove it. By attaching verification reports to Git notes, we create an audit trail that “Future Us” will be very grateful for.
Setup is Complete
The setup is finished and Conductor finally says:

Here are the resulting files in the newly created conductor folder:

Making Some Tweaks
At this stage I want to update the style guides to incorporate my existing GEMINI.md guidance. I say to it: “Please update the code style docs in code_styleguides to incorporate [@]~/.gemini/GEMINI.md.” This works well.
Creating a Conductor Track
Once the setup finishes, Conductor asks us if we want to create an initial track. Think of a track as the detailed, tracked and specific tasks required to complete a high-level objective.
I tell conductor:
“I would like to add user authentication to the frontend, starting with Google auth and then GitHub. The API should only allow requests from authenticated users.”
Conductor responds:

It goes ahead and creates the Conductor artifacts for managing this track:

Conductor updates the tracks.md as follows:
# Project Tracks

This file tracks all major tracks for the project. Each track has its own detailed plan in its respective folder.

---

## [ ] Track: Add user authentication to the frontend (Google, then GitHub) and secure the API.
*Link: [./conductor/tracks/auth_20251223/](./conductor/tracks/auth_20251223/)*
Note that we can have more than one track in parallel. The tracks.md records which tracks we have, and where they live in the conductor folder. Speaking of which… Conductor has created a tracks folder, and inside it: the auth_20251223 sub-folder. This sub-folder contains two files:
- The spec.md.
- The plan.md.
Let’s have a look at spec.md:
# Specification: User Authentication & API Security

## Context
The application currently allows unauthenticated access to the backend API and frontend.
To secure the application and enable personalized experiences,
we need to implement user authentication.

## Goals
1.  **Frontend Authentication:**
    -   Implement Google OAuth sign-in in the Next.js frontend.
    -   Implement GitHub OAuth sign-in in the Next.js frontend.
    -   Ensure the user session is maintained securely.
2.  **API Security:**
    -   Secure all backend API endpoints to require a valid authentication token.
    -   Verify tokens passed from the frontend (likely JWTs).
    -   Reject unauthenticated requests with appropriate HTTP error codes (401/403).

## Technical Requirements
-   **Frontend:** Next.js (using NextAuth.js or similar library recommended for OAuth).
-   **Backend:** FastAPI (using `fastapi-users` or custom dependency injection for token verification).
-   **Identity Providers:** Google, GitHub.
-   **Token Standard:** JWT (JSON Web Tokens).

## Out of Scope
-   User role management (RBAC) is out of scope for this initial track.
-   Database storage of user profiles beyond basic auth data needed for the session.
And here’s the plan.md:
# Implementation Plan - Auth Track

## Phase 1: Backend Preparation
- [ ] Task: Research and select FastAPI auth library (e.g., Authlib, FastAPI Users).
- [ ] Task: Create a basic `AuthUser` model/schema.
- [ ] Task: Implement a dependency for verifying mock tokens (for initial testing).
- [ ] Task: Write Tests: Unit tests for token verification logic.
- [ ] Task: Conductor - User Manual Verification 'Backend Preparation' (Protocol in workflow.md)

## Phase 2: Next.js Google Auth
- [ ] Task: Install and configure NextAuth.js in the Next.js project.
- [ ] Task: Configure Google OAuth provider credentials (env vars).
- [ ] Task: Create a Login/Logout button component.
- [ ] Task: Implement a protected route/page that requires login.
- [ ] Task: Write Tests: Component tests for the Login button.
- [ ] Task: Conductor - User Manual Verification 'Next.js Google Auth' (Protocol in workflow.md)

## Phase 3: Connect Frontend to Backend
- [ ] Task: Update Next.js API calls to include the auth token in the Authorization header.
- [ ] Task: Update FastAPI backend to verify the actual Google/GitHub JWTs (replacing mock logic).
- [ ] Task: Write Tests: Integration test ensuring frontend can call protected API endpoint.
- [ ] Task: Conductor - User Manual Verification 'Connect Frontend to Backend' (Protocol in workflow.md)

## Phase 4: GitHub Auth & Final Polish
- [ ] Task: Add GitHub OAuth provider to NextAuth.js configuration.
- [ ] Task: Update Login component to support multiple providers.
- [ ] Task: Refactor API error handling for auth failures (ensure clean UI feedback).
- [ ] Task: Conductor - User Manual Verification 'GitHub Auth & Final Polish' (Protocol in workflow.md)
There’s a few things I really like about this plan.
- It starts with a reseach task. This is definitely what I would have started with. This ensures that Gemini will research the optimal tools and libraries for my use case.
- The plan is split into phases.
- Each phase has a final “User Manual Verification” step that must be closed before the next phase can begin.
Where Are We in The Current Plan?
We can run /conductor:status to see where we are. This shows a tidy summary:

Executing the Plan
Let’s go ahead and implement the plan. To do this, we run /conductor:implement.
Conductor now proceeds to implement all the tasks in the first phase of the plan for this track.
It is fascinating to watch the implementation. With each step, Conductor initially marks a task in progress, i.e. by updating an item like this:
[ ] Some task
To this:
[~] Some task
And with each update, we can see the diff, like this:

Conductor then goes ahead and implements the desired changes, including any associated tests that are required, and test executions. And then, for each completed task, Conductor actually creates a new commit on the current git branch!
Not only that, it creates detailed notes for each git commit, using this approach:
git notes add -m "Your note here" <commit_hash>
When we get towards the end of phase 1, we see a bunch of git commits, and a message like this in Gemini CLI:

I follow the manual test verification steps, and the 5 tests run successfully as required. But I noticed that my test documentation (tests/README.md) is not updated. So I say to Gemini CLI:
Yes, this worked. Before continuing, please update (at)src/tests/README.md, including an explanation of the “CI=true”
Gemini CLI diligently updates my documentation and creates a new docs(test) git commit.
Conductor now tells us that it’s starting Phase 2:

Conductor goes ahead and implements the code for authentication. It creates a whole bunch of files and associated commits, and a bunch of tests. Then, as before, it asks me to perform manual validation in order to complete Phase 2.
When I start the frontend with npm run dev and navigate to http://localhost:3000, I see this:
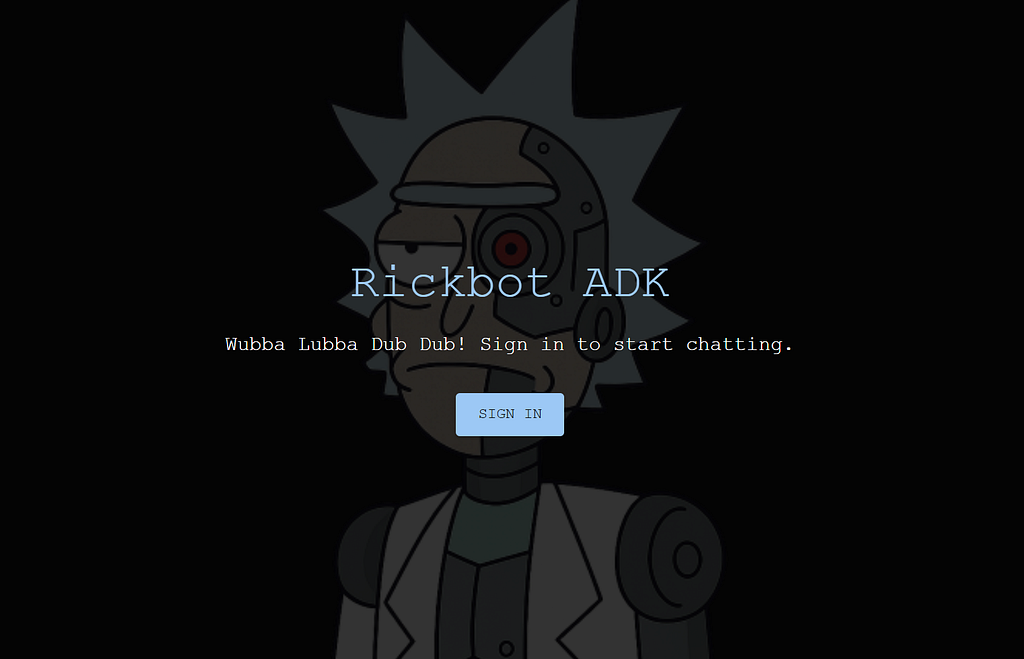
And the button works! We can sign in with a mock user.
I inform Conductor, and it then proceeds to implement Phase 3. This is the phase that connects frontend to API, using the actual Google and GitHub auth providers. It completes the tasks and then says:

When I begin the manual validation, I see that the changes have broken my API:

So I inform Gemini CLI and it diligently fixes the erroneous imports and checks the tests pass.
Finally, once everyting is working, Conductor offers to close the current track and move it to an archive folder. I’m happy to proceed with this.

If we once again run /conductor:status, we see that there are no current tracks active:
Current Date/Time: Wednesday, December 25, 2025
 Project Status: 🟢 Idle

Current Phase and Task:
   * Phase: None
   * Task: None
  Next Action Needed:
   * Create a new track to begin work.
  Blockers:
   * None.
  Statistics:
   * Phases (total): 0
   * Tasks (total): 0
   * Progress: 0/0 (0%)
  Active Tracks:
   * No active tracks found.
(Yep, that’s right. I’m currently running this experiment on Christmas day!)
What Have We Actually Implemented?
Although the intent of this page is to give you a walkthrough of using the Conductor extension, I’ll go ahead and provide a brief summary of what Conductor implemented for us.
Goal Reminder
Recall that the goal was to implement frontend user authentication, decoupled from backend authorisation.
- The Frontend (Next.js) handles the user interaction through a Login button. It deals with Google and GitHub, gets a session, and holds onto it.
- The Backend (FastAPI) is stateless. It doesn’t care how you logged in, only that you have a valid token. It verifies every single request.
This is robust. It means if we swap the frontend for a mobile app later, the backend doesn’t change.
Auth in the Frontend
We used NextAuth.js because it gives you pre-canned auth handling. (Recall that this library was recommended by the initial research task.) We implement this in a new src/nextjs_fe/pages/api/auth/[…nextauth].ts.
import NextAuth,  from "next-auth"
import GoogleProvider from "next-auth/providers/google"
import GitHubProvider from "next-auth/providers/github"
import CredentialsProvider from "next-auth/providers/credentials"

export const authOptions: NextAuthOptions = {
  providers: [
    GoogleProvider( "",
    ),
    GitHubProvider(
      clientId: process.env.GITHUB_ID ),
    // Mock provider for local development
    CredentialsProvider({
      id: "mock",
      name: "Mock Login",
      credentials: {
        username: { label: "Username", type: "text", placeholder: "mockuser" },
      },
      async authorize(credentials, req) {
        // In dev mode, we allow a mock user
        if (process.env.NODE_ENV === "development" || process.env.NEXT_PUBLIC_ALLOW_MOCK_AUTH === "true") {
           const mockEmail = process.env.MOCK_AUTH_USER || "mock@example.com";
           return {
             id: "mock-123",
             name: "Mock User",
             email: mockEmail,
             image: "/avatars/dazbo.png"
           }
        }
        return null
      }
    })
  ],
  callbacks: {
    async jwt({ token, account, user }) {
      // Persist the OAuth access_token to the token right after signin
      if (account) {
        token.accessToken = account.access_token
        token.idToken = account.id_token
        token.provider = account.provider

        // Handle Mock Provider specifically when account is present
        if (account.provider === 'mock' && user) {
             const cleanId = user.id.replace('mock-', '');
             token.idToken = `mock:${cleanId}:${user.email}:${user.name}`;
             token.provider = 'mock';
        }
      }

      return token
    },
    async session({ session, token, user }) {
      // Send properties to the client, like an access_token from a provider.
      session.accessToken = token.accessToken as string
      session.idToken = token.idToken as string
      session.provider = token.provider as string
      if (session.user) {
         session.user.id = token.sub as string
      }
      return session
    }
  },
  secret: process.env.NEXTAUTH_SECRET,
}

export default NextAuth(authOptions)
This file handles the OAuth callbacks automatically. And for OAuth providers, note that it loads client credentials from environment variables. In Dev, we set these using .env files. When we deploy to Google Cloud, we’ll store these as secrets and inject them as environment variables into our Cloud Run environment.
Then, the Session: We wrap the entire app in _app.tsx with a <SessionProvider>. This gives every component access to the useSession() hook.
import '../styles/globals.css'
import type { AppProps } from 'next/app'
import { SessionProvider } from "next-auth/react"

function MyApp({ Component, pageProps: { session, ...pageProps } }: AppProps) {
  return (
    <SessionProvider session={session}>
      <Component {...pageProps} />
    </SessionProvider>
  )
}

export default MyApp
Gatekeeping in the Backend API
First we implemented a new src/rickbot_agent/auth.py by adding the verify_token function:
import os

import requests
from fastapi import Depends, HTTPException
from fastapi.security import HTTPAuthorizationCredentials, HTTPBearer
from google.auth.transport import requests as google_requests
from google.oauth2 import id_token

from rickbot_agent.auth_models import AuthUser
from rickbot_utils.config import logger

security = HTTPBearer()

async def verify_token(creds: HTTPAuthorizationCredentials = Depends(security)) -> AuthUser:
    """
    Verifies the authentication token and returns an AuthUser object.
    Supports:
    - Mock tokens (format: \"mock:id:email:name\") - Development only
    - Google ID Tokens
    - GitHub Access Tokens
    """
    token = creds.credentials
    if not token or token == "undefined":
         raise HTTPException(status_code=403, detail="Not authenticated")

    # 1. Check for Mock Token (Development Only)
    if token.startswith("mock:"):
        # In a real app, you'd check an environment variable to ensure this is only enabled in dev
        allow_mock = os.getenv("NEXT_PUBLIC_ALLOW_MOCK_AUTH")

        if allow_mock != "true":
             logger.warning(f"Mock auth failed. ALLOW_MOCK={allow_mock}")
             raise HTTPException(status_code=401, detail="Mock authentication is disabled")

        try:
            # Format: mock:id:email:name
            parts = token.split(":")
            if len(parts) < 4:
                 logger.warning(f"Mock token malformed: {token}")
                 raise HTTPException(status_code=401, detail="Malformed mock token")

            return AuthUser(
                id=parts[1],
                email=parts[2],
                name=parts[3],
                provider="mock"
            )
        except Exception as e:
             logger.error(f"Mock auth exception: {e}")
             raise HTTPException(status_code=401, detail="Invalid mock token") from e

    # 2. Try Google ID Token Verification
    try:
        # We need the client ID to verify the token
        google_client_id = os.getenv("GOOGLE_CLIENT_ID")
        if google_client_id:
            idinfo = id_token.verify_oauth2_token(token, google_requests.Request(), google_client_id)

            return AuthUser(
                id=idinfo['sub'],
                email=idinfo['email'],
                name=idinfo.get('name', idinfo['email']),
                provider="google"
            )
    except ValueError:
        # Not a valid Google token or verification failed, continue to next provider
        pass
    except Exception as e:
        logger.error(f"Error verifying Google token: {e}")

    # 3. Try GitHub Access Token Verification
    try:
        # GitHub tokens are opaque, we must call their API
        github_response = requests.get(
            "https://api.github.com/user",
            headers={"Authorization": f"token {token}"},
            timeout=5
        )
        if github_response.status_code == 200:
            user_data = github_response.json()
            # GitHub email might be private, so we might need another call if email is null
            email = user_data.get("email")
            if not email:
                 # Try to get emails
                 emails_resp = requests.get(
                     "https://api.github.com/user/emails",
                     headers={"Authorization": f"token {token}"},
                     timeout=5
                 )
                 if emails_resp.status_code == 200:
                     emails = emails_resp.json()
                     # Find primary or first
                     primary_email = next((e['email'] for e in emails if e['primary']), emails[0]['email'] if emails else None)
                     email = primary_email

            return AuthUser(
                id=str(user_data['id']),
                email=email or f"{user_data['login']}@github.com",
                name=user_data.get('name') or user_data['login'],
                provider="github"
            )
    except Exception as e:
        logger.error(f"Error verifying GitHub token: {e}")

    # Default reject
    raise HTTPException(status_code=401, detail="Invalid authentication credentials")
- If it sees a Google Token it uses google.oauth2.id_token to cryptographically verify it against Google’s certs.
- If it sees a GitHub Token it calls the GitHub User API.
- If it sees a mock token (and ALLOW_MOCK_AUTH is True), it lets you in.
But now we need to ensure that this function is called for every secured endpoint in the API. We can do this by adding the function as a dependency whenever we would have previously just passed in a user. For example, by going from this:
@app.post("/chat")
async def chat(
    prompt: Annotated[str, Form()],
    session_id: Annotated[str | None, Form()] = None,
    personality: Annotated[str, Form()] = "Rick",
    user_id: Annotated[str, Form()] = "api-user",
    file: UploadFile | None = None,
) -> ChatResponse:
    """Chat endpoint to interact with the Rickbot agent."""
To this:
@app.post("/chat")
async def chat(
    prompt: Annotated[str, Form()],
    session_id: Annotated[str | None, Form()] = None,
    personality: Annotated[str, Form()] = "Rick",
    user: AuthUser = Depends(verify_token),
    file: UploadFile | None = None,
) -> ChatResponse:
    """Chat endpoint to interact with the Rickbot agent."""
    user_id = user.email # Use email as user_id for ADK sessions
Depends is a dependency injection system provided by FastAPI. It allows you to declare dependencies that need to be resolved before your endpoint function runs.
So simple!
What Could We Improve?
The current workflow fails to update my overall workspace documentation, and my specific tests/README.md whenever tests are added or updated. This should be easy to fix:
Please update the (at)conductor/workflow.md such that it always updates the relevant documentation in the repo as required, including (at)README.md and (at)src/tests/README.md.
Gemini CLI goes ahead and updates the workflow.md accordingly.
Conclusions
That was fun!
We started with a tricky goal: add robust authentication to a brownfield full-stack app. And let’s be honest — for a Python guy like me, diving into the deep end of Next.js, TypeScript, and OAuth could have ended in tears; or at the very least: less hair. Not this time!
Vibe coding is all the rage. You chat to the LLM, and it writes your code for you. And if it runs… great! It feels like magic. But often, it’s brittle magic, using inappropriate frameworks and poor design decisions. The moment you ask for a refactor or add a new feature, the whole house of cards collapses.
Conductor changes the game.
It forces the agent to stop, think, and plan. It turns “vibes” into managed artifacts.
- It made the impossible, possible: I successfully implemented a secure, production-grade Auth flow in a tech stack I barely know.
- It built confidence: I didn’t just hope the code worked. The workflow forced me (and the agent) to prove it with tests and manual verification steps before moving on.
- It kept the receipts: Every decision, every plan, and every verification report is now part of my git history. (Let’s not forget the detailed git notes!) Future me is going to be so grateful when I look at this code in six months.
This isn’t just about writing code faster; it’s about building robust software with an AI partner that acts like a senior engineer, not an enthusiastic intern.

You Know What To Do!
- Please share this with anyone that you think will be interested. It might help them, and it really helps me!
- Please give me 50 claps! (Just hold down the clap button.)
- Feel free to leave a comment 💬.
- Follow and subscribe, so you don’t miss my content. Go to my Profile Page, and click on these icons:

Useful Links and References
Gemini CLI
- Gemini CLI
- Romin Irani’s Gemini Tutorial Series
- Give Gemini CLI the Ability to Generate Images and Video, Work with GitHub Repos, and Use Other Tools
- Using Gemini CLI to Create a Gemini CLI Config Repo
- Gemini CLI Extensions
- Power-Up Your Gemini CLI with Your Own FastMCP Server Extension
Conductor
- Conductor: Introducing context-driven development for Gemini CLI
- Conductor Extension for Gemini CLI (GitHub)
Rickbot-ADK
- Rickbot
- Please star my repo! Rickbot-ADK GitHub repo
- Building the Rickbot Multi-Personality Agentic Application using Gemini CLI, Google Agent-Starter-Pack and the Agent Development Kit (ADK)
Trying Out the New Conductor Extension in Gemini CLI was originally published in Google Cloud – Community on Medium, where people are continuing the conversation by highlighting and responding to this story.
Source Credit: https://medium.com/google-cloud/trying-out-the-new-conductor-extension-in-gemini-cli-0801f892e2db?source=rss—-e52cf94d98af—4


