
Welcome to the tutorial on the newly released Google Developer Knowledge MCP Server.
Introducing the Developer Knowledge API and MCP Server
If you are looking to get information on getting started with Google MCP Servers, I suggest that you go through the previous tutorial: Getting Started with Google MCP Servers, that I had authored. That tutorial covered the initial set of MCP Servers that were released in December 2025 : Maps, BigQuery, GKE and GCE.
One key challenge has remained when Agents are tasked with requests for information around documentation: Hallucination.
We’ve all been there. You ask an AI agent how to configure a specific feature in Terraform or how to migrate from one version of an API to another, and it confidently gives you code that doesn’t exist or references documentation from an earlier version or even years ago.
Enter the Developer Knowledge MCP Server. This fully managed MCP server connects your AI agents directly to Google’s massive library of official developer documentation — covering several products from Google Cloud, Firebase, Android and more.
In this tutorial, we will explore what this server offers, how to set it up, and most importantly, the powerful use cases it unlocks for your development workflow.
I will focus on Google Cloud and provide examples vis-a-vis a few Google Cloud services. But if you are into Android or Firebase, give similar prompts a try and it should access the right corpus for you and provide answers, grounded in the documentation.
What does Developer Knowledge MCP Server offer?
Previously, if you wanted your agent to know about the latest Google Cloud features, you had to manually scrape documentation or rely on the LLM’s training data (which is always cut off at a certain date).
The Developer Knowledge MCP Server solves this by providing a live pipe to Google’s technical documentation corpus. When your agent needs to know “How do I implement vector search in Firestore?”, it doesn’t guess — it queries the Developer Knowledge MCP Server, retrieves the official guide, and synthesizes the answer based on ground truth.
This server exposes a set of tools designed for Information Retrieval (IR). Unlike the BigQuery server (which executes SQL) or the Maps server (which calculates routes), the Knowledge server is about fetching context.
Key points to note about this MCP Server:
- Endpoint: knowledge.googleapis.com/mcp.
- Corpus: Includes Google Cloud, Firebase, Android, Google Maps Platform, and more. As per the Corpus Reference in the initial release, it covers several product areas.
Core Primitives
While the toolset is evolving, the core primitives typically include:
- search_document: The entry point. Allows the agent to query the documentation corpus using natural language.
- get_document: Retrieves the content of a specific documentation page found via search.
Getting Started
The instructions will assume that you are running this in an environment where you have setup Google Cloud CLI tools and are conversant with configuring a project and using gcloud CLI.
Let us assume that you have a Google Cloud project created and available and you have an environment variable $PROJECT_ID pointing to it.
Enable the API
The first step is to enable the Developer Knowledge API in your project. Use the command given below:
gcloud services enable developerknowledge.googleapis.com --project=$PROJECT_ID
Alternatively, if you prefer using the Google Cloud console, you can following the instructions here.
Provision a Developer Knowledge API Key
You need a Developer Knowledge API key to authenticate your requests. You can give the following command to generate the key and restrict it to the Developer Knwoledge API, which is a good practice.
API_KEY_NAME="developer-knowledge-apikey-$(date +%s)"

API_KEY_JSON=$(gcloud alpha services api-keys create --display-name="$API_KEY_NAME" \
    --api-target=service=developerknowledge.googleapis.com \
    --format=json 2>/dev/null)

API_KEY=$(echo "$API_KEY_JSON" | grep -oP '"keyString": "\K[^"]+' 2>/dev/null || echo "$API_KEY_JSON" | grep '"keyString":' | cut -d '"' -f 4)

echo "Your API Key is :" $API_KEY
The above is a script that you can use to provision the API Key in an automated fashion. Alternatively, you can also use the instructions here, to use the Google Cloud console to provision the API Key.
If you visit the Credentials page in Google Cloud console, you can see the API Key that we have configured and restricted to the Developer Knowledge API.
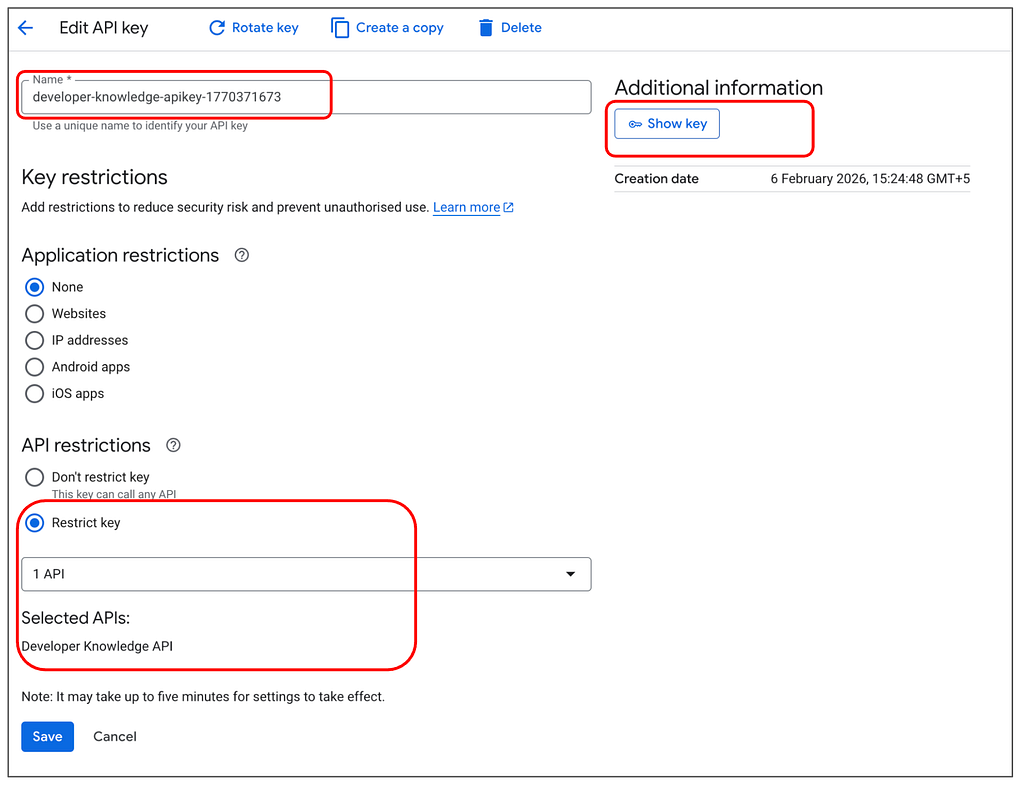
Keep the API Key value, either obtained via the script above or from the Console page shown above. We will need that later on to be configured in our AI clients.
Enable the Developer Knowledge MCP Server in your project
You need to then enable the Developer Knowledge MCP Server and this is done via the gcloud beta service mcp enable <service-name> command.
The exact command is shown below:
gcloud beta services mcp enable developerknowledge.googleapis.com \
    --project=$PROJECT_ID
You should always check if this and other MCP services in your project are enabled correctly. You can do that via the command shown below:
$ gcloud beta services mcp list

NAME                                        MCP_ENDPOINT
services/bigquery.googleapis.com            bigquery.googleapis.com/mcp
services/developerknowledge.googleapis.com  developerknowledge.googleapis.com
services/mapstools.googleapis.com           mapstools.googleapis.com/mcp
You can see that I have enabled multiple other MCP Services but the developerknowledge.googleapis.com MCP service endpoint is also visible in this enabled list.
Identity and Access Management (IAM)
As with other MCP services, we enforce the dual-layer security model. Your identity (or the service account running your agent) needs:
- Gate 1 (MCP Access): roles/mcp.toolUser
- Gate 2 (Service Access): Ensure your user has permissions to view the Knowledge API (typically covered by basic Viewer roles).
export PROJECT_ID=$(gcloud config get-value project)
export USER_EMAIL=$(gcloud config get-value account)

gcloud projects add-iam-policy-binding $PROJECT_ID \
    --member="user:$USER_EMAIL" \
    --role="roles/mcp.toolUser"
If you are prompted for a condition while running the add-iam-policy-binding call, please select None as the value.
Test with MCP Inspector
MCP Inspector is a dedicated, interactive developer tool designed to streamline the building, testing, and debugging of MCP servers. Acting as a lightweight client, it provides a web-based visual interface that allows developers to connect directly to their local or remote MCP servers without needing a full AI application (like Gemini CLI , Google Antigravity, Claude) or an LLM.
It is best to try out the MCP Inspector on your local machine.
We shall use it now to test the Developer Knowledge MCP Server.
From a terminal, launch MCP Inspector as follows:
npx @modelcontextprotocol/inspector
Give it the required permissions if you are launching it for the first time. You should finally see the server getting launched a browser being launched with MCP Inspector interface loaded in it. On the left side, we are going to configure the MCP Inspector to connect to our Developer Knowledge MCP Server. The step by step instructions and specific values are shown below and the parameters and values are reiterated:
- Transport type : Select Streamble HTTP
- URL : Provide the Developer Knowledge MCP Server endpoint i.e. https://developerknowledge.googleapis.com/mcp
- Connection Type : Select via Proxy
- In Custom Headers, we need to use the X-Goog-Api-Key header parameter and then provide the value of your Developer Knowledge API Key.
- Finally click on Connect
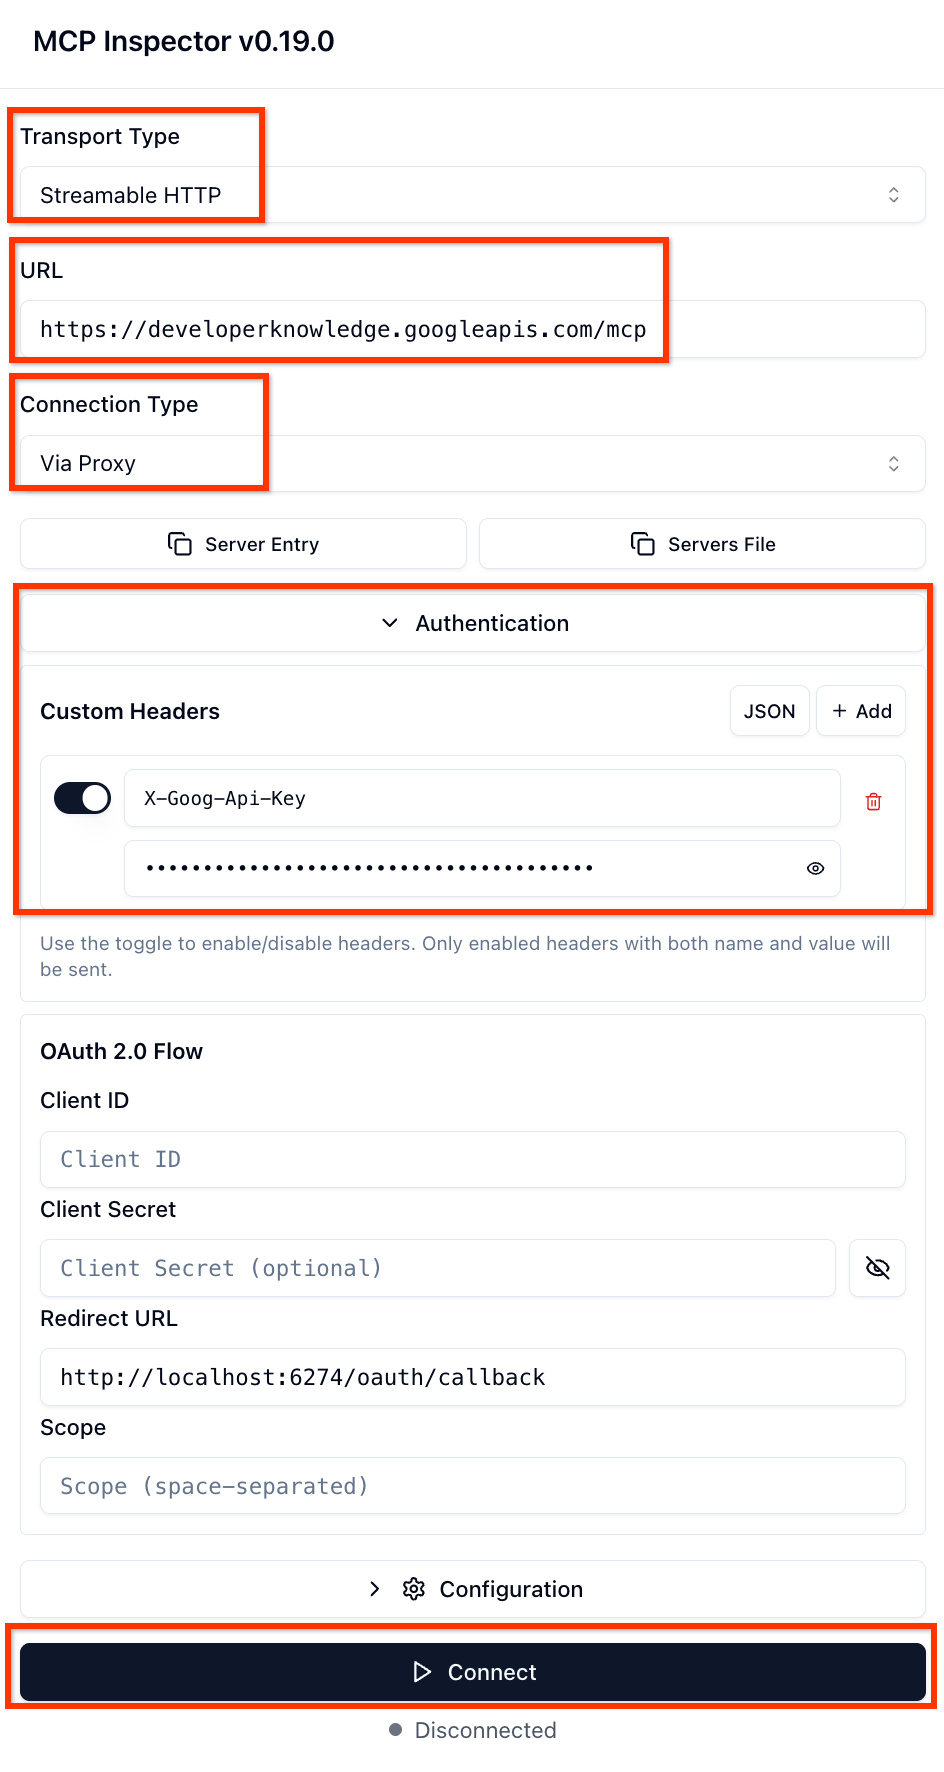
If all goes well you should see the MCP Inspector connecting successfully to the Server. In the right panel, you will be able to get the tools supported by the Developer Knowledge MCP Server by clicking on List Tools.

Let’s try one query now. Select the search_documents tool, then provide a sample query How to create a Google Cloud Storage Bucket?and then click on Run Tool as shown below:
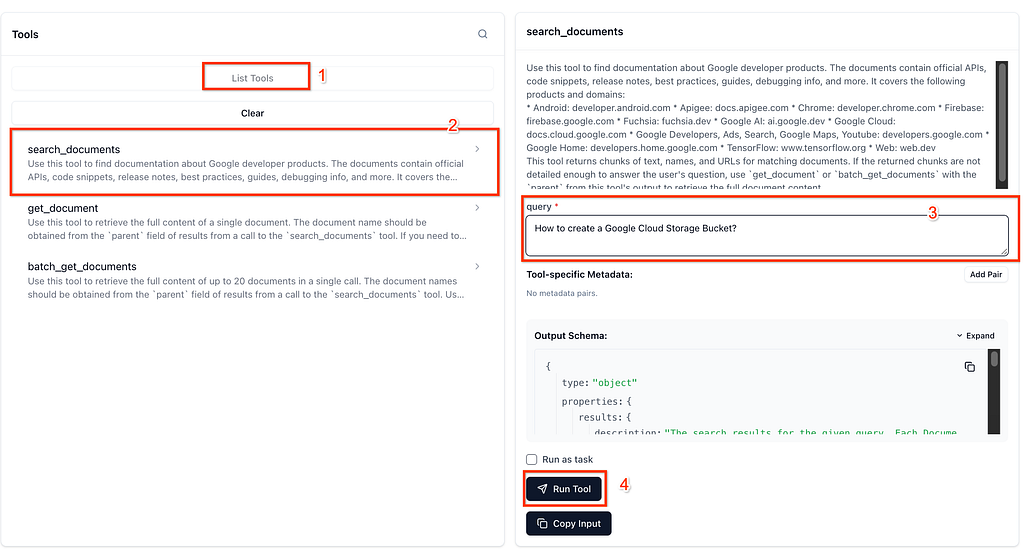
You should get back a result as shown below:

Configure with Gemini CLI
If you are using Gemini CLI, you need to add a MCP Server configuration for the Developer Knowledge MCP Server in the settings.json file that is found in the $HOME\.gemini folder.
The gemini mcp add command is a nifty way of adding our Developer Knowledge MCP Server into the settings.json file. Thank you to Jack Wotherspoon for this suggestion. It is a much better way to manage the MCP Servers in Gemini CLI instead of wrangling around with the settings.json file.
Given that Gemini CLI is available in your system, run the following command in the terminal:
gemini mcp add -t http -H "X-Goog-Api-Key: YOUR_DEVELOPER_KNOWLEDGE_ API_KEY" DeveloperKnowledge https://developerknowledge.googleapis.com/mcp
You can use the gemini mcp list command to view the list of MCP servers that are configured for your Gemini CLI instance. You should be able to see the DeveloperKnowledge MCP server listed.
Once it is configured, you should launch Gemini CLI and then use the /mcp list command as shown below and it should show you the DeveloperKnowledge MCP server that we configured along with 3 tools ready.

You can give a quick prompt to test it out. It correctly asks me for permission to invoke the search_documents tool:

It might then ask you for further invocation of other tools ( batch_get_documents, ) to get the documents, their contents and then synthesize the output for you.
Here is the output that I received:
To create a Google Cloud Storage bucket, you have several options depending on your workflow.

  Option 1: Using the Command Line (Fastest)

  If you have the gcloud CLI installed, run the following command:


   1 gcloud storage buckets create gs://YOUR_UNIQUE_BUCKET_NAME --location=US
   * Replace YOUR_UNIQUE_BUCKET_NAME with a globally unique name.
   * Replace US with your desired region (e.g., us-central1, eu-west1).

  Option 2: Using the Google Cloud Console (Visual)


   1. Go to the [Cloud Storage Buckets page](https://console.cloud.google.com/storage/browser) in the Google Cloud Console.
   2. Click + CREATE.
   3. Name your bucket: Enter a globally unique name.
   4. Choose where to store your data: Select a Location Type (Multi-region, Dual-region, or Region) and a specific Location.
   5. Choose a storage class: Select Standard (for frequently accessed data) or another class like Nearline/Coldline/Archive (for
      backups/archiving).
   6. Choose how to control access:
       * Uniform: (Recommended) Uses IAM permissions for the whole bucket.
       * Fine-grained: Allows per-object permissions (legacy).
   7. Click CREATE.

  Option 3: Using Client Libraries (For Developers)


  You can create buckets programmatically using Google Cloud client libraries. Here are a few examples:

  Python:


   1 from google.cloud import storage
   2
   3 def create_bucket(bucket_name):
   4     storage_client = storage.Client()
   5     bucket = storage_client.create_bucket(bucket_name)
   6     print(f"Bucket {bucket.name} created")

  Node.js:


   1 const {Storage} = require('@google-cloud/storage');
   2 const storage = new Storage();
   3
   4 async function createBucket(bucketName) {
   5   const [bucket] = await storage.createBucket(bucketName);
   6   console.log(`${bucket.name} created.`);
   7 }

  Go:


    1 import (
    2     "context"
    3     "cloud.google.com/go/storage"
    4 )
    5
    6 func createBucket(projectID, bucketName string) error {
    7     ctx := context.Background()
    8     client, _ := storage.NewClient(ctx)
    9     defer client.Close()
   10     return client.Bucket(bucketName).Create(ctx, projectID, nil)
   11 }


  I can also provide examples for C++, C#, Java, PHP, Ruby, or Terraform if you need them.
Configure with Google Antigravity
If you are using Gooogle Antigravity, you need to add the Developer Knowledge MCP Server as follows.
Assuming that you have launched Antigravity, visit the Editor window and then click on the top right … in the Agent Chat Panel, as shown below:
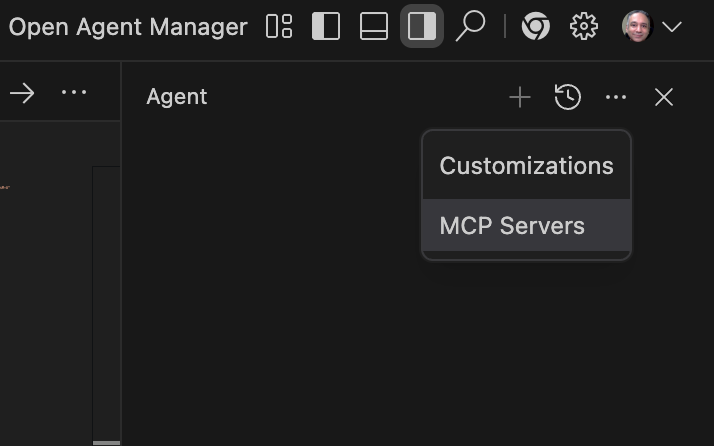
You will see two options, Customizations and MCP Servers. Click on the MCP Servers. This will show list of MCP Servers from the store, but we are not going to select from that.
Instead click on the Manage MCP Servers. This will show a list of custom MCP Servers if you have already configured them. We are going to now add an entry for the Developer Knowledge MCP Server. On the top, you will see an option saying View raw config. Click on that.

It will open up the mcp_config.json file, which is present in the HOME/.gemini/antigravity folder. We need to add an entry for the Developer Knowledge MCP server. If your file is empty, you can simply add this block shown below. Make sure that you replace the variable YOUR_DEVELOPER_KNOWLEDGE_API_KEY with your Developer Knowledge API Key.
{
    "mcpServers": {
        "developer-knowledge-mcp": {
            "serverUrl": "https://developerknowledge.googleapis.com/mcp",
            "headers": {
                "X-Goog-Api-Key": "YOUR_DEVELOPER_KNOWLEDGE_API_KEY"
            }
        }
    }
}
If you already have some MCP Servers configured, you will just need to add the following additional block on the mcpServers object in the file:
"developer-knowledge-mcp": {
            "serverUrl": "https://developerknowledge.googleapis.com/mcp",
            "headers": {
                "X-Goog-Api-Key": "YOUR_DEVELOPER_KNOWLEDGE_API_KEY"
            }
        }
Save this file and then refresh the MCP Servers by clicking on the Refresh button.

This should result in Antigravity connecting to the Developer Knowledge MCP Server and display the list of tools that are currently exposed by it.
A sample screenshot is shown below. If you are not able to see the tools, ensure that the configuration block is correct and you have used your Developer Knowledge API Key.
You should see search_documents, get_document and batch_get_documentsin the tool list.
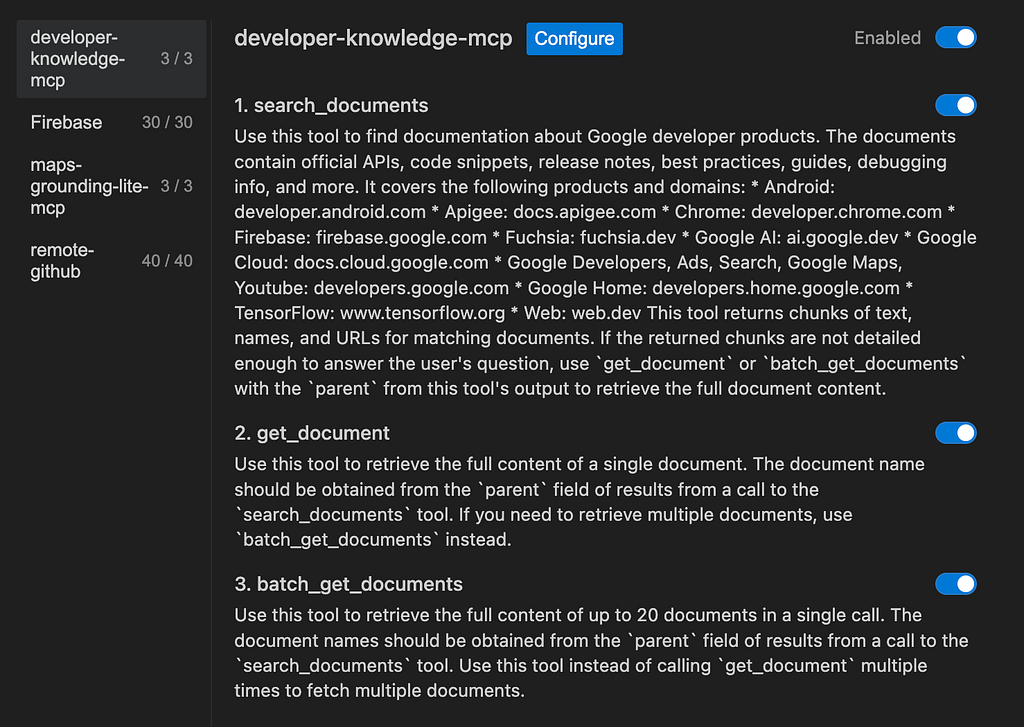
Observe how you can enable the entire MCP Server or the individual tools via the toggle buttons.
You can now start using the Developer Knowledge MCP Server in your interactions with the agent. Give a query in the Playground to the Agent and see it work.
Interesting Use Cases
The Developer Knowledge MCP server isn’t just a search bar; it enables semantic workflows. Here are three powerful use cases you can try right now.
Use Case 1: The “Legacy Migration” Assistant
You have an older application running on App Engine (Python 2.7) or Cloud Functions (1st Gen) and need to upgrade.
The Prompt:
I need to migrate my Cloud Functions from 1st Gen to 2nd Gen.
What are the key differences in the signature, and can you find the official
migration guide?
The result:
The answer depends on whether you are using standard Google Cloud Functions (GCP) or Cloud Functions for Firebase. Both moved to a new
  architecture based on Cloud Run, but the code changes differ.

  1. Standard Google Cloud Functions (GCP)
  If you are deploying via gcloud or the Cloud Console, you are likely using standard GCP functions.


  Official Migration Guide
   * Guide: Migrate from 1st Gen to 2nd Gen (https://cloud.google.com/functions/docs/migrating/1st-2nd-gen)


  Signature Differences
   * HTTP Functions:
       * No change. The signature (request, response) remains the same (e.g., Express.js request/response objects in Node.js, Flask in
         Python).
   * Event-Driven Functions (Pub/Sub, Storage, etc.):
       * Major Change: 1st Gen used "Background Functions" with separate data and context arguments. 2nd Gen uses CloudEvents with a single
         event object.


  ┌──────────┬─────────────────────────────────────────┬────────────────────────────────────────────────────────────┐
  │ Language │ 1st Gen Signature                       │ 2nd Gen Signature (CloudEvents)                            │
  ├──────────┼─────────────────────────────────────────┼────────────────────────────────────────────────────────────┤
  │ Node.js  │ exports.fn = (data, context) => { ... } │ functions.cloudEvent('fn', (cloudEvent) => { ... })        │
  │ Python   │ def fn(data, context): ...              │ @functions_framework.cloud_event<br>def fn(cloud_event): ... │
  │ Go       │ func Fn(ctx context.Context, e Event)   │ func Fn(ctx context.Context, e event.Event)                │
  │ Java     │ accept(Payload p, Context c)            │ accept(CloudEvent event)                                   │
  └──────────┴─────────────────────────────────────────┴────────────────────────────────────────────────────────────┘

  ---

  2. Cloud Functions for Firebase
  If you are deploying via the firebase deploy CLI, you are using the Firebase SDK.


  Official Migration Guide
   * Guide: Upgrade to 2nd Gen Cloud Functions for Firebase (https://firebase.google.com/docs/functions/2nd-gen-upgrade)


  Signature Differences
   * Imports: You must switch from firebase-functions/v1 to firebase-functions/v2.
   * Triggers: Arguments are consolidated into a single event object.


  ┌─────────────┬─────────────────────────────────────────────────┬─────────────────────────────────────────────────────────────────────────┐
  │ Trigger ... │ 1st Gen (v1)                                    │ 2nd Gen (v2)                                                            │
  ├─────────────┼─────────────────────────────────────────────────┼─────────────────────────────────────────────────────────────────────────┤
  │ Imports     │ `const functions = require("firebase-functio... │ `const { onDocumentCreated } = require("firebase-functions/v2/firest... │
  │ Firestore   │ onCreate((snap, context) => { ... })            │ onDocumentCreated(event => { const snap = event.data; ... })            │
  │ HTTP        │ functions.https.onRequest((req, res) => ...)    │ onRequest((req, res) => ...)                                            │
  │ Schedule    │ functions.pubsub.schedule(...).onRun(...)       │ onSchedule(event => { ... })                                            │
  └─────────────┴─────────────────────────────────────────────────┴─────────────────────────────────────────────────────────────────────────┘


  Key Architectural Differences (Both)
   * Concurrency: 2nd Gen instances can handle multiple requests simultaneously (default 80, max 1000), whereas 1st Gen handled only one.
   * Timeouts: 2nd Gen supports longer execution times (up to 60 minutes for HTTP) compared to 1st Gen (max 9 minutes).
Use Case 2: The “Cross-Product” Architect
You are building a mobile app and need to decide between using Firebase Realtime Database or Firestore.
The Prompt:
Compare Firebase Realtime Database and Firestore for a chat application.
Which one handles offline syncing better according to the documentation?
The result:
Based on the official Firebase documentation, Cloud Firestore handles offline syncing better than Realtime Database, particularly if you
  are building for the web.

  Here is the key difference found in the documentation:


   * Cloud Firestore: Supports offline persistence for Android, iOS, and Web clients.
   * Realtime Database: Supports offline persistence primarily for Android and iOS clients.


  While both databases offer robust offline capabilities for mobile apps (caching data locally and syncing writes when connectivity is
  restored), Cloud Firestore is the superior choice if your chat application needs to work offline in a browser.
Use Case 3: The “Error Decoder”
You are deploying to Cloud Run and hit a cryptic error code 13.
The Prompt:
I am getting an internal error with code 13 on Cloud Run during container
startup. Check the troubleshooting docs for what this specific error code
means.
The result:
In the context of Google Cloud Run, an Internal Error with Code 13 corresponds to the gRPC status code INTERNAL. While generic, during
  container startup, it almost always indicates that your container crashed or exited before it could successfully signal readiness to the
  Cloud Run control plane.

  This error usually masks a more specific application-level failure. Here is how to troubleshoot it:


  1. Check Container Logs (Most Critical)
  Because "Code 13" is a system-level error reporting that the process failed, the actual reason is likely in your application's stdout or
  stderr.
   * Go to the Logs tab of your Cloud Run service.
   * Look for "Application" logs (not just "System" logs) that appear right before the crash.
   * Common findings: Panic/stack traces, missing environment variables, or syntax errors in your entrypoint script.


  2. Verify Port Binding
  Cloud Run requires your application to listen on the port defined by the PORT environment variable (default: 8080).
   * Do not hardcode port 80. Ensure your app uses process.env.PORT (Node), os.environ.get('PORT') (Python), etc.
   * Listen on 0.0.0.0: Ensure your server binds to 0.0.0.0 (all interfaces), not 127.0.0.1 (localhost). Code 13 often occurs if the health
     check probe fails to connect because the app is only listening on localhost.


  3. Test Locally
  The most effective way to debug this is to replicate the Cloud Run environment locally:
   1 # Replace [IMAGE_URI] with your image
   2 docker run -p 8080:8080 -e PORT=8080 [IMAGE_URI]
  If it crashes locally, you will see the error immediately.


  4. Check for "User root" Errors
  If you are using a strictly hardened container or specific base images, ensuring you are not trying to write to read-only paths (like /app
  or system directories) as a non-root user without permission can be a cause, though this usually throws a "Permission Denied" rather than a
  generic Code 13.


  5. Memory/Resource Limits
  If your application consumes more memory during startup than allocated, the OOM (Out Of Memory) killer might terminate it immediately,
  resulting in an abrupt exit that can be interpreted as an internal error.
   * Check the memory usage metrics.
   * Try increasing the memory limit for the service.
Use Case 4: The “compliance & Security” Auditor
A security engineer needs to verify if a specific configuration complies with Google Cloud’s organizational policy constraints or security best practices.
The Prompt:
I need to ensure my GKE clusters are secure.
Search for the 'GKE Hardening Guide' and
summarize the top 5 distinct recommendations for securing the control plane.
The result:
Based on the GKE Hardening Guide and control plane security best practices, here are the top 5 distinct recommendations for securing the control plane:


   1. Restrict Control Plane Access:
       * Recommendation: Use the DNS-based endpoint for the control plane and use VPC Service Controls to restrict access.
       * Alternative: If using IP-based endpoints, enable Authorized Networks to strictly limit access to the Kubernetes API server to a specific set of
         IP addresses and disable the public (external) endpoint if possible.


   2. Use IAM for Authentication:
       * Recommendation: leverage Google Cloud IAM as the primary identity provider for the cluster.
       * Action: Ensure that legacy authentication methods like Basic Authentication (static password) and Client Certificate issuance are disabled.


   3. Implement Role-Based Access Control (RBAC):
       * Recommendation: Use Kubernetes RBAC to define granular permissions within the cluster.
       * Action: Avoid granting the broad cluster-admin role; instead, create custom roles with the principle of least privilege, ensuring users and
         service accounts have only the permissions they strictly need.


   4. Rotate Credentials Regularly:
       * Recommendation: Perform regular Credential Rotation for the cluster.
       * Action: This process rotates the cluster's Root Certificate Authority (CA), the TLS certificates used by the control plane, and the IP address of
         the API server, invalidating old credentials.


   5. Monitor Audit Logs:
       * Recommendation: Enable and actively monitor Cloud Audit Logs.
       * Action: Review the "Admin Activity" and "Data Access" logs to track calls made to the Kubernetes API server, allowing you to detect and
         investigate suspicious activities or configuration changes.
Use Case 5: The “Android Modernization” Dev
An Android developer is updating an app to target a specific Android SDK and needs to handle new changes/restrictions for a certain service.
The Prompt:
I am updating my app to target Android 15.
What are the changes regarding foreground service types?
Find the migration guide and list the new requirements.
The result:
Android 15 Foreground Service Changes


  For apps targeting Android 15 (API level 35), there are significant changes to foreground service types, focusing on new timeouts and launch
  restrictions.


  1. New mediaProcessing Service Type
  A new foreground service type specifically for time-consuming media operations (like transcoding).
   * Manifest Declaration: android:foregroundServiceType="mediaProcessing"
   * Permission: android.permission.FOREGROUND_SERVICE_MEDIA_PROCESSING
   * Usage: For converting media formats or other intensive media tasks.
   * Time Limit: Restricted to run for 6 hours within a 24-hour period.


  2. dataSync & mediaProcessing Timeouts
  Both dataSync and the new mediaProcessing types now have a strict 6-hour runtime limit per 24-hour window.
   * Behavior: If the service exceeds the limit, the system calls Service.onTimeout(int, int).
   * Requirement: You must implement onTimeout and call stopSelf() immediately (within a few seconds).
   * Failure: If you do not stop the service, the system will throw a failure exception (ANR/Crash).
   * Reset: The timer resets if the user brings the app to the foreground.


  3. BOOT_COMPLETED Launch Restrictions
  Apps targeting Android 15 can no longer launch the following foreground service types directly from a BOOT_COMPLETED broadcast receiver:
   * dataSync
   * camera
   * mediaPlayback
   * phoneCall
   * mediaProjection
   * Note: `microphone` was already restricted in Android 14.


  Action Required: If you rely on starting these services at boot, you must migrate to alternative approaches (like WorkManager) or rely on other
  triggers.


  4. SYSTEM_ALERT_WINDOW Restrictions
  Apps holding the SYSTEM_ALERT_WINDOW permission now face stricter rules for launching foreground services from the background. They must currently have
  a visible overlay window to be exempt from background start restrictions.
Use Case 6: The “API Integration” Specialist
A backend engineer is trying to integrate the Gemini API but is confused about the specific JSON schema for a multi-turn chat.
The Prompt:
I'm using the Gemini REST API for a chat application.
Find the reference documentation for the projects.generativeModels.generateContent method
and show me the JSON structure for sending a history of 'user' and 'model' messages.
The result:
The projects.generativeModels.generateContent method uses a contents array to manage conversation history. Each entry in the array is a Content object
  representing a single turn in the conversation.

  JSON Structure for Message History


  To send a history of 'user' and 'model' messages, you must alternate the roles in the contents array. Each Content object contains a role field (either
  "user" or "model") and a parts array containing the message data (usually as a "text" field).


    1 {
    2   "contents": [
    3     {
    4       "role": "user",
    5       "parts": [
    6         {
    7           "text": "Hello, how are you?"
    8         }
    9       ]
   10     },
   11     {
   12       "role": "model",
   13       "parts": [
   14         {
   15           "text": "I'm doing well, thank you! How can I help you today?"
   16         }
   17       ]
   18     },
   19     {
   20       "role": "user",
   21       "parts": [
   22         {
   23           "text": "Can you explain how photosynthesis works?"
   24         }
   25       ]
   26     }
   27   ]
   28 }

  Key Components


   * `contents`: A required array of Content objects. For multi-turn conversations, this list includes the entire history plus the latest user request.
   * `role`:
       * "user": Indicates the message was sent by the user.
       * "model": Indicates the message was generated by the model.
   * `parts`: An array of Part objects. For basic text chat, each Part typically contains a single "text" field.
Use Case 7: The “Infrastructure as Code” (IaC) Builder
A DevOps engineer is writing Terraform scripts and needs to know the correct resource arguments for a new Google Cloud product that might not be fully memorized by the LLM yet.
The Prompt:
I want to deploy a Cloud Run job using Terraform.
Search the Google Cloud documentation for the supported Terraform
resource arguments for Cloud Run Jobs and list the required fields.
The result:
Based on the Google Cloud documentation, here are the required resource arguments for the google_cloud_run_v2_job Terraform resource:

  Required Fields


   * `name`: The name of the Cloud Run job.
   * `location`: The region where the Cloud Run job will be hosted (e.g., us-central1).
   * `template`: The block describing the execution template. This block must contain:
       * `template`: A nested block describing the task template. This must contain:
           * `containers`: A block describing the container(s) to run. This must contain:
               * `image`: The URL of the container image to deploy (e.g., us-docker.pkg.dev/...).

  Example Configuration


    1 resource "google_cloud_run_v2_job" "default" {
    2   name     = "my-cloud-run-job"
    3   location = "us-central1"
    4
    5   template {
    6     template {
    7       containers {
    8         image = "us-docker.pkg.dev/cloudrun/container/job:latest"
    9       }
   10     }
   11   }
   12 }
Developing an Agent using Agent Development Kit
We will be using the Google Agent Development Kit (ADK) to develop a sample agent in Python that interacts with the Developer Knowledge MCP Server.
To follow along, you will need to be familiar with the Python language, creating environments and read along code that develops agents using the Agent Development Kit.
Let’s create the Python environment first and install the dependencies.
Open the terminal on your machine and create a folder named my-agents as follows. Navigate to the my-agents folder too.
mkdir my-agents
cd my-agents
Now, let’s create a virtual Python environment using venv as follows:
python -m venv .venv
Activate the virtual environment as follows:
source .venv/bin/activate
Install the ADK package.
pip install google-adk
We are now going to use adk to create a scaffolding for our sample Developer Knowledge Agent via the adk create command with an app name (devknowledge_agent)as given below.
adk create devknowledge_agent
Follow the steps and select the following:
- Gemini model for choosing a model for the root agent : gemini-2.5-flash
- Choose Vertex AI for the backend.
- Your default Google Project Id and region will be displayed. Select the default itself.
This should display the following output:
Agent created in <YOUR_HOME_FOLDER>/my-agents/devknowledge_agent:
- .env
- __init__.py
- agent.py
Observe the folder in which a default template (agent.py) and required files for the Agent have been created. You can see the files via the ls -al command in the terminal in the <YOUR_HOME_FOLDER>/my-agents/devknowledge_agent directory.
First up is the .env file. This file is already created as mentioned earlier and you can just view the contents of the file that are shown below:
GOOGLE_GENAI_USE_VERTEXAI=1
GOOGLE_CLOUD_PROJECT=YOUR_GOOGLE_PROJECT_ID
GOOGLE_CLOUD_LOCATION=YOUR_GOOGLE_PROJECT_REGION
The values indicate that we will be using Gemini via Vertex AI along with the respective values for the Google Cloud Project Id and location.
Add the following value to it and replace YOUR_DEVELOPER_KNOWLEDGE_KEY with the Developer Knowledge API Key that we generated in an earlier section.
DEVELOPER_KNOWLEDGE_API_KEY=YOUR_DEVELOPER_KNOWLEDGE_KEY
Now, replace the agent.py code with the following:
import os
import logging
from dotenv import load_dotenv
from google.adk.agents import LlmAgent
from google.adk.tools.mcp_tool import McpToolset
from google.adk.tools.mcp_tool.mcp_session_manager import StreamableHTTPConnectionParams

# Setup logging to see the tool calls in action
logging.basicConfig(level=logging.INFO)
load_dotenv()
# Configuration Constants
DEVELOPER_KNOWLEDGE_MCP_URL = "https://developerknowledge.googleapis.com/mcp"
# Ensure you exported this in your shell or.env file
DEVELOPER_KNOWLEDGE_API_KEY = os.getenv("DEVELOPER_KNOWLEDGE_API_KEY")
if not DEVELOPER_KNOWLEDGE_API_KEY:
    raise ValueError("DEVELOPER_KNOWLEDGE_API_KEY not found. Please set it in your environment.")
# Initialize the Toolset
# We use StreamableHTTPConnectionParams for remote Google servers.
# The 'X-Goog-Api-Key' header is mandatory for the Developer Knowledge MCP server.
developerknowledge_toolset = McpToolset(
    connection_params=StreamableHTTPConnectionParams(
        url=DEVELOPER_KNOWLEDGE_MCP_URL,
        headers={
            "X-Goog-Api-Key": DEVELOPER_KNOWLEDGE_API_KEY
        }
    )
)
# Define the Agent
root_agent = LlmAgent(
    model="gemini-3-pro-preview",
    name="root_agent",
    instruction="""
    You are a Google Cloud Technical Lead.
        Always verify technical claims by searching the official documentation
        using the 'search_documents' tool before answering.
    """,
    tools=[developerknowledge_toolset]
)
Test the Agent App locally
From the existing terminal window and give the following command. Ensure that you are in the parent folder (my-agents) containing the devknowledge-agent folder.
adk web
A sample execution is shown below:
INFO:     Started server process [32205]
INFO:     Waiting for application startup.

+-----------------------------------------------------------------------------+
| ADK Web Server started                                                      |
|                                                                             |
| For local testing, access at http://127.0.0.1:8000.                         |
+-----------------------------------------------------------------------------+

INFO:     Application startup complete.
INFO:     Uvicorn running on http://127.0.0.1:8000 (Press CTRL+C to quit).
Click on the last link and it should bring up a web console to test out the Agent.
You should see the following launched in the browser as shown below:

You can now provide a sample prompt ( What is the difference between Cloud Run and Cloud Functions. Please cite the resources that you used to determine the answer). A sample run is shown below:

Notice that it invokes the tools and then provides the answer with the resources cited.

This concludes how you can integrate the MCP Server as a Tool in your agent written using the Agent Development Kit (ADK).Developing an Agent with ADK (Python)
Whats Possible? Ideas for Autonomous Agents
Let me state upfront that I used Gemini here to explore what kind of Autonomous agents we could build with not just the Developer Knowledge MCP Server but also in combination with other MCP Servers (BigQuery, etc).
Here are few ideas that you could potentially explore and see if you would like to implement them using the Developer Knowledge MCP Server. Please note that some of them might not be possible to implement without further hacks.
These scenarios focus on “agentic” workflows, where the AI actively monitors, analyzes, and improves your Google Cloud environment by grounding its decisions in official documentation.
1. The “Self-Healing” Incident Responder
The Problem: An error log appears in Cloud Logging (e.g., a 429 Quota Exceeded or a specific gRPC error code), and the on-call engineer has to scramble to find what it means.
The Agent: An autonomous agent that monitors critical log sinks.
Workflow:
- Observe: The agent detects a “Severity: ERROR” log entry via the BigQuery MCP Server (querying _AllLogs).
- Research: It extracts the specific error message (e.g., “Service ‘https://www.google.com/search?q=run.googleapis.com' is not enabled”) and queries the Developer Knowledge MCP Server: “troubleshoot Cloud Run error Service not enabled”.
- Resolve : The agent could possibly try to resolve. It retrieves the specific gcloud command to fix the issue from the documentation.
- Act: It either executes the fix (if permissioned) or posts a Slack message with the exact documentation link and the command to run.
2. The “Well-Architected” Reviewer (CI/CD Bot)
The Problem: Developers push Terraform or deployment configurations that “work” but violate Google Cloud’s recommended best practices (e.g., public GKE clusters, default service accounts).
The Agent: A GitHub/GitLab bot that runs on every Pull Request.
Workflow:
- Analyze: The agent parses the Terraform plan or deployment.yaml files.
- Cross-Reference: It identifies resources (e.g., google_storage_bucket) and queries the Knowledge MCP Server: "Google Cloud Storage security best practices blueprint".
- Audit: It compares the PR configuration against the official “Enterprise Foundations” guide retrieved from the docs.
- Report: It comments on the PR: “Warning: You are using uniform_bucket_level_access = false. According to the official security guide retrieved just now, this is not recommended for new buckets."
3. The “Deprecation” Watchdog
The Problem: Google Cloud APIs and SDKs evolve. Your code works today, but might rely on a field or method scheduled for deprecation in 6 months.
The Agent: A weekly scheduled agent that scans your codebase.
Workflow:
- Scan: The agent reads your requirements.txt (Python) or package.json (Node.js) and key API import statements.
- Investigate: It queries the Knowledge MCP Server for release notes: “Vertex AI SDK Python release notes deprecations 2025”.
- Alert: It detects that you are using vertexai.preview.language_models which the documentation says is moving to vertexai.generative_models.
- Propose: It opens a Jira ticket: “Upcoming Breaking Change detected in Vertex AI SDK. See migration guide here: [Link from Knowledge MCP].”
4. The “Cost-Aware” Architect
The Problem: Developers often pick a VM size or database instance type based on a guess, potentially over-provisioning.
The Agent: An optimization agent that analyzes current utilization vs. available options.
Workflow:
- Measure: The agent uses the GCE MCP Server to check the current machine type (e.g., n1-standard-4) and its average CPU utilization (via a metrics tool). Not sure if this is possible today with the GCE MCP Server but you get the drift.
- Consult: It queries the Knowledge MCP Server: “Compute Engine machine family comparison cost performance N1 vs E2 vs T2A”.
- Synthesize: It reads the “Machine Series Comparison” doc.
- Recommend: It reports: “You are using N1. The documentation indicates that the E2 series offers similar performance for 30% less cost for this workload type. Refer to the ‘General Purpose Machine Types’ doc.”
5. The “Readme” Generator & Onboarding Buddy
The Problem: Internal documentation goes stale. A new developer joins, tries to run the setup script, and it fails because the gcloud commands are outdated.
The Agent: An agent that refreshes project documentation automatically.
- Workflow:
- Context: The agent reads the project’s source code to understand which Google Cloud services are used (e.g., Pub/Sub, Cloud Functions).
- Retrieve: It queries the Knowledge MCP Server for the latest “Quickstart” guides for those specific services.
- Generate: It rewrites the README.md "Prerequisites" section. Instead of generic text, it inserts the current CLI commands: "To run this project locally, the documentation recommends installing the emulator: gcloud components install pubsub-emulator."
- Verify: It ensures the links in your documentation point to valid, live Google Cloud pages, not 404s.
6. The “IAM Rightsizing” Specialist
The Problem: Over-privileged Service Accounts are a top security risk. Developers often assign roles/editor because figuring out the exact granular permission (e.g., pubsub.topics.publish) for a specific API call is tedious.
The Agent: A security agent that refines permissions during the development lifecycle.
Workflow:
- Intercept: The agent scans a Terraform PR adding a new Service Account.
- Analyze: It looks at the code to see which API methods are being called (e.g., publisher.publish()).
- Map: It queries the Knowledge MCP Server: “What minimal IAM permission is required for the Pub/Sub Publish API method?”.
- Correct: It suggests replacing roles/pubsub.editor with roles/pubsub.publisher in the Terraform resource, citing the official IAM permissions reference page.
7. The “BigQuery Cost” Optimizer
The Problem: Users write SQL queries that scan full tables or use expensive operations like SELECT * on petabyte-scale datasets.
The Agent: A proactive SQL reviewer that runs before a scheduled query is deployed.
Workflow:
- Parse: The agent analyzes a proposed SQL query using the BigQuery MCP Server’s dry-run capability to estimate bytes processed.
- Identify: It detects a full table scan on a partitioned table.
- Consult: It queries the Knowledge MCP Server: “Best practices for querying partitioned tables in BigQuery to reduce cost”.
- Optimize: It rewrites the query to include a WHERE _PARTITIONDATE = … clause and presents the estimated cost savings to the user alongside the "Controlling Costs" documentation link.
8. The “Org Policy” Compliance Author
The Problem: Cloud Architects need to enforce governance (e.g., “No public IPs on VMs”), but finding the exact Constraint ID in the massive Organization Policy constraint list is difficult.
The Agent: A governance assistant that translates intent into policy code.
Workflow:
- Input: The architect tells the agent: “I want to prevent any VM from having an external IP address in the production folder.”
- Search: The agent queries the Knowledge MCP Server: “Organization Policy constraint restrict external IP Compute Engine”.
- Synthesize: It identifies the correct constraint: constraints/compute.vmExternalIpAccess.
- Generate: It outputs the exact gcloud resource-manager org-policies command or the equivalent Terraform google_org_policy_policy block to enforce this rule.
9. The “Disaster Recovery” Architect
The Problem: Teams deploy resources to a single region without realizing that some Google Cloud services offer multi-region or dual-region redundancy options that must be configured at creation time.
The Agent: A resiliency auditor.
Workflow:
- Audit: The agent checks a Cloud Storage bucket configuration and sees location = "US-CENTRAL1".
- Verify: It queries the Knowledge MCP Server: “Cloud Storage location types durability availability dual-region vs regional”.
- Assess: It reads the docs stating that dual-region buckets provide geo-redundancy.
- Nudge: It prompts the user: “This bucket is Regional. For your ‘Production_Backups’ workload, the documentation recommends Dual-Region to survive a regional outage. Would you like to switch to NAM4 (Dual-region)?"
10. The “Dependency Hell” Resolver (Java/Android)
The Problem: A developer is building a Java application using Google Cloud libraries but hits a NoSuchMethodError because of conflicting versions of Guava, gRPC, or Protobuf.
The Agent: A build-fixer agent.
Workflow:
- Diagnose: The agent captures the build error trace showing the version conflict.
- Research: It queries the Knowledge MCP Server: “Google Cloud Java BOM compatibility versions” or “Cloud Libraries BOM”.
- Solution: It learns about the “Google Cloud Libraries BOM” (Bill of Materials) which manages compatible versions for you.
- Refactor: It provides the Maven pom.xml or Gradle snippet to import the BOM, ensuring all Google Cloud client libraries are synchronized to a documented, compatible set.
Conclusion
The Developer Knowledge MCP Server acts as the upto date knowledge base for your agents. By grounding your AI in the official, ever-updating documentation, generative guessing might be a thing of the past. More importantly it creates the possibility of interesting use cases.
If you build an interesting use case using the Developer Knowledge MCP Server, do let me know.
Tutorial: Mastering the Google Developer Knowledge MCP Server was originally published in Google Cloud – Community on Medium, where people are continuing the conversation by highlighting and responding to this story.
Source Credit: https://medium.com/google-cloud/tutorial-mastering-the-google-developer-knowledge-mcp-server-172201f9a9cb?source=rss—-e52cf94d98af—4

 is Now Available in MCP Toolbox")


