![The Global Service Mesh [1/4]: Cloud Service Mesh & Cloud Run](https://cdn-images-1.medium.com/max/1024/1*iAewBZzSmujnCVIxaXoJ-w.png "The Global Service Mesh [1/4]: Cloud Service Mesh & Cloud Run")
In distributed systems architecture, “Regional” is often just a polite synonym for “Single Point of Failure.”
For years, creating truly high-availability (HA) internal connectivity between Cloud Run services meant stitching together complex VPC peering, VPNs, or settling for active-passive failover scripts.
Enter Cloud Service Mesh, the unified evolution of Traffic Director and Anthos Service Mesh. By leveraging the modern Service Routing API and native serverless integrations, we can build a true Global Service Mesh that allows Cloud Run services to communicate securely and reliably across regions using customised URLs.
In this article, we will move beyond the basics to cover the “hidden” requirements of a production mesh: DNS configuration, native backend integration, and Client-Side Load Balancing.
The “Old” World: Regional Silos
Before Cloud Service Mesh, if Service A in us-central1 needed to call Service B, it usually hit a private endpoint in us-central1.
If us-central1 went down:
- Service A breaks.
- Service B (replica in us-east1) sits idle because Service A doesn't know how to reach it.
- The Fix: You manually update DNS entries or redeploy Service A with a new URL.
These are manual operations disguised as DevOps.
The “New” World: Cloud Service Mesh
Cloud Service Mesh (CSM) provides a global control plane that manages reliable connectivity between your services.
For Cloud Run, CSM uses the Service Routing APIs (Mesh, Route, Gateway) to create a managed mesh.
Architecture
This is not a standard Load Balancer setup; this is Client-Side Load Balancing. The client itself decides where the traffic goes before the request even leaves the environment.
Key Technical Concepts:
- Mesh Resource: A logical boundary that contains your services.
- Service Routing: You define HTTPRoute resources that map a hostname (VIP) to one or more backend services.
- Global Reach: The mesh is global. A client in us-central1 can seamlessly talk to a backend in us-east1 if the local instance is unavailable or if traffic routing dictates it.
DNS vs. Virtual IP
One common misconception is that the Service Mesh replaces DNS. It does not, it relies on it.
When your code makes a request to http://orders.mesh, three distinct steps occur:
- DNS Resolution: Your application queries the VPC DNS. It returns a Virtual IP (VIP) (e.g., 10.0.0.5). This VIP doesn't belong to any specific server, it acts as a "trap" for traffic.
- Interception: The transparent Envoy proxy intercepts all traffic destined for 10.0.0.5.
- Routing: Envoy ignores the IP. It looks at the Host Header (orders.mesh), queries the Cloud Service Mesh control plane, and calculates the best actual backend IP to send the request to.
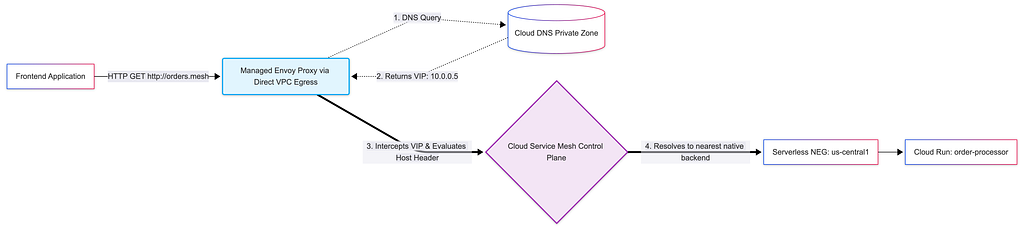
Without configuring a Private DNS Zone, your mesh is technically functional, but your applications can’t find it.
Hands-On: Configuring the Infrastructure
Let’s build the infrastructure. We will use the gcloud CLI to set up the Mesh, the native Serverless NEGs, the Global Mesh Backends, the DNS, and the Client.
1. Create the Mesh
First, we define the Mesh resource. This acts as the logical container for our service routing rules.
# mesh.yaml
name: global-mesh
gcloud network-services meshes import global-mesh \
  --source=mesh.yaml \
  --location=global
2. Configure the Regional Anchors (Serverless NEGs)
Because Cloud Service Mesh natively supports serverless environments, we don’t need to build complex internal load balancer bridges. We simply create a Serverless NEG for each of our regional Cloud Run deployments.
# -- US-CENTRAL1 ANCHOR --
gcloud compute network-endpoint-groups create order-neg-usc1 \
  --region=us-central1 \
  --network-endpoint-type=serverless \
  --cloud-run-service=order-processor

# -- US-EAST1 ANCHOR --
gcloud compute network-endpoint-groups create order-neg-use1 \
  --region=us-east1 \
  --network-endpoint-type=serverless \
  --cloud-run-service=order-processor
3. Configure the Global Mesh Backends
Now we tell Cloud Service Mesh about our endpoints. We create Global Backend Services using the INTERNAL_SELF_MANAGED scheme. This tells Google Cloud that these backends are part of the Service Mesh, rather than a standard Cloud Load Balancer.
Since we want to perform precise traffic splitting later, we will create two separate backend services and attach our respective NEGs to them.
# 1. Create the Global Mesh Backend for US-Central1
gcloud compute backend-services create order-mesh-backend-usc1 \
  --global \
  --load-balancing-scheme=INTERNAL_SELF_MANAGED

# Attach the US-Central1 NEG natively
gcloud compute backend-services add-backend order-mesh-backend-usc1 \
  --global \
  --network-endpoint-group=order-neg-usc1 \
  --network-endpoint-group-region=us-central1

# 2. Create the Global Mesh Backend for US-East1
gcloud compute backend-services create order-mesh-backend-use1 \
  --global \
  --load-balancing-scheme=INTERNAL_SELF_MANAGED

# Attach the US-East1 NEG natively
gcloud compute backend-services add-backend order-mesh-backend-use1 \
  --global \
  --network-endpoint-group=order-neg-use1 \
  --network-endpoint-group-region=us-east1
4. Define the Route & Traffic Split
With the native backends in place, we use an HTTPRoute to glue the vanity URL ( orders.mesh) to the Mesh Backends.
This is where the magic happens. We can mathematically split the traffic (e.g., 90% to us-central1 and 10% to us-east1) without touching the client application.
# http_route.yaml
name: "order-service-route"
hostnames:
  - "orders.mesh"
meshes:
  - "projects/YOUR_PROJECT_ID/locations/global/meshes/global-mesh"
rules:
  - action:
      destinations:
        # Route 90% of traffic to the US-Central1 native backend
        - serviceName: "projects/YOUR_PROJECT_ID/locations/global/backendServices/order-mesh-backend-usc1"
          weight: 90
        # Route 10% of traffic to the US-East1 native backend
        - serviceName: "projects/YOUR_PROJECT_ID/locations/global/backendServices/order-mesh-backend-use1"
          weight: 10
gcloud network-services http-routes import order-service-route \
  --source=http_route.yaml \
  --location=global
5. The Critical Step: Cloud DNS
Finally, for orders.mesh to resolve on the client side, we create a private zone and an A-record pointing to a Virtual IP (VIP). The Envoy proxy intercepts traffic sent to this VIP.
# Create the Private Zone
gcloud dns managed-zones create mesh-zone \
  --description="Private zone for Mesh Services" \
  --dns-name="mesh." \
  --visibility="private" \
  --networks="default"

# Map 'orders.mesh' to the Mesh VIP (e.g., 10.0.0.5)
gcloud dns record-sets transaction start --zone="mesh-zone"
gcloud dns record-sets transaction add "10.0.0.5" \
  --name="orders.mesh." \
  --ttl="300" \
  --type="A" \
  --zone="mesh-zone"
gcloud dns record-sets transaction execute --zone="mesh-zone"
The Client (Proxyless vs. Managed Sidecar)
How does the client (the Frontend) actually “speak” to this mesh? In Cloud Run, you have two choices depending on your application’s protocol.
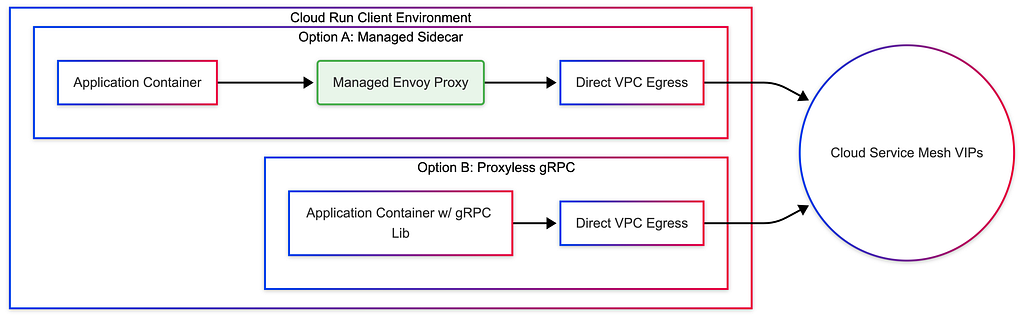
Option A: The Managed Sidecar (Universal & Zero-Config)
For standard HTTP/REST applications, Cloud Run now integrates natively with Cloud Service Mesh. You no longer need to manage complex multi-container bootstrap.yaml files.
When you deploy your Cloud Run service and attach it to your VPC, the platform automatically provisions a transparent, managed Envoy sidecar. Its resource footprint is incredibly small, and it transparently intercepts outbound requests to your mesh vanity URLs.
Option B: Proxyless gRPC (High Performance)
If your app is written in Go, Java, C++, or Python and uses gRPC, you can bypass the sidecar entirely. The gRPC library itself connects to Cloud Service Mesh natively via xDS APIs. This saves the microscopic cost and latency of the managed sidecar and is ideal for ultra-high-throughput microservices.
Hands-On: Deploying the Client
Since most users start with HTTP, we will rely on the Managed Sidecar approach. Our only requirement is that our Cloud Run service must have network egress access to the Virtual Private Cloud (VPC) where our DNS and Mesh reside.
We achieve this by using Direct VPC Egress.
gcloud run deploy frontend-service \
  --region=us-central1 \
  --image=us-docker.pkg.dev/my-project/app/frontend:latest \
  --service-account=YOUR_SERVICE_ACCOUNT_EMAIL \
  --network=default \
  --subnet=default \
  --vpc-egress=all-traffic
That’s it. No multi-container configurations. No Envoy image tags to track.
When your frontend code makes a request to http://orders.mesh, it routes through the Direct VPC Egress into the VPC network. The platform's managed proxy intercepts the DNS resolution to the VIP ( 10.0.0.5), checks the Cloud Service Mesh control plane, and instantly routes the packet to the correct native Serverless NEG based on your routing rules.
Global Traffic Splitting & Canary Deployments
The true power of this setup is not just connectivity, but absolute control. Because the proxy acts as a client-side load balancer, we can perform Global Canary Deployments without touching the application code or deploying heavy API gateways.
How the “Dice Roll” Works
When your frontend application makes an HTTP call to orders.mesh, the local proxy intercepts the request. Before the packet even leaves the client environment, it looks at the routing weights (90/10) downloaded from the Cloud Service Mesh control plane and performs a localized "dice roll."
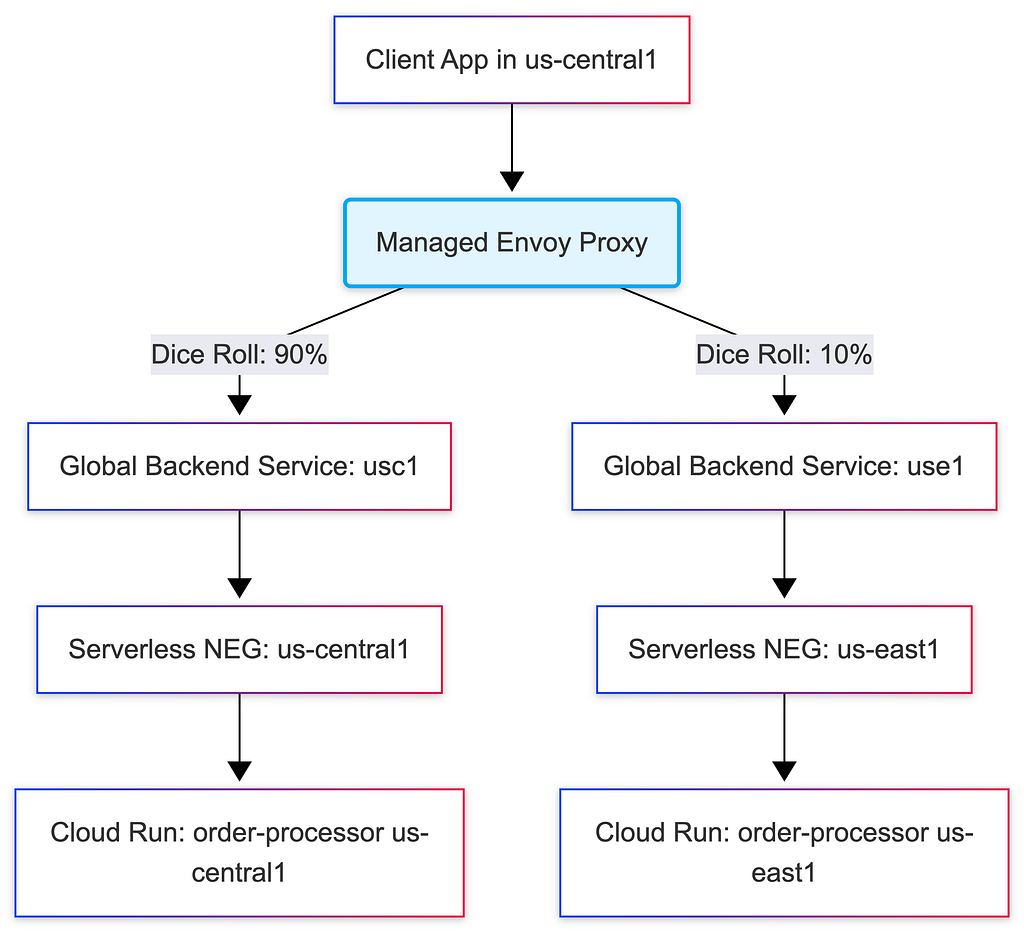
If it rolls for the 10%, it encapsulates the traffic and sends it directly across Google’s private backbone to the us-east1 Serverless NEG.
This creates a mathematically precise distribution of traffic across the globe. It prevents unnecessary cross-region hops (“tromboning”) and is completely invisible to your application logic.
Conclusion
We have moved past the era where “Region” was a hard boundary. By combining Cloud Run with Cloud Service Mesh through native Serverless NEGs, we stop treating our serverless infrastructure as a collection of isolated islands. Instead, we wire them into a single, global system.
You no longer deploy your frontend to call “us-central1”, your frontend calls the Mesh. The proxy layer and Google’s global control plane handle the routing, the precise traffic splitting, the regional failover, and the cross-environment bridging.
What’s Next? This was part 1 of our “Global Service Mesh” series. In the next post, we will dive deeper into Security, exploring how to use AuthorizationPolicy to enforce strict mTLS and service-to-service authentication rules across this platform-native global architecture.
References & Documentation
- Cloud Service Mesh Overview
- Service Routing APIs (Mesh & Route Resources)
- Serverless Network Endpoint Groups (NEGs)
- Cloud Run Direct VPC Egress
Originally published at https://lineargs.dev.
The Global Service Mesh [1/4]: Cloud Service Mesh & Cloud Run was originally published in Google Cloud – Community on Medium, where people are continuing the conversation by highlighting and responding to this story.
Source Credit: https://medium.com/google-cloud/the-global-service-mesh-1-4-cloud-service-mesh-cloud-run-416e6b1a6e18?source=rss—-e52cf94d98af—4


