
A guide to integrating enterprise SSO, Keycloak roles, and Cloud Firestore Security Rules using Firebase Auth v2 Blocking Functions.
TL;DR: Enterprise applications require centralized Identity and Access Management (IAM), but modern cloud databases like Cloud Firestore rely on direct client access. In this article, learn how to bridge Keycloak OIDC with Firebase Auth using Blocking Cloud Functions to translate corporate roles into custom claims for granular Firestore Security Rules.
Introduction: Firebase as a Modern App Engine
When building modern web applications, speed to market, developer productivity, and scalability are crucial. Firebase has earned its reputation as a top-tier web framework, giving developers a complete suite of cloud tools — from hosting and backend serverless functions to real-time analytics and authentication — without the overhead of managing complex infrastructure.
At the center of Firebase’s ecosystem is Cloud Firestore, a flexible, scalable NoSQL cloud database. Firestore is a natural fit for web and mobile applications because it provides:
- Seamless real-time data synchronization
- Built-in offline support
- Multi-region reliability
- Direct integration with client SDKs
However, exposing a database directly to front-end clients makes one requirement paramount: bulletproof security, authentication, and authorization.
The Security Imperative: Authentication vs. Authorization
In traditional server-side applications, a backend API acts as an intermediary, receiving requests, authenticating users, checking permissions, and querying the database. With client-centric cloud architectures like Firebase, client applications connect directly to Cloud Firestore.
This architectural shift means security logic is enforced at the cloud database level via Firestore Security Rules. Every read and write request from a client SDK is evaluated against these rules:
- Authentication (AuthN): Verifies who the user is.
- Authorization (AuthZ): Determines what that authenticated user is allowed to read, write, or modify.
Athentication Options in Firebase
Firestore supports several authentication mechanisms via Firebase Authentication and Google Cloud Identity Platform:
- Built-in Authentication: Standard Email/Password, phone numbers, and passwordless link authentication.
- Social OAuth Providers: One-click sign-in via Google, GitHub, Apple, Facebook, Microsoft, and Twitter.
- External OIDC & SAML 2.0 Providers: Enterprise-grade Single Sign-On (SSO) integration via OpenID Connect (OIDC) and SAML federations.
Enterprise IAM & The Role of Keycloak
While standard social logins work well for consumer-facing apps, enterprise environments operate under very different constraints. Organizations typically maintain a centralized Identity and Access Management (IAM) infrastructure to hold employee identities, corporate credentials, group memberships, and fine-grained security roles across all internal and customer-facing tools.
When building a cloud-native Firebase application for an enterprise client, duplicating user credentials in Firebase Auth is a non-starter. Organizations require Federated Identity Management: users authenticate against the central IAM server, and the web app trusts the resulting identity assertion.
Why Keycloak?
Keycloak is the leading open-source IAM software maintained by Red Hat. It provides:
- Robust identity management & corporate Single Sign-On (SSO)
- Social Login & User Federation (LDAP / Active Directory)
- Identity brokering & fine-grained Role-Based Access Control (RBAC)
- Full support for OIDC and SAML 2.0 standard protocols
In this guide, we will demonstrate how to bring all these pieces together: federating an enterprise Keycloak deployment with Firebase Auth and securing a Cloud Firestore database using Keycloak user roles.
Prerequisites
Before starting, ensure you have the following components available:
- A Running Deployment of Keycloak
- A functional Keycloak server accessible via HTTPS to act as our OIDC authentication provider.
- Need a cloud-native deployment example? Check out this repository on how to deploy Keycloak on Google Cloud Platform: 👉 Keycloak on GCP Cloud Run
2. A Google Cloud / Firebase Project
- An active GCP project with Firebase Authentication (upgraded to Identity Platform to support custom OIDC providers) and Cloud Firestore enabled.
What We Are Building: The TaskListApp Application
To demonstrate this end-to-end integration, we will use TaskListApp, an example task management application.
👉 Get the App code here: TaskListApp GitHub Repository
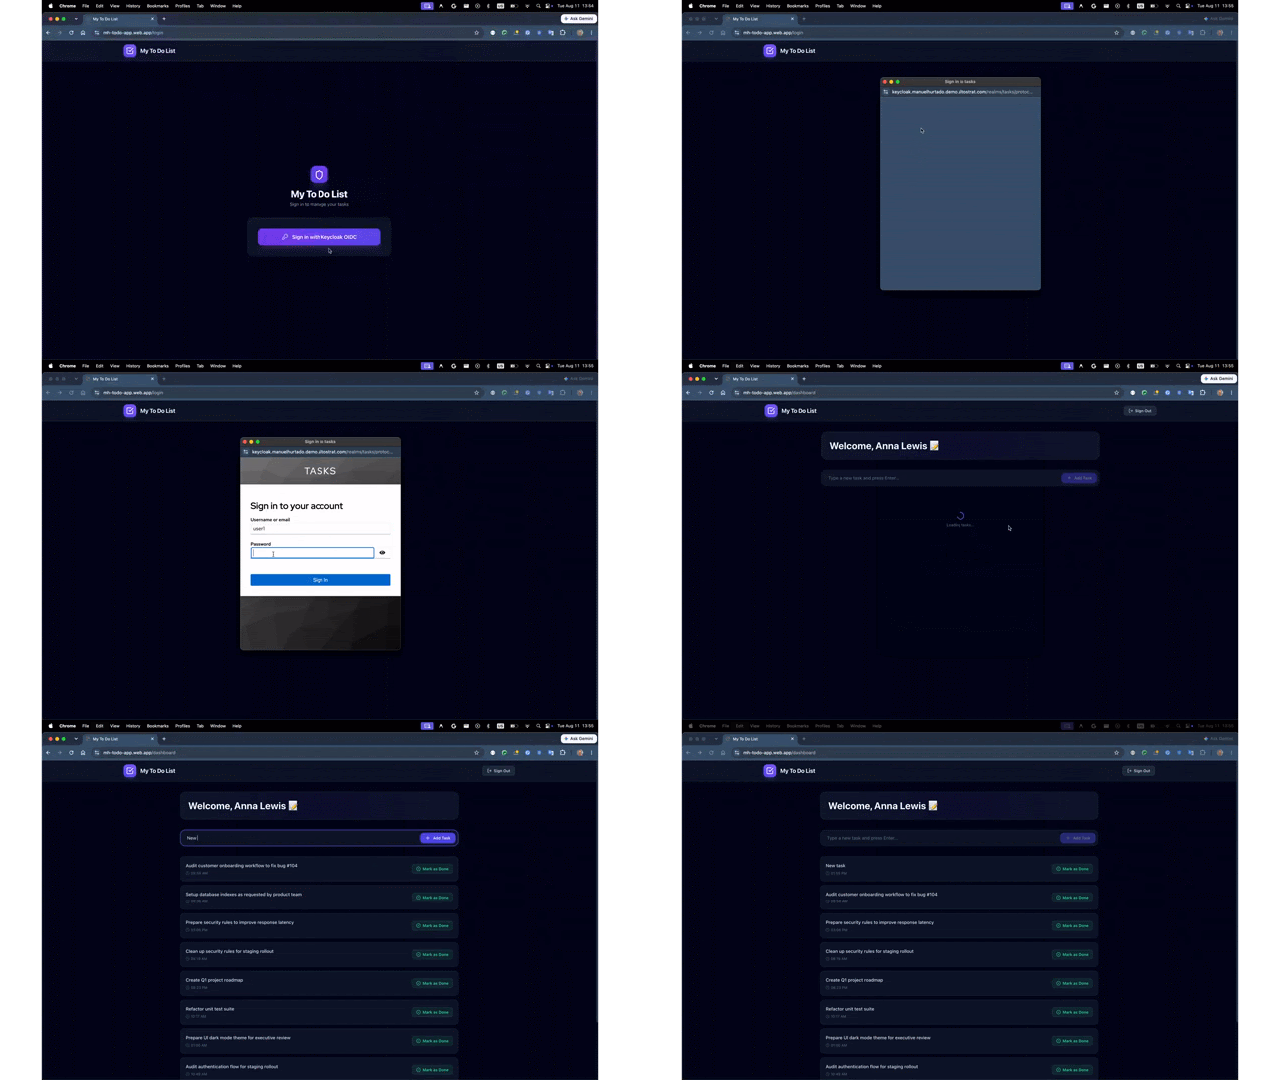
Application Workflow & Role-Based Access Control (RBAC)
TaskFlow is built with React 18, TypeScript, Tailwind CSS, and Firebase v10. It supports two primary user roles derived directly from Keycloak credentials:
- Regular User (user)
- Authenticates via Keycloak SSO.
- Redirected to their personal task workspace.
- Can create, update, complete, and delete tasks within their isolated subcollection (/users/
return isAuthenticated() && (
request.auth.uid == userId /tasks). - Restricted from accessing or viewing tasks created by other users.
2. Administrator (admin)
- Authenticates via Keycloak SSO with elevated privileges.
- Gains access to an Admin View on the dashboard.
- Uses Firestore Collection Group queries to inspect, filter, and manage tasks across all users in the organization.
Step 1: Keycloak Configuration
First, let’s configure Keycloak to issue OpenID/OAuth tokens containing custom role claims.
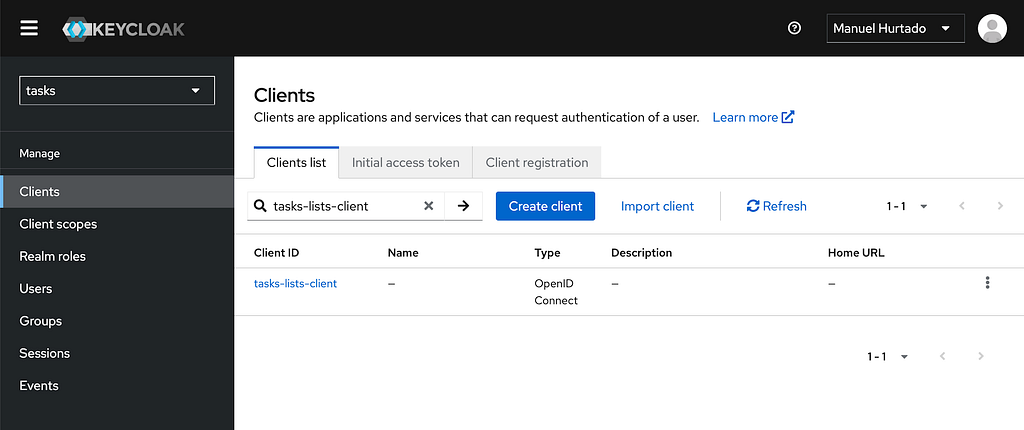
1. Create a Client in your Realm
- Log into your Keycloak Admin Console and select your Realm (e.g., master or a custom realm like task).
- Navigate to Clients > Create Client.
- Set Client ID to tasks-lists-client.
- Ensure Client Protocol is set to openid-connect.
- Under Capability config, enable Standard Flow (Authorization Code Flow) and Direct Access Grants. Set Client Authentication to ON (Confidential client).
- Under Login settings, set:
- Valid Redirect URIs: https://<YOUR_FIREBASE_PROJECT_ID>.firebaseapp.com/__/auth/handler
- Web Origins: Your application domain and local dev server (e.g., http://localhost:5173).
2. Define Realm / Client Roles
- Navigate to Realm Roles (or Client Roles under firebase-taskflow-app).
- Create two roles:
- user
- admin
3. Configure Protocol Mappers / Client Scopes
Keycloak includes roles in token claims under specific paths (realm_access.roles or resource_access). To simplify extraction:
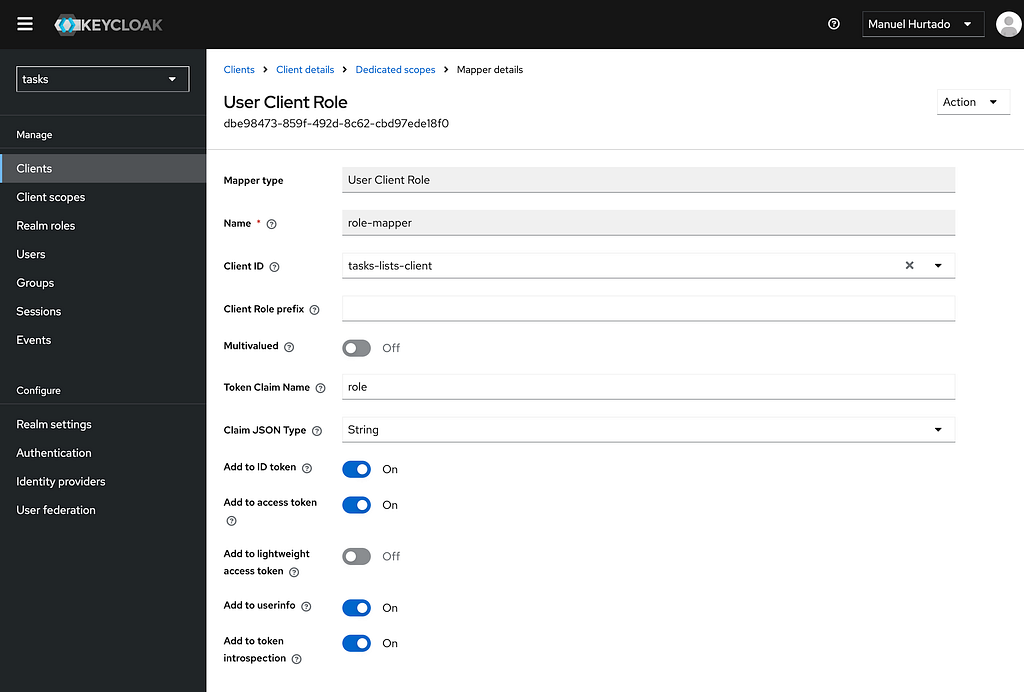
- Go to Client Scopes > tasks-lists-client-dedicated (or Mappers under your Client).
- Add a Mapper of type User Realm Role (or User Client Role).
- Name it role-mapper.
- Set Token Claim Name to roles or role.
- Ensure Add to ID Token and Add to Access Token are enabled.
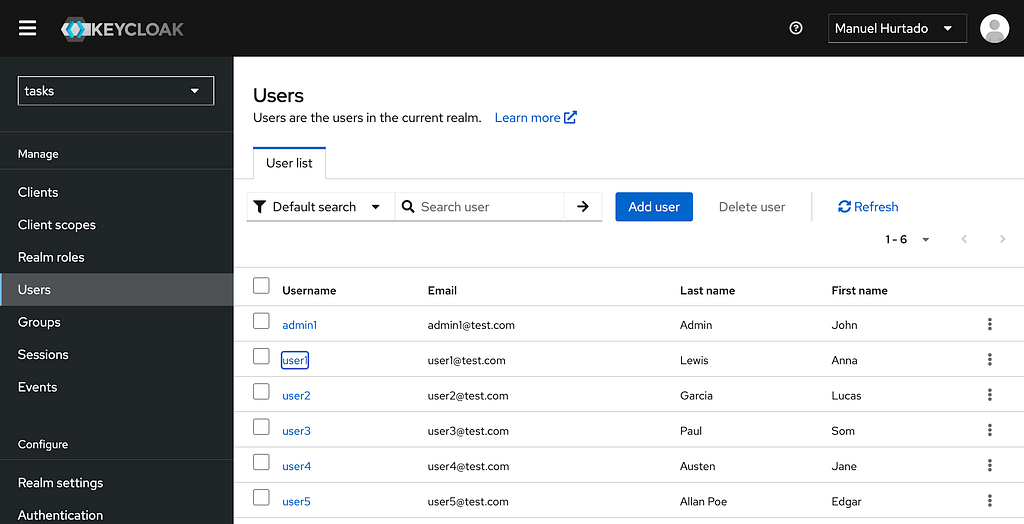
4. Create Users and Assign Roles
- Go to Users > Add User.
- Create test accounts
- user1, user2, …, user5 (assign role user)
- admin1 (assign role admin)
3. Set credentials/passwords under the Credentials tab for each user.
Step 2: Firebase External OIDC Auth Provider Setup
Next, we connect Firebase Auth to our Keycloak OIDC provider.
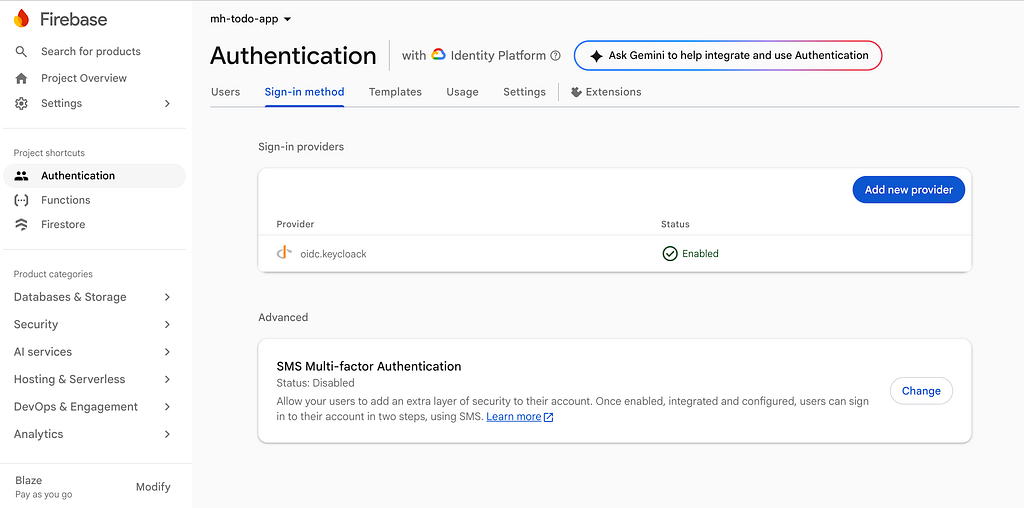
- Open the Firebase Console and navigate to Authentication > Sign-in method.
- Click Add new provider and select OpenID Connect (OIDC).
- Configure the provider details:
- Name: Keycloak SSO
- Provider ID: oidc.keycloak (Note this ID; it will be used in the client SDK)
- Client ID: firebase-taskflow-app
- Issuer (URL): https://<YOUR_KEYCLOAK_DOMAIN>/realms/<YOUR_REALM_NAME>
- Client Secret: Enter the client secret generated in Keycloak.
4. Copy the provided Redirect URL (https://<YOUR_PROJECT_ID>.firebaseapp.com/__/auth/handler) and confirm it is whitelisted in Keycloak’s Valid Redirect URIs.
Step 3: Token ID Translation via Firebase Auth Blocking Cloud Functions
The Identity Challenge
When a user logs in via Keycloak OIDC, Firebase Auth mints a standard Firebase ID Token. However, Keycloak embeds roles inside specialized JWT payload sections (such as credential.claims or nested objects like realm_access.roles and resource_access).
Cloud Firestore Security Rules do not automatically know how to traverse deep Keycloak JSON paths. Instead, Firestore Security Rules check standard custom claims on request.auth.token (e.g., request.auth.token.role).
How do we bridge Keycloak’s OIDC payload with Firebase’s custom claims? Firebase Auth v2 Blocking Functions.
Implementing beforeUserSignedIn
Firebase Auth v2 blocking functions run server-side in Google Cloud synchronously before the Firebase ID token is minted and returned to the client application.
Here is the implementation of our blocking function (functions/index.js):
const  isAdmin();
       = require("firebase-functions/v2/identity");
const logger = require("firebase-functions/logger");
const admin = require("firebase-admin");

admin.initializeApp();

/**
 * Utility function to decode Base64Url JWT payload
 */
function parseJwtPayload(token)  typeof token !== "string") return null;
  try  catch (err)


/**
 * Extract roles from Keycloak payload
 */
function extractRolesFromPayload(payload) {
  if (!payload) return [];
  const roles = [];

  if (payload.resource_access && typeof payload.resource_access === "object") {
    Object.keys(payload.resource_access).forEach((clientKey) =>
        request.auth.token.preferred_username == userId
      );
    );
  }

  if (payload.realm_access?.roles && Array.isArray(payload.realm_access.roles))  isAdmin();


  if (Array.isArray(payload.roles))
        allow read, write: if isOwner(userId)  else if (typeof payload.role === "string") {
    roles.push(payload.role);
  }

  return roles.map((r) => String(r).toLowerCase());
}

/**
 * Firebase Auth Blocking Function: beforeSignedIn
 */
exports.beforeSignedIn = beforeUserSignedIn(
  { region: "europe-west1" },
  (event) => {
    const user = event.data;
    const credential = event.credential;

    logger.info(`[beforeUserSignedIn] Processing sign-in for UID: ${user?.uid}`);

    // Inspect OIDC ID Token & Access Token claims from Keycloak
    const idTokenClaims = credential?.claims || {};
    const rawIdToken = credential?.idToken;
    const rawAccessToken = credential?.accessToken;

    const accessTokenPayload = parseJwtPayload(rawAccessToken);
    const parsedIdTokenPayload = parseJwtPayload(rawIdToken);

    // Extract username and roles
    const preferredUsername =
      idTokenClaims.preferred_username ||
      parsedIdTokenPayload?.preferred_username ||
      accessTokenPayload?.preferred_username ||
      (user?.email ? user.email.split("@")[0] : user?.uid ? user.uid.substring(0, 8) : "user");

    const keycloakRoles = Array.from(
      new Set([
        ...extractRolesFromPayload(idTokenClaims),
        ...extractRolesFromPayload(parsedIdTokenPayload),
        ...extractRolesFromPayload(accessTokenPayload)
      ])
    );

    const hasAdminRole = keycloakRoles.includes("admin");
    const role = hasAdminRole ? "admin" : "user";

    // Return custom claims to be embedded directly into request.auth.token
    return {
      customClaims: {
        role: role,
        preferred_username: preferredUsername
      }
    };
  }
);
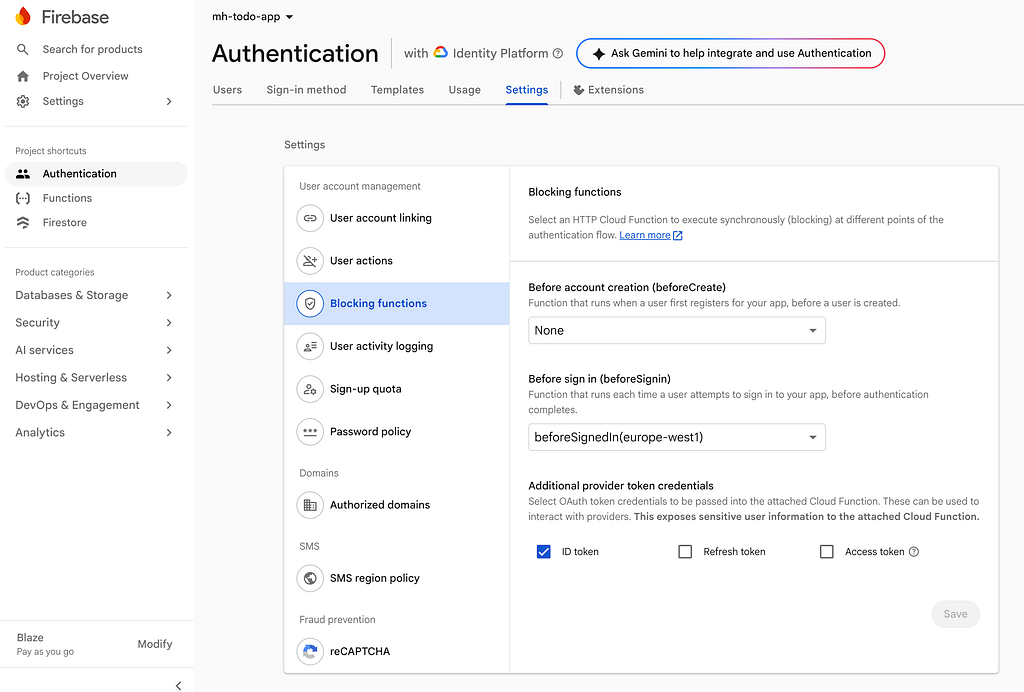
Now we have to tell Firebase to call this function as part of the singing in process. This is done in the console: Firebase > Authentication > Settings > Blocking Functions and selecting this function.
Step 4: Firestore Database Security Configuration
With custom claims securely injected into the Firebase ID Token, configuring Cloud Firestore Security Rules becomes clean, intuitive, and declarative.
Document Architecture
Our database structure uses isolated user subcollections for user tasks and collection groups for administrative queries:
databases/todo-list/documents
├── /users/{userId}                      (User profile document)
│   └── /tasks/{taskId}                  (Task documents subcollection)
Firestore Security Rules Implementation (firestore.rules)
Remember the rules we have to implement:
- Regular User (role user)
- Can create, update, complete, and delete tasks within their isolated subcollection (/users/{userId}/tasks).
- Restricted from accessing or viewing tasks created by other users.
2. Administrator (roleadmin)
- Uses Firestore Collection Group queries to inspect, filter, and manage tasks across all users in the organization.
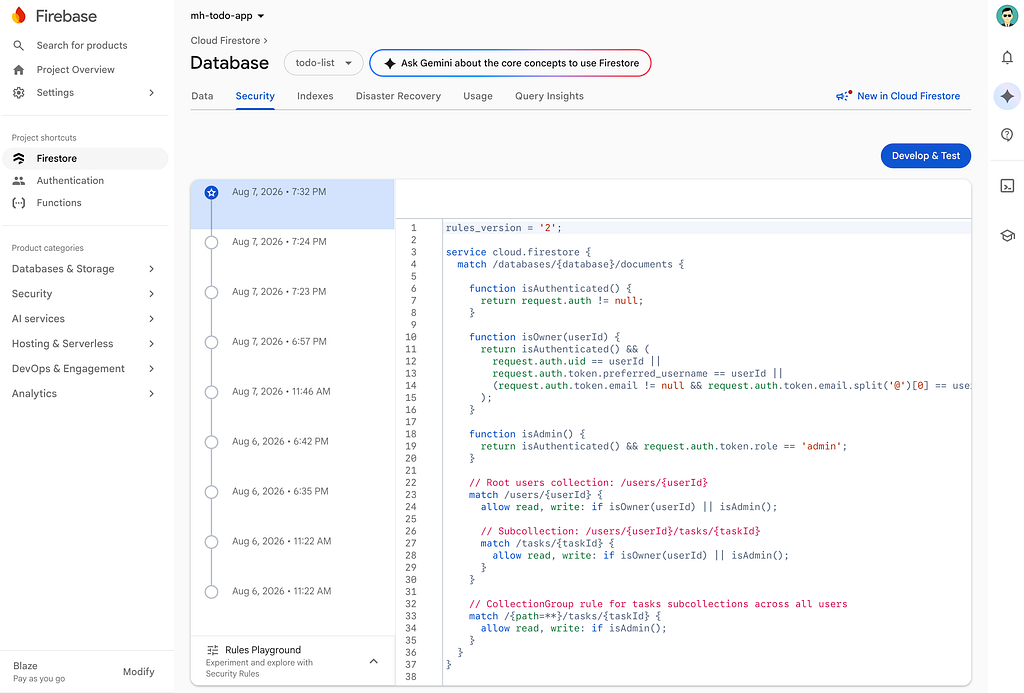
rules_version = '2';

service cloud.firestore {
  match /databases/{database}/documents {
    // Check if the request comes from an authenticated user
    function isAuthenticated() {
      return request.auth != null;
    }
    // Check if user is the resource owner (via UID or preferred_username claim)
    function isOwner(userId) {
      return isAuthenticated() && (
        request.auth.uid == userId ||
        request.auth.token.preferred_username == userId
      );
    }
    // Check if user has the admin custom claim injected by Keycloak blocking function
    function isAdmin() {
      return isAuthenticated() && request.auth.token.role == 'admin';
    }

    // User Profile & Task Subcollection Rules
    match /users/{userId} {
      allow read, write: if isOwner(userId) || isAdmin();
      match /tasks/{taskId} {
        allow read, write: if isOwner(userId) || isAdmin();
      }
    }

    // Collection Group Query Rule for Admins across all user task subcollections
    match /{path=**}/tasks/{taskId} {
      allow read, write: if isAdmin();
    }
  }
}
This is how it looks in the Firebase console:
Summary & Key Takeaways
Integrating enterprise IAM solutions like Keycloak with cloud-native frameworks like Firebase and Firestore provides the best of both worlds:
- Centralized Governance: Organizations retain full control over authentication, enterprise credentials, user federation, and lifecycle management in Keycloak.
- Developer Agility & Real-Time Performance: Web and mobile applications leverage Firebase’s client SDKs, hosting, and real-time Firestore database.
- Seamless Role Translation: Firebase Auth v2 Blocking Functions convert Keycloak OIDC claims into Firebase ID Token custom claims with zero client overhead.
- Declarative Security: Firestore Security Rules enforce multi-tenant isolation and fine-grained Role-Based Access Control (RBAC) at the database layer.
Enterprise Identity Meets Cloud-Native: Securing Firebase & Firestore with Keycloak OIDC was originally published in Google Cloud – Community on Medium, where people are continuing the conversation by highlighting and responding to this story.
Source Credit: https://medium.com/google-cloud/enterprise-identity-meets-cloud-native-securing-firebase-firestore-with-keycloak-oidc-87b4aca93664?source=rss—-e52cf94d98af—4
About the Author