
Putting a “Principal ADK Engineer” in every developer’s laptop
Introduction
In this tutorial, we’ll build a complete multi-agent customer support system in about an hour. Not a prototype or a demo: a production-ready system with CI/CD, comprehensive testing, and cloud deployment. The kind of project that would normally take a few weeks to scaffold properly.
Here’s what we’ll end up with:
- Multi-agent orchestration with intelligent routing
- Production deployment to Vertex AI Agent Engine
- Unit tests, integration tests, and evaluation datasets
- Full CI/CD pipeline with staging and production environments
- Cloud observability with tracing and logging
The approach? We’ll barely write any code ourselves. Instead, we’ll use ADK Dev Skills to turn our AI coding assistant into an expert ADK (Google Agent Development Kit) developer who knows exactly what to build and how to build it right.
Let’s see how this works! (Video tutorial below for anyone interested)
https://medium.com/media/8215a0be27d75279554e5cde6ec81916/href
What Are ADK Dev Skills?
ADK Dev Skills are pre-built knowledge modules that give AI coding assistants deep expertise in specific domains. When we install them, our AI assistant stops guessing about ADK APIs and starts giving us correct, production-ready code.
Think of it this way: instead of our AI assistant reading generic documentation and trying to piece together how ADK works, it has direct access to the actual patterns, APIs, and best practices that the ADK team recommends.
This solves some real problems:
- The AI stops hallucinating non-existent ADK APIs
- We don’t need to constantly look up documentation
- We get consistent patterns across our codebase
- Evaluation and deployment configs just work
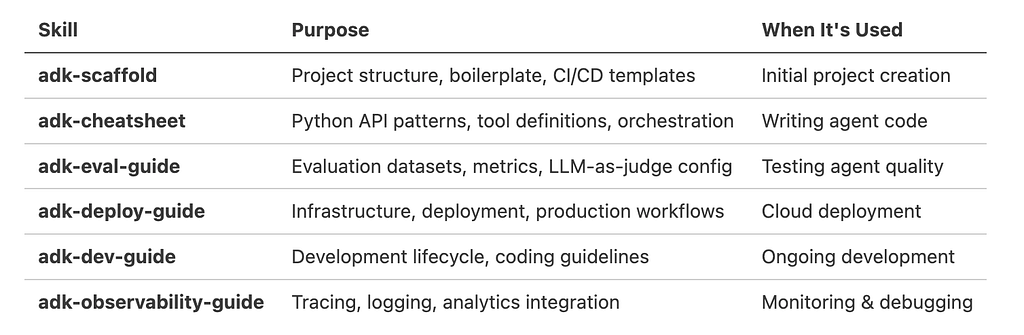
Available Skills
Compatibility
These skills work with any AI coding tool that supports the Skills Protocol. They work with Gemini CLI, Claude Code, Cursor, Antigravity, and other compatible tools.
Prerequisites
Before we start, we’ll need:
# Required tools
- Node.js (for npx)
- Python 3.10+
- uv package manager (pip install uv)
- Google Cloud SDK (gcloud)
- An active GCP project with billing enabled
Let’s set up our GCP project:
gcloud config set project YOUR_PROJECT_ID
gcloud auth application-default login
Step 1: Install ADK Dev Skills
First, install the skills globally so they’re available in all your projects:
npx skills add google/adk-docs/skills -y -g
This downloads the 6 ADK skills from Google’s repository and makes them available to our AI assistant. The -g flag means global installation, and -y just auto-confirms the prompt.
Let’s verify it worked:
npx skills list
We should see all 6 ADK skills listed. Once they’re installed, any compatible AI assistant can use them.
Step 2: Define Your Requirements
Let’s start by telling our AI assistant what we’re trying to build. Be specific about the features we need.
Here’s what we’ll ask for:
I need to build a Retail Returns multiagent system using ADK.

Requirements:
- Check order status by order ID
- Process refunds for delivered orders
- Multi-agent architecture with routing
- Production deployment to Agent Engine
The AI will use the adk-scaffold skill to figure out the right project structure and create a design spec.
Step 3: Generate Project Scaffolding
Next, ask the AI to create the project structure:
Use adk-scaffold to create this project with:
- Agent Engine deployment target
- GitHub Actions CI/CD
- No datastore needed (we'll use mock data)
The AI runs the agent-starter-pack (repo here) scaffolding command with the right parameters and generates everything:
retail-returns/
├── app/                    # Our agent code
├── tests/                  # Unit, integration, eval tests
├── .github/workflows/      # CI/CD pipelines
├── deployment/terraform/   # Infrastructure as code
├── notebooks/              # Jupyter notebooks
└── Makefile               # Common development commands
It also sets up pyproject.toml with the right dependencies and configures deployment metadata.
The nice thing here is we don’t need to remember the agent-starter-pack command syntax or know which deployment target to pick. The skill has that knowledge built in.
Step 4: Implement Business Logic
Now for the actual agent code. Let’s tell the AI what tools we need:
Add tools for:
1. check_order_status(order_id: str) -> dict
2. process_refund(order_id: str) -> dict

Use mock data with 3 sample orders. Refunds only work for delivered orders.
The AI uses adk-cheatsheet to write proper ADK code. Here’s what we get:
app/tools.py:
# Mock database
ORDERS = {
    "12345": {"status": "shipped", "total": 45.99, "items": ["T-shirt"], "refunded": False},
    "67890": {"status": "delivered", "total": 120.50, "items": ["Shoes", "Socks"], "refunded": False},
}

async def check_order_status(order_id: str) -> dict:
    """Checks order status and details."""
    if order_id in ORDERS:
        return {"status": "success", "order": ORDERS[order_id]}
    return {"status": "error", "message": f"Order {order_id} not found."}
async def process_refund(order_id: str) -> dict:
    """Processes refund with validation."""
    if order_id not in ORDERS:
        return {"status": "error", "message": f"Order {order_id} not found."}
    order = ORDERS[order_id]
    if order["status"] != "delivered":
        return {"status": "error", "message": "Order must be delivered"}
    if order["refunded"]:
        return {"status": "error", "message": "Already refunded"}
    order["refunded"] = True
    return {"status": "success", "transaction_id": f"REF-{order_id}-123"}
app/agent.py with multi-agent architecture:
from google.adk.agents import Agent
from google.adk.apps import App
from google.adk.models import Gemini

def create_status_agent() -> Agent:
    return Agent(
        name="status_agent",
        model=Gemini(model="gemini-3-flash-preview"),
        instruction="Look up orders using check_order_status tool.",
        tools=[check_order_status],
    )
def create_refund_agent() -> Agent:
    return Agent(
        name="refund_agent",
        model=Gemini(model="gemini-3-flash-preview"),
        instruction="Verify order is delivered before processing refund.",
        tools=[check_order_status, process_refund],
    )
root_agent = Agent(
    name="triage_agent",
    model=Gemini(model="gemini-3-flash-preview"),
    instruction="Route requests to status_agent or refund_agent.",
    sub_agents=[create_status_agent(), create_refund_agent()],
)
app = App(name="retail_returns_app", root_agent=root_agent)
Notice a few things here:
- It used factory functions for sub-agents, which is the recommended pattern
- The imports are correct (google.adk.agents, google.adk.models)
- It set up the orchestration properly with a parent agent and sub_agents
- Validation logic is both in the instructions and the tool code itself
Without adk-cheatsheet, we’d probably spend time figuring out the right way to structure this. The skill just knows.
Step 5: Test Locally
Before deploying anything, test it locally:
Let's test this locally
This runs the install and playground commands:
cd retail-returns
make install
make playground
The ADK web interface starts on localhost:8501. We can chat with our agent and try different scenarios:
- “Where is my order #12345?”
- “Can I get a refund for order #67890?”
- “Refund order #99999” (this one should fail gracefully)
Step 6: Create Evaluations
Manual testing is fine for development, but you need automated evaluations for production. Ask the AI to create them:
Create an evaluation to test invalid order handling
Using adk-eval-guide, it generates proper evaluation datasets:
tests/eval/evalsets/invalid_orders.evalset.json:
{
  "eval_set_id": "invalid_orders",
  "eval_cases": [
    {
      "eval_id": "invalid_status_check",
      "conversation": [
        {"user_content": {"parts": [{"text": "What's the status of order #99999?"}]}}
      ],
      "expected_tool_calls": [
        {"tool_name": "check_order_status", "args": {"order_id": "99999"}}
      ]
    },
    {
      "eval_id": "invalid_refund",
      "conversation": [
        {"user_content": {"parts": [{"text": "I want a refund for order #88888"}]}}
      ]
    }
  ]
}
tests/eval/eval_config.json:
{
  "criteria": {
    "tool_trajectory_avg_score": {
      "threshold": 1.0,
      "match_type": "IN_ORDER"
    },
    "final_response_match_v2": {
      "threshold": 0.8,
      "judgeModelOptions": {"judgeModel": "gemini-3-flash-preview"}
    }
  }
}
Run the evaluations:
make eval
Output:
Tests passed: 2
Tests failed: 0
The skill knows the right evalset schema, applies the appropriate metrics (tool trajectory scoring for tool calls, LLM-as-judge for responses), and sets reasonable thresholds. We didn’t need to read any documentation about how ADK evaluations work.
Step 7: Deploy to Production
Once testing looks good, let’s deploy to Agent Engine:
Deploy this to Agent Engine
The AI uses adk-deploy-guide to run the deployment:
# Export dependencies
uv export --no-hashes > app/app_utils/.requirements.txt

# Deploy to Vertex AI
uv run -m app.app_utils.deploy \
  --source-packages=./app \
  --entrypoint-module=app.agent_engine_app \
  --entrypoint-object=agent_engine \
  --requirements-file=app/app_utils/.requirements.txt
This packages our code, uploads it to Google Cloud, and provisions a Reasoning Engine instance. We’ll get back an Engine ID (something like 2484736849587732480). The deployment takes 5-10 minutes while it builds the container and provisions infrastructure.
Let’s test it:
import vertexai

client = vertexai.Client(project="YOUR_PROJECT", location="us-central1")
agent = client.agent_engines.get(name="ENGINE_ID")
async for event in agent.async_stream_query(
    message="Where is order #12345?",
    user_id="test"
):
    print(event)
Step 8: Set Up CI/CD
For a production system, we need automated testing and deployment:
Set up CI/CD with GitHub Actions
The AI generates three GitHub Actions workflows:
1. PR Checks (.github/workflows/pr_checks.yaml)
- Runs on every Pull Request
- Executes unit + integration tests
- Blocks merge if tests fail
2. Staging Deployment (.github/workflows/staging.yaml)
- Triggers on merge to main
- Deploys to staging environment
- Runs load tests
- Uploads results to GCS
3. Production Deployment (.github/workflows/deploy-to-prod.yaml)
- Requires manual approval
- Deploys to production environment
- Same validation as staging
Infrastructure setup:
uvx agent-starter-pack setup-cicd \
  --staging-project YOUR_STAGING_PROJECT \
  --prod-project YOUR_PROD_PROJECT \
  --repository-name YOUR_REPO \
  --repository-owner YOUR_GITHUB_USER \
  --auto-approve
This provisions:
- Workload Identity Federation (secure, keyless auth)
- Service accounts with proper IAM roles
- GitHub secrets configuration
Step 9: Observability
Let’s check on observability:
How's observability configured?
The AI (using adk-observability-guide) explains what’s already set up:
Built-in (No Configuration Needed)
Cloud Trace — Distributed tracing
- Automatic instrumentation via OpenTelemetry
- Tracks: agent invocation → LLM calls → tool execution
- View in GCP Console → Trace explorer
Prompt-Response Logging — Privacy-preserving by default
- Mode: NO_CONTENT (metadata only, no PII)
- Logs: token counts, latency, model names
- Upload path: gs://BUCKET_NAME/completions
Optional Integrations
BigQuery Agent Analytics:
# Add to app/agent.py
from google.adk.plugins import BigQueryAgentAnalyticsPlugin

app = App(
    root_agent=root_agent,
    plugins=[BigQueryAgentAnalyticsPlugin(dataset="agent_analytics")]
)
Third-party platforms:
- AgentOps (session replay)
- Phoenix/Arize (open-source tracing)
- Freeplay, Weave, MLflow
The adk-observability-guide has instructions for all of these if you want to add them.
Step 10: Write Tests for Production
We need tests that run against the actual deployed agent:
Create integration tests that hit the deployed agent
The AI generates tests/integration/test_remote_agent.py:
import pytest
import requests
import subprocess

def get_access_token():
    result = subprocess.run(
        ["gcloud", "auth", "print-access-token"],
        capture_output=True, text=True
    )
    return result.stdout.strip()
@pytest.mark.integration
def test_valid_order_status():
    """Test order lookup on deployed agent."""
    token = get_access_token()
    response = requests.post(
        f"https://us-central1-aiplatform.googleapis.com/v1/projects/{PROJECT_NUM}/locations/us-central1/reasoningEngines/{ENGINE_ID}:streamQuery",
        headers={"Authorization": f"Bearer {token}"},
        json={"input": {"message": "Where is order #12345?", "user_id": "test"}}
    )
    assert response.status_code == 200
    text = "".join(event.get("text", "") for event in response.json())
    assert "shipped" in text.lower()
    assert "45.99" in text
Run against production:
pytest tests/integration/test_remote_agent.py
Before and After
Without Skills
The traditional approach:
- Read through ADK documentation
- Look up deployment examples
- Figure out the Agent Engine APIs
- Research how to do evaluations properly
- Set up CI/CD for AI agents (not well documented)
- Trial and error with observability
- Write all the boilerplate yourself
- Debug import errors and API mismatches
Time investment: probably 2–3 weeks if you’re new to this, 3–5 days if you’re experienced.
With Skills
What we actually did:
- Installed skills once
- Described what we wanted
- Let the AI generate it
- Reviewed and tested the code
Time investment: about an hour.
Best Practices and Tips
1. Install Skills Globally
npx skills add google/adk-docs/skills -y -g
Use the -g flag so the skills are available in all our projects, not just the current one.
2. Be Specific in Prompts
Vague prompts like “Build an agent” don’t give the AI enough to work with. Better: “Build a customer support agent with order lookup and refund processing, using multi-agent architecture”
3. Leverage the Right Skill for Each Phase

4. Iterate with Evaluations
Run make eval frequently, not just at the end. After each major change, run the evaluations to catch regressions. Use make eval-all to run all evaluation sets.
5. Review Generated Code
The skills make the AI competent at ADK, but we still need to review what it generates:
- Check that agent instructions are clear
- Verify tool validation logic makes sense
- Make sure the model choices are appropriate
- Confirm business rules are correctly implemented
6. Use Version Control
Let’s initialize a git repo early:
git init
git add .
git commit -m "Initial scaffold from ADK Dev Skills"
This way we can see exactly what the AI generated and track our changes over time.
Common Questions
Do we need to learn ADK first?
Basic understanding helps, but the skills reduce the learning curve significantly. We can be productive pretty quickly.
Can we modify the generated code?
Yes. The code is ours. Treat it as a starting point and modify whatever we need.
Will this work with different AI assistants?
If it supports the Skills Protocol, yes. Works with Gemini CLI, Claude Code, Cursor, and Antigravity.
What if we want to deploy to Cloud Run instead?
Just ask. The adk-deploy-guide skill covers multiple deployment targets.
Can we create our own skills?
Yes. Skills are just markdown files with structured information. We can create company-specific ones.
How do we update the skills?
Re-run the install command:
npx skills add google/adk-docs/skills -y -g
What We Built
In about an hour, we created:
- Production-ready multi-agent system with intelligent routing
- Two custom tools with validation logic
- Unit tests for business logic
- Integration tests for agent behavior
- Evaluation datasets with LLM-as-judge scoring
- Deployed agent on Vertex AI Agent Engine
- Full CI/CD pipeline with staging and production
- Cloud observability with tracing and logging
- Remote integration tests against deployed infrastructure
What to Build Next
Some ideas for what we can build next:
- Customer service bot with ticket routing
- Data analysis agent with BigQuery tools
- Code review assistant with GitHub integration
- Documentation generator with web scraping
The skills work for any domain. Install them once and our AI assistant can build production agents.
Conclusion
ADK Dev Skills turn AI coding assistants into ADK experts. Instead of the AI guessing at APIs and patterns, it has direct access to the right way to do things. This solves real problems:
- No more documentation diving
- No more boilerplate fatigue
- No API mismatches from outdated examples
- No deployment guesswork
- No evaluation uncertainty
The generated code follows best practices, includes comprehensive testing, and has production-grade infrastructure. Not just faster: actually better.
Contacts
If you want to keep updated with my latest articles and projects follow me on Medium and subscribe to my mailing list. These are some of my contacts details:
- Personal Website
- Medium Profile
- GitHub
- Kaggle
Building End to End AI Agents with ADK Dev Skills was originally published in Google Cloud – Community on Medium, where people are continuing the conversation by highlighting and responding to this story.
Source Credit: https://medium.com/google-cloud/building-end-to-end-ai-agents-with-adk-dev-skills-26e1176ba661?source=rss—-e52cf94d98af—4


