How to go from pair-programming with AI to fully hands-off autonomous engineering and when each mode actually shines
Introduction
Here’s a scenario most developers know: you’re building a feature, and you ask an AI assistant to help. You type a prompt, read the response, type another prompt, read, type, read. Twenty exchanges later, the feature works. Your fingers are tired, but you’re happy.
Now imagine a different scenario: you write a single, detailed brief, like handing a spec to a senior engineer and walk away. You come back 30 minutes later to find the feature fully implemented, tested, deployed, and documented. Your fingers barely moved.
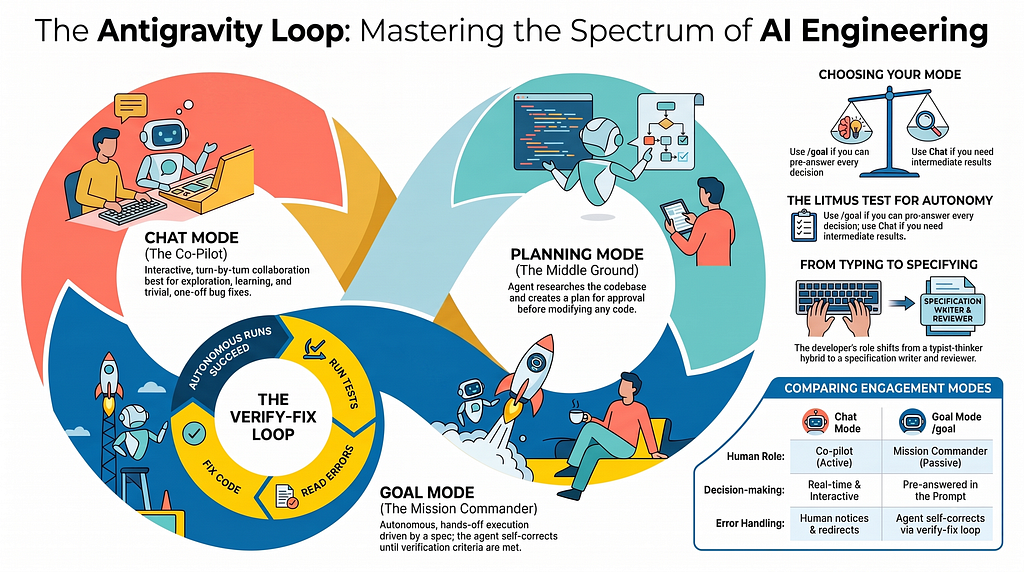
Both of these are real ways to work with Google Antigravity. The first is Chat Mode, which is conversational, interactive, real-time. The second is Goal Mode, which is autonomous, hands-off, mission-driven.
Most developers live exclusively in the first. This post will show you when, why, and how to use the second mode i.e. the Goal mode and to get there with the right kind of requirements. This post is not about which mode is better than the other, rather it is an exploration of which modes are best suited to which scenarios.
What Exactly Are These Modes?
Before diving into examples, let’s be precise about what each mode means in Antigravity:
Chat Mode (The Default)
You type a message. The agent responds. You type again. The conversation proceeds turn by turn. The agent might edit files, run commands, or search the web, but it waits for your input after each step. You see every change as it happens and can redirect immediately.
Think of it like: Pair programming with a colleague sitting next to you. You’re both looking at the screen, talking through every decision.
Planning Mode (The Middle Ground)
When you ask for something architecturally significant, Antigravity automatically shifts into planning mode. It researches your codebase, creates a detailed implementation_plan.md artifact, and presents it with a "Proceed" button. Nothing changes in your code until you approve. After approval, it executes the plan and creates a walkthrough artifact, summarizing what it did.
Think of it like: Hiring a contractor. They survey the site, give you a detailed quote and plan, and only start work after you sign off.
Goal Mode (/goal)
You prefix your prompt with /goal. The agent enters a persistent execution loop: research → plan → execute → verify → fix → repeat. It doesn't stop to ask you questions. It handles errors on its own. It may spawn sub-agents for parallel work. It only reports back when it's done (or when it's genuinely stuck and needs human input).
Think of it like: Assigning a ticket to a senior engineer. You write the requirements, set the acceptance criteria, and check back when you get the “PR ready for review” notification.
The Spectrum of Autonomy
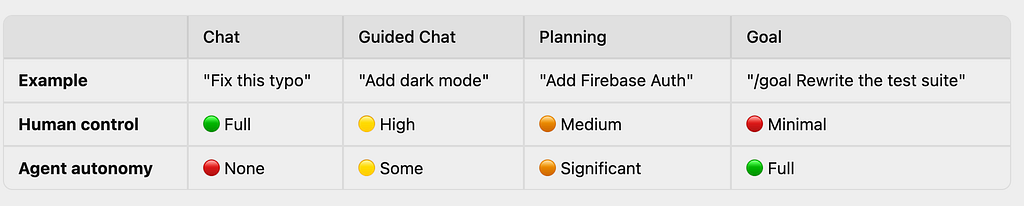
These modes aren’t a binary switch, they’re a dial:

For each of the above modes, let us look at Human control v/s Agent autonomy, as shown below:
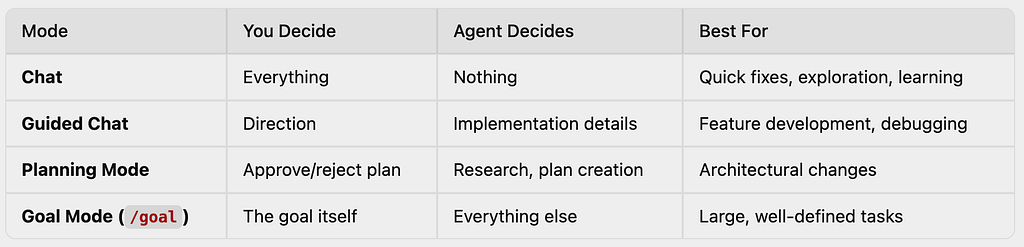
Another way to understand these modes is to understand what the roles of a human v/s Agent are i.e. who is in control during a specific mode and what is each mode best suited for.
Example 1: Chat Mode — Quick Fixes and Exploration
When to use: The task is trivial, you want to learn something, or you’re not sure what you want yet.
Scenario A: Fix a Bug
Fix the typo in README.md — "recieve" should be "receive"
What happens: The agent makes the single edit and shows you the diff. Done in a few seconds (hopefully). No plan, no artifact, no ceremony.
Scenario B: Understand Your Code
Explain how the authentication middleware works in server.js.
Walk me through the flow step by step.
What happens: The agent reads the file, locates the middleware, and gives you a clear explanation with references to the relevant functions. It doesn’t change anything — it’s pure exploration. This is something Goal Mode may not be good at, since there is no “deliverable” to verify.
Scenario C: Brainstorm Ideas
What are some ways I could improve the onboarding flow in this app?
The current sign-up takes 4 steps.
What happens: The agent analyzes your codebase, understands the current flow, and proposes improvements with rationale. This is inherently interactive, you want to react, ask follow-ups, and refine. Chat mode is perfect.
Why Chat Mode Is Right Here
These tasks share a common trait: you can’t pre-specify the outcome. You don’t know what the agent will say about your code. You don’t know which brainstormed ideas will resonate. You need to see intermediate results before deciding what’s next.
Rule of thumb: If the next step depends on seeing this step’s output, use chat.
Example 2: Guided Chat — Building Features Interactively
When to use: You know the feature you want, but the implementation details should be driven by conversation.
Real-World Example: Adding Dark Mode
Prompt 1: "Add a dark mode toggle to the header. Use CSS custom
           properties for theming. Save the preference to
           localStorage so it persists."

[Agent implements the toggle, CSS variables, localStorage logic]

Prompt 2: "That works, but the transition is jarring. Add a 300ms
           ease on all color properties."

[Agent adds smooth transition CSS]

Prompt 3: "The icons in the sidebar aren't switching colors. They're
           using hardcoded hex values."

[Agent finds and replaces the hardcoded colors with CSS variables]
Total interaction: 3 prompts, ~5 minutes of your attention. Each prompt built on seeing the result of the previous one.
Why Guided Chat Is Right Here
You could have written all three requirements upfront as a goal. But you didn’t know about the jarring transition or the hardcoded icon colors until you saw the first implementation. The iterative nature of guided chat lets you discover requirements as you go.
This is the most common mode for day-to-day feature development. You have a general direction, but the details emerge through interaction.
Example 3: Planning Mode — Architectural Changes
When to use: The change is significant enough that you want to review the approach before any code changes happen.
Scenario: Adding Firebase Authentication
Add Google Sign-In to the app using Firebase Authentication.
Only authenticated users should see the main content.
Show a login screen with a Google sign-in button for unauthenticated users.
What happens automatically:
- Research phase: The agent audits your codebase. It finds your existing HTML structure, identifies where the login gate should go, checks if any Firebase SDKs are already loaded, and reviews your current routing.
- Plan creation: The agent creates an implementation_plan.md covering:
- Which Firebase SDKs to add
- Where to insert the auth state listener
- How to gate the main content behind onAuthStateChanged
- Security considerations (Firestore rules, protected routes)
- Proposed file changes with estimated line numbers
3. Review checkpoint: The plan appears as an artifact with a “Proceed” button. You read exactly what’s going to change before a single line of code is modified.
4. Execution: After you click “Proceed,” the agent executes all steps, verifies the login flow works, and creates a walkthrough artifact summarizing what changed.
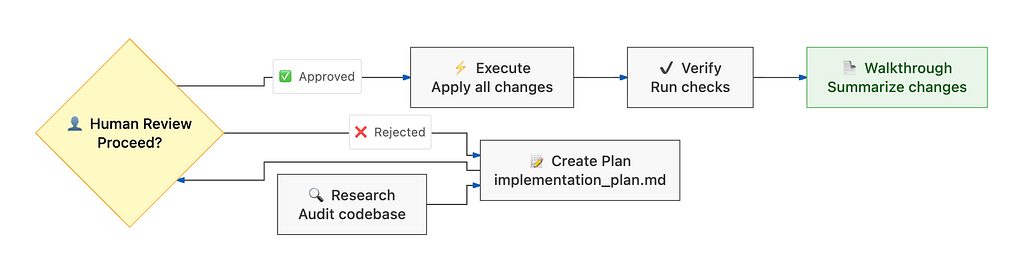
The critical difference from Goal Mode: the human review checkpoint at step 3. Nothing changes in your code until you approve.
Why Planning Mode Is Right Here
Authentication is a cross-cutting concern. It touches your HTML structure, JavaScript logic, security rules, and potentially your deployment config. If the agent had started editing without a plan, a wrong assumption about your routing could cascade into a broken app. The plan gives you a chance to catch issues before they become problems.
How Planning Mode Gets Triggered
You don’t explicitly ask for it, though you could. Antigravity decides based on the scope of your request and this is what I have typically observed:
- Simple fixes → direct execution
- New features → may or may not plan (depends on complexity)
- Architectural changes, migrations, multi-file refactors → almost always plans
If you want a plan for something the agent would normally just do, say: “Create a plan for this before implementing.”
Example 4: Goal Mode — The Power Move
When to use: The task is well-defined, you’ve pre-answered every decision, and you want to walk away.
The Transition Point: Chat vs. Goal
Let’s compare two approaches to the same task: migrating a REST API integration from fetch to a typed SDK with error handling.
Approach A: Chat Mode (interactive, ~30 minutes)
Exchange 1:  "I want to replace raw fetch calls with the
              official SDK. Where are all the API calls?"
Exchange 2:  [Reviews list] "Start with the user endpoints."
Exchange 3:  [Reviews changes] "The error handling isn't matching
              our pattern. Use the AppError class."
Exchange 4:  [Reviews fix] "Good. Now do the products endpoints."
Exchange 5:  [Reviews changes] "You missed the pagination helper."
Exchange 6:  [Reviews fix] "Now the orders endpoints."
Exchange 7:  [Reviews changes] "The types are wrong on the
              response object."
Exchange 8:  [Reviews fix] "Looks good. Run the tests."
Total time: ~30 minutes of continuous attention across 8 exchanges.
Approach B: Goal Mode (autonomous, ~5 minutes of your time)
/goal

Replace all raw fetch() API calls with the official TypeScript SDK.

## Current State
- API calls are in src/api/*.ts (users.ts, products.ts, orders.ts)
- Raw fetch with manual JSON parsing
- Error handling is inconsistent across files
- Types are defined in src/types/api.ts

## Requirements
1. Install @acme/sdk@^3.0 via npm
2. Replace every fetch() call with the equivalent SDK method
3. Use the existing AppError class (src/utils/errors.ts) for
   all error handling
4. Ensure all response types match src/types/api.ts
5. Handle pagination using SDK's built-in paginator
6. Remove unused fetch utility functions from src/utils/http.ts

## Constraints
- Don't change any component code that calls these API functions
- Keep the same function signatures (callers shouldn't need to change)
- Don't modify existing types — adapt SDK responses to match them

## Verification
- npm run typecheck passes with zero errors
- npm run test passes (all existing tests should still work)
- grep 'fetch(' src/api/ → zero results
- grep 'AppError' src/api/ → at least one result per file
Total time: ~5 minutes to write the prompt. Walk away.
What the agent does autonomously:
1. Research   → Reads all files in src/api/, catalogs every fetch call
2. Plan       → Maps each fetch call to its SDK equivalent
3. Execute    → Installs SDK, rewrites all three files
4. Verify     → Runs typecheck → finds 2 type mismatches → fixes them
5. Re-verify  → Runs tests → one test fails due to mock changes →
                fixes the mock → all tests pass
6. Final grep → Confirms zero remaining fetch() calls
7. Report     → Creates walkthrough summarizing all changes
The key difference: in Goal Mode, the type mismatches and failing test would have been caught and fixed automatically during the verify-fix loop. In Chat Mode, those same issues required two more exchanges of your time.
Example 5: Goal Mode — Multi-Component Feature
Here’s a more complex goal prompt:
/goal

Add a real-time admin dashboard to the web application.

## Requirements

### Navigation
- Add a "Dashboard" link in the sidebar, visible only to admin users
- Create a new route /admin/dashboard
- Include three tabs: "Users", "Activity", "Revenue"

### Users Tab
- Total registered users (count)
- New users this week (count with trend arrow)
- User growth chart (last 12 weeks, inline SVG bar chart)
- Top 10 most active users (sorted by login count)

### Activity Tab
- Actions per day chart (last 30 days, SVG line chart)
- Most common actions (table with percentages)
- Error rate (percentage with color indicator)

### Revenue Tab
- Monthly revenue chart (last 6 months, SVG bar chart)
- Average order value
- Top selling products (table)

### Design
- Use the existing design system (Tailwind CSS classes)
- Match the existing card component style
- Dark mode compatible
- Responsive — usable on tablet and desktop
- Animate chart elements on render

### Data
- Query existing Firestore collections: users, events, orders
- Use real-time onSnapshot listeners for live updates
- Admin check: user.role === 'admin'

### Constraints
- No external charting libraries (pure SVG)
- Admin-only: gate with role check, redirect non-admins
- Don't modify existing routes or components

### Verification
- Dashboard only accessible when user.role === 'admin'
- All three tabs render without console errors
- Charts display correctly with sample data
- Responsive at 768px viewport width
- npm run build succeeds
What makes this a good goal prompt:
- Every decision is pre-made (no “should I use Chart.js?” ambiguity)
- Data sources are specified (which collections, which fields)
- Visual style is pinned to existing conventions
- Verification is concrete and testable
- Constraints prevent scope creep
Anatomy of a Great Goal Prompt
An effective /goal prompt should ideally have these sections:
/goal

[One-line summary of what you want]

## Current State
What exists today. Tech stack, file locations, relevant architecture.

## Requirements
Numbered list of specific, concrete deliverables.

## Constraints
What NOT to do. Boundaries. Style rules. "Don't touch X."

## Verification
How the agent knows it's done. Tests to run, greps to check,
behavior to validate.
The Decision Pre-Answer Rule
For every place where you’d normally say “yes, do that” or “no, use the other approach” in a chat conversation, pre-answer it in the goal prompt.
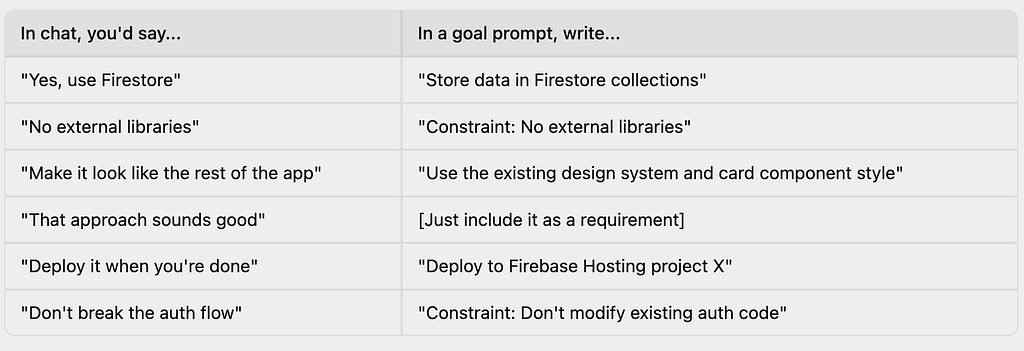
What to Include in Verification
Verification criteria are what separate a sub-optimal goal prompt from a good one. Think of them as acceptance tests:
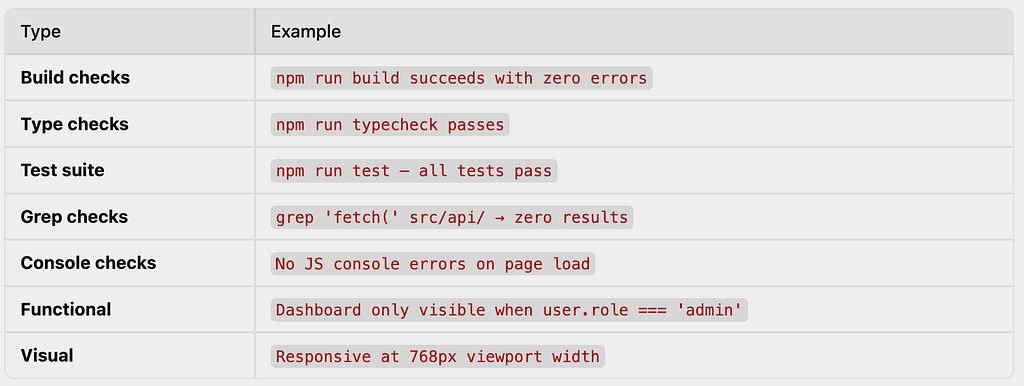
Without verification criteria, the agent has no way to self-correct. It can’t enter the fix-verify loop because there’s no “verify” step defined.
Spec-Driven Development: The Bigger Idea
If the structure of a goal prompt i.e. current state, requirements, constraints, verification looks familiar, it should. It’s a specification. And what we’re really doing with /goal is something that we as software engineers have aspired to for decades now: writing a spec that executes itself.
The Old Way vs. The New Way
Traditional software development has always involved specifications, but there was a gap between the spec and the code:
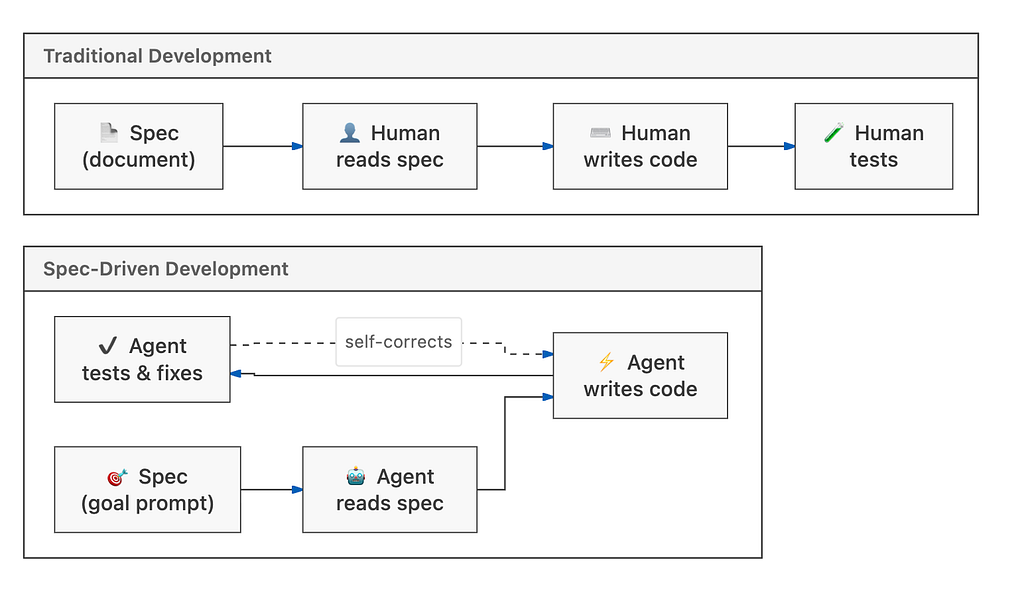
In the traditional flow, the spec is a communication artifact, it tells a human what to build, and the human translates it into code. The translation step is where most bugs are born: misunderstandings, missed edge cases, things the spec assumed were obvious.
In spec-driven development with Antigravity, the spec is an execution artifact. It doesn’t just describe what to build, it directly drives the building. The “translation step” still exists (the agent interprets your spec), but the feedback loop is immediate: if the agent misinterprets something, the verification step catches it, and the agent self-corrects.
What Makes a Spec Executable?
Not every spec works as a goal prompt. The difference between a traditional spec and an executable spec is verifiability. Compare:
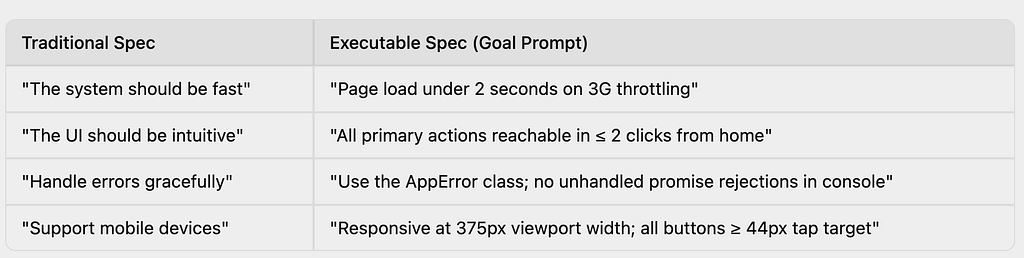
The left column is what humans interpret. The right column is what agents can verify. When every line in your spec has a corresponding check, you’ve written an executable specification.
The Spec as the Single Source of Truth
Here’s where it gets powerful. In traditional development, the spec, the code, and the tests are three separate artifacts that can drift apart. The spec says one thing, the code does another, and the tests check a third.
With a goal prompt:
- The spec is the prompt and it defines requirements, constraints, and verification.
- The code is generated from the spec by the agent, not by manual translation.
- The tests are embedded in the spec as verification criteria that run automatically.
There’s one artifact instead of three. And when you need to change behavior, you update the spec and re-run it. You don’t separately update the requirements doc, then the code, then the tests.
Leveling Up: Composable Specs
Once you’re comfortable with single goal prompts, you can compose them into multi-phase specifications. This is a possibility and you should try it.
Phase 1 Spec: Authentication
  → Verification: users can sign in, auth state persists,
    protected routes redirect

Phase 2 Spec: Data Layer  (depends on Phase 1)
  → Verification: CRUD operations work, security rules enforce
    auth, real-time updates sync

Phase 3 Spec: UI Dashboard  (depends on Phase 2)
  → Verification: charts render, admin gate works,
    responsive layout, no console errors
Each phase is a self-contained, verifiable spec. Phase 2 doesn’t start until Phase 1’s verification passes. This is dependency-ordered, verified, incremental development and each phase can run autonomously.
The Implication for Teams
Spec-driven development changes how teams coordinate. Instead of:
- Product manager writes a PRD
- Engineer reads the PRD and writes code
- QA reads the PRD and writes tests
- Everyone argues about what the PRD actually meant
You get:
- Product manager and engineer co-write an executable spec
- The spec runs and produces code, tests, and verification in one pass
- Review shifts from “does this code match the spec?” to “is this spec correct?”
The bottleneck moves from implementation to specification quality. And that’s a much better bottleneck to have, because it’s a thinking bottleneck, not a typing bottleneck.
The Slash Commands You Should Know
Beyond /goal, Antigravity offers several slash commands that sit at different points on the autonomy spectrum:
/grill-me — The Bridge from Chat to Goal
This is arguably the most important slash command to understand, because it solves the hardest problem in autonomous execution: how do you know what you don’t know?
When you sit down to write a /goal prompt, you need to pre-answer every decision the agent would otherwise ask you about. But for complex tasks, you don't know what all those decisions are. You don't know what you haven't considered. That's where /grill-me comes in.
/grill-me I want to add multi-tenancy to my SaaS app
The agent reads your codebase, understands the current architecture, and then interviews you with a series of targeted questions — not generic ones, but questions specific to your code and your situation:
Agent: I've reviewed your app. Here are the key decisions we need
       to make before I can build this:

1. DATA ISOLATION: Your Firestore is currently a single database.
   Should each tenant get:
   a) Separate Firestore databases (strongest isolation, higher cost)
   b) Separate top-level collections per tenant (moderate isolation)
   c) A tenantId field on every document (simplest, weakest isolation)

2. URL STRATEGY: Currently your app runs on app.example.com.
   Should tenants get:
   a) Subdomains (acme.app.example.com)
   b) Path-based routing (app.example.com/acme)
   c) Shared URL with tenant selected after login

3. AUTH BOUNDARY: Your Firebase Auth is project-wide. Should:
   a) Users be scoped to a single tenant
   b) Users be able to belong to multiple tenants
   c) Admin users have cross-tenant access

4. DATA ON DELETE: When a tenant is removed, should their data be:
   a) Hard deleted immediately
   b) Soft deleted with a 30-day recovery window
   c) Archived to Cloud Storage

5. EXISTING USERS: You have 340 users in production. How should
   they be assigned to tenants during migration?
You answer each question. The agent follows up on ambiguous answers. By the end of the interview — typically 5–10 minutes — you’ve surfaced every decision that would have been a blocking question during an autonomous run.
From Interview to Executable Spec
Here’s the key: your answers from /grill-me become your goal prompt. The interview output maps directly to the spec structure:
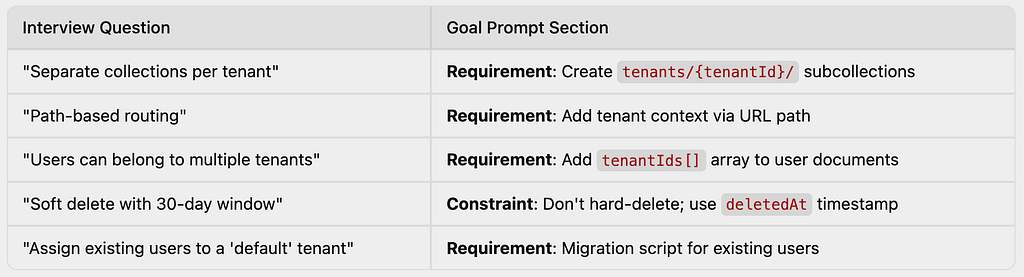
Without /grill-me, you'd discover these decisions the hard way — either by writing an incomplete goal prompt that the agent guesses at (badly), or by having a long chat session where you gradually realize what you missed. /grill-me front-loads all of that discovery into a structured interview.
Think of it this way: Chat is exploration. /grill-me is structured discovery. /goal is execution. The best specs come from running /grill-me first.
/learn — Persist Patterns
/learn
After a productive chat session, use /learn to capture successful patterns. The agent creates a persistent rule or skill so future sessions (including autonomous runs) benefit from what you discovered interactively. For example, after figuring out your project's error handling pattern through chat, /learn saves it so the agent follows the same pattern in future /goal runs.
/browser — Web Automation
/browser Go to https://ai.google.dev and find the current pricing
for Gemini 2.5 Flash. Summarize it in a table.
The agent launches a browser, navigates pages, reads content, clicks links, fills forms, and takes screenshots. Useful for:
- Verifying deployed web apps look correct
- Scraping documentation into structured formats
- Testing user flows end-to-end
- Filling out forms and capturing results
/schedule — Recurring Tasks
/schedule Run the test suite every morning at 9am and report any failures
Sets up cron-based agent execution. The agent runs autonomously on a schedule without any intervention. Useful for:
- Health checks on deployed services
- Periodic report generation
- Automated data syncs
The Self-Correction Loop: How Autonomous Runs Actually Work
When you use /goal, the agent enters a persistent loop:
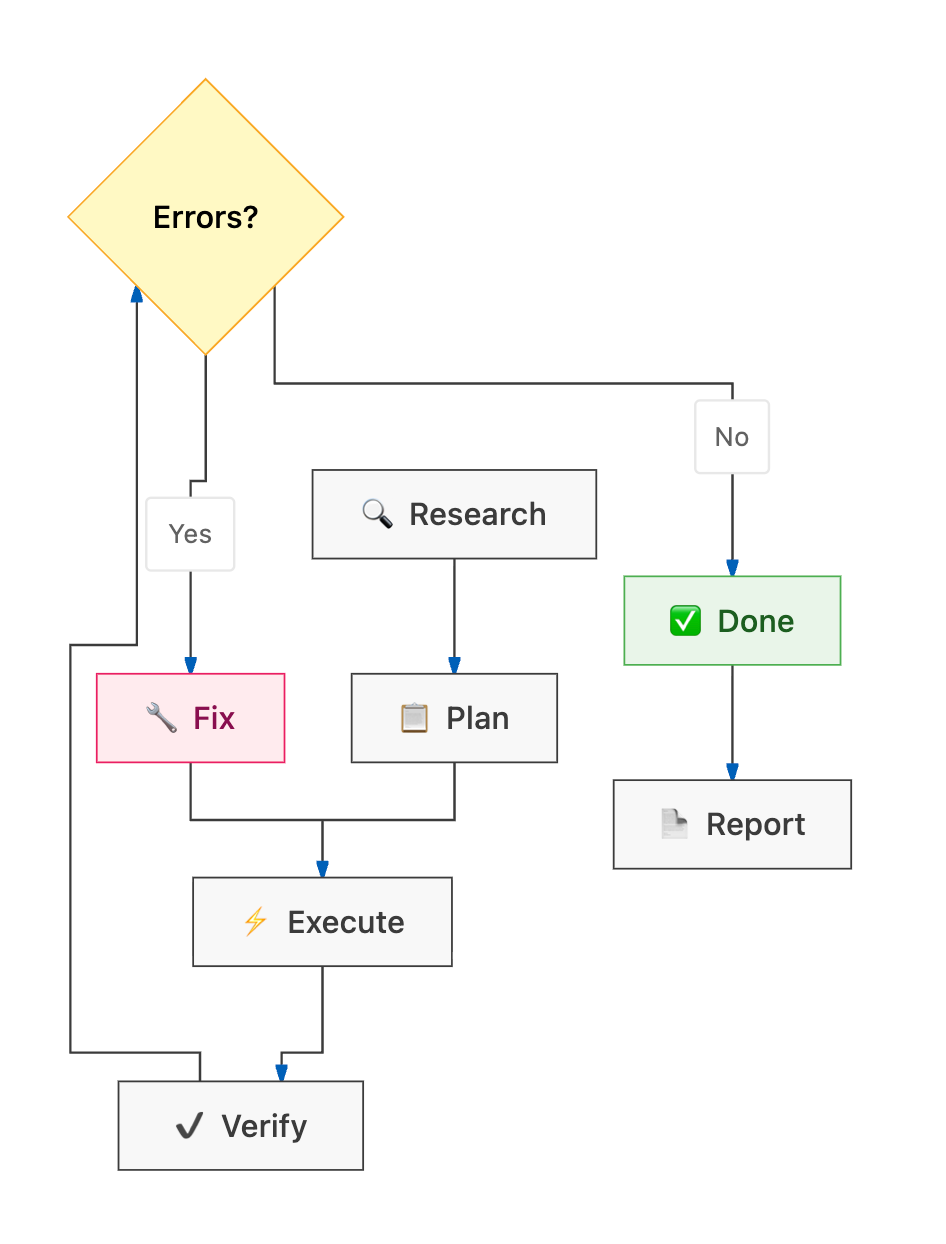
This isn’t just a flowchart, it’s the difference between chat and goal mode.
Here’s a concrete example:
The “Remove Deprecated Feature” Scenario
Imagine you ask the agent to remove a feature. Let’s say, an old notification system that’s been replaced. In Chat Mode, you’d say:
Remove the notification bell feature from the app.
The agent removes the HTML, the JS functions, and the CSS. But let’s say that it misses two stale references:
- initNotifications() is still called in the app's startup() function
- notificationCount is still referenced in the user profile component
These cause runtime errors. You catch them by testing, report them back, and the agent fixes them one at a time across two more exchanges. Three total interactions to complete what should have been one task.
In Goal Mode with proper verification:
/goal
Remove the deprecated notification bell feature.

## Requirements
- Remove notification bell HTML from the header
- Remove all notification JS functions
- Remove notification CSS styles
- Remove notification-related state variables

## Verification
- grep -ri 'notification' src/ → zero results (excluding
  this prompt and git history)
- npm run build succeeds
- No console errors on page load
- App loads normally for both regular and admin users
The verify step catches the stale references. The fix step removes them. The re-verify step confirms a clean build. The two extra chat exchanges become zero — the loop handles them automatically.
What Self-Correction Looks Like
During an autonomous run, the agent:
- Runs a command → command fails → reads the error → fixes the code → retries
- Deploys → deployment fails → checks the error log → fixes the config → redeploys
- Greps for leftover code → finds stale references → removes them → re-greps
- Runs the test suite → 2 tests fail → reads the assertion errors → fixes the code → re-runs tests
This is the core advantage of autonomous execution — it doesn’t just run your code, it runs your tests and fixes its own mistakes.
When Autonomy Fails: Anti-Patterns to Avoid
Goal Mode isn’t magic. Here are real failure modes and how to avoid them. The suggestions given are with a best intention.
Anti-Pattern 1: The Vague Goal
❌ Bad:
/goal Make the app better
Why it fails: “Better” is not a verification criterion. The agent will make changes, but it has no way to know when to stop or whether its changes are improvements.
✅ Good:
/goal Add loading spinners to all async buttons. Show a spinner
icon and "Working..." text while operations run. Disable buttons
during processing to prevent double-clicks.

## Verification
- All async buttons show spinners during their operations
- Buttons are disabled while processing
- Spinners disappear after completion or error
- No console errors
Anti-Pattern 2: The Under-Constrained Goal
❌ Bad:
/goal Add charts to the dashboard
Why it fails: Should it use Chart.js, D3, or inline SVG? What data should the charts show? What colors? This forces the agent to make design decisions that you’ll likely want to override.
✅ Good: Pre-answer every design decision — specify the chart approach (inline SVG, no external libraries), data sources (which collections/arrays), visual style (match existing design system), and include concrete verification criteria.
Anti-Pattern 3: The Goal That Needs Discussion
❌ Bad:
/goal Redesign the entire UI to be more modern
Why it fails: “Modern” is subjective. The agent will make choices you disagree with, but since it’s running autonomously, it’ll make all of them before you see any of them. Use chat or /grill-me first to align on the direction.
✅ Better approach:
1. Start with chat: "What would a more modern UI look like for this app?"
2. Discuss options, agree on direction
3. Then use /goal with specific design tokens, colors, and patterns
Anti-Pattern 4: Missing Verification
❌ Bad:
/goal

Remove the notification feature from the app

## Requirements
- Remove notification HTML
- Remove notification JS functions
- Remove notification variables
Why it fails: No verification step. The agent removes what you listed, but doesn’t check for stale references, the very type of bug that’s easiest to catch with a simple grep.
✅ Good:
## Verification
- grep -ri 'notification' src/ → zero results
- npm run build succeeds
- No console errors on page load
Anti-Pattern 5: The Goal That’s Too Large
❌ Bad:
/goal

Build a complete e-commerce platform with user auth,
product catalog, shopping cart, checkout, payment processing,
order management, admin dashboard, and email notifications
Why it fails: Too many interacting components. If the auth system has a subtle bug, it cascades into everything else. The agent can’t isolate failures when 8 subsystems are being built simultaneously.
✅ Better: Break it into phases:
Phase 1: /goal Add user authentication with Google Sign-In
Phase 2: /goal Add product catalog with Firestore backend
Phase 3: /goal Add shopping cart with real-time sync
Phase 4: /goal Add checkout and payment processing
Each phase can be verified independently before moving to the next. You might want to even use /grill-me before coming up with the /goal at each of the phases.
When to Use Which Mode: The Decision Matrix
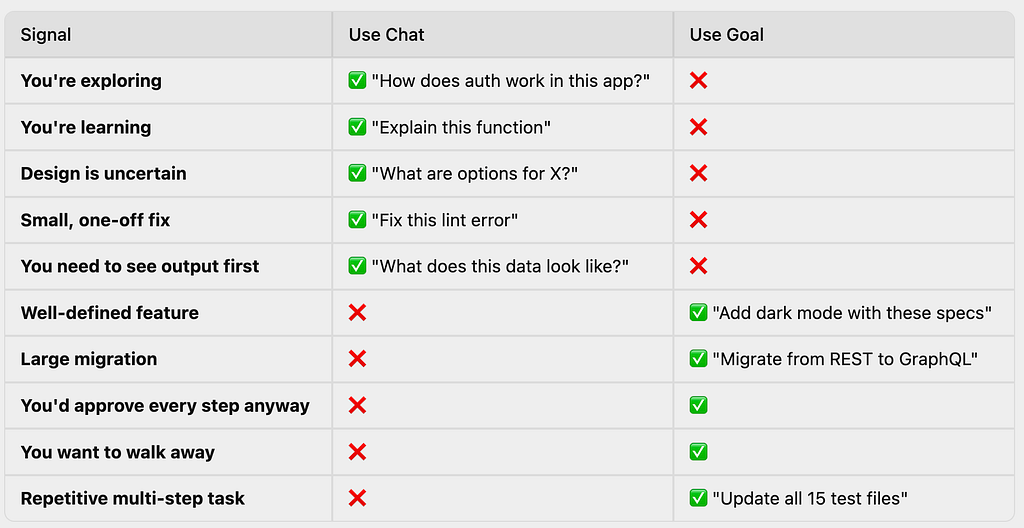
The Litmus Test
If you can write down every decision the agent would need to make, use /goal. If you'd need to see intermediate results before deciding, use chat.
The Hybrid Approach
In practice, the best workflow is often:

For example:
- You chat to understand your codebase’s auth patterns
- Use /grill-me to surface edge cases you haven't considered ("what about expired tokens? rate limiting? session management?")
- Chat a bit more to decide on the approach
- Write the spec as a goal prompt, let /goal execute it autonomously while you focus on something else, and then
- Review the walkthrough and diff when it's done.
Practical Tips for Better Autonomous Runs
1. Start with Chat, Graduate to Goal
Your first time building a feature? Use chat to understand the patterns. The second time you build something similar? Write a goal prompt based on what you learned.
2. Use /grill-me Before Writing Complex Goals
Not sure if you’ve thought of everything? The agent interviews you with targeted questions to surface decisions you haven’t considered. Then use the answers to write a comprehensive goal prompt.
3. Include File Paths in Goal Prompts
Don’t make the agent guess where things are:
❌ "Update the main app file"
✅ "Update src/App.tsx and src/components/Header.tsx"
4. Name Your Data Structures
If the agent needs to work with existing code, tell it the variable names:
❌ "Use the product list"
✅ "Use the productCatalog[] array from src/data/products.ts"
5. Specify the Deploy Target
If deployment is part of the goal, be explicit:
❌ "Deploy it"
✅ "Deploy to Firebase Hosting project my-project-id"
6. Use /learn After a Chat Session
After a productive chat session, /learn persists successful patterns so future goal runs benefit from what you discovered interactively.
7. Set Permissions for Autonomous Runs
For autonomous runs, pre-configure permissions so the agent doesn’t block waiting for approval:
- Tool Execution Policy: always-proceed (the agent runs commands without asking)
- Trusted Workspaces: Add your project directory so file operations proceed automatically
⚠️ Only use always-proceed in trusted workspaces where you're comfortable with the agent running commands autonomously.
The Bigger Picture: How Developer Roles Are Shifting
The distinction between chat and autonomous execution isn’t just a UX feature, it reflects a fundamental shift in what it means to “write code.”
In the chat era, the developer is a typist-thinker hybrid. You think about what to build, type the code, think about what broke, type the fix. Your value is split between knowing what to do and doing it.
In the autonomous era, the developer is a specification writer and reviewer. You think about what to build, write a precise spec, and review the output. Your value shifts entirely to judgment, knowing what to build, how to verify it, and how to catch subtle errors in AI-generated code.
This isn’t a loss. It’s a liberation. The mental model shifts from:
Think → Type → Debug → Type → Test → Type → Deploy → Type
To:
Think → Specify → Review → Deploy
The “typing” — the mechanical act of translating intent into code — is the part that gets automated. The thinking, specifying, and reviewing are the parts that remain uniquely human. And those are, arguably, the most intellectually rewarding parts. I hope we have consensus there though some would like to debate what is actually rewarding to them and I will respect that.
Summary
The transition from chat to autonomous execution isn’t about trust — it’s about specification clarity. When you can write down exactly what you want, including constraints and verification criteria, you’ve written a goal prompt. When you can’t yet, chat your way there first.
Start small. Try a /goal on your next well-understood task. See what happens. Then gradually increase the scope as you build confidence in your prompt engineering.
The dial goes from “fix this typo” to “build this entire feature.” Your job is to figure out, for each task, where to set it.
A quick table summary to end this article:
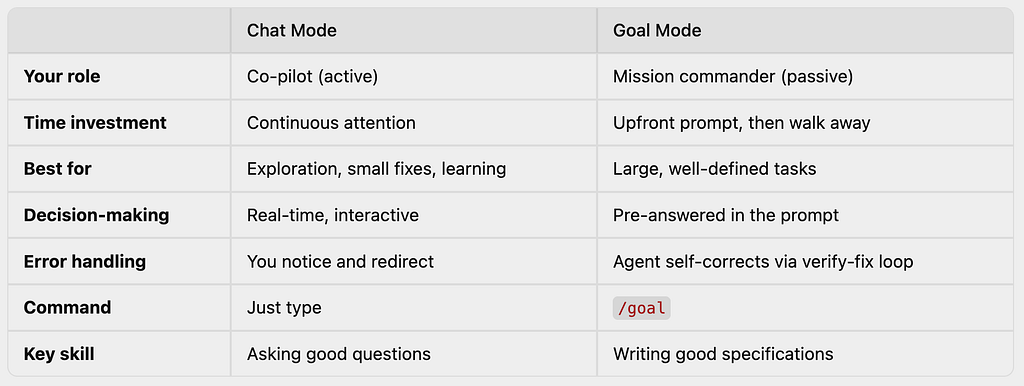
The Antigravity Loop: From Chat to Autonomous Engineering was originally published in Google Cloud – Community on Medium, where people are continuing the conversation by highlighting and responding to this story.
Source Credit: https://medium.com/google-cloud/the-antigravity-loop-from-chat-to-autonomous-engineering-62c981ecdc44?source=rss—-e52cf94d98af—4
About the Author